Art Lab, Episode 13

marbling-with-paint

Welcome back to Art Lab! Today I’m going to show you how to make some fun marbled art inspired by some this gorgeous art prompt!

Technique: Marbling

Art Prompt:

Ooooohhhh! Marbled/swirled paint.:

{via}

Wow. Aren’t those marbled canvases just stunning? I’m going to show you how to create your own mini marbled masterpiece using just acrylic paint and a toothpick! (I’m afraid they won’t look quite the same as the canvases above, but… XD 😉 )

Step 1:

Spread a layer of paint on your paper (heavy paper such as cardstock works best). Make your layer nice and “juicy” but not too thick.

allison-002-1024x768

Step 2: Pour or drip a little bit of different colored paint onto your base paint. Here I added a drop of purple and pink-purple (which was already kind of marbled together in my palette).

allison-003-1024x768

Step 3: This is the fun part! Drag your toothpick through the paint to marble it. It works best if you drag through the paint without scraping the paper underneath. I chose to drag from the center point out which made a beautiful starburst pattern!

allison-004-1024x768allison-014-1024x768

Here are a few other marbling suggestions:

Start with four different colors:

allison-009-1024x768

Go wild with your toothpick! Swirl it, drag it, move it up and down and side to side…

allison-012-1024x768

Make a swirly pattern by drawing a spiral with your toothpick:

allison-011-1024x768

Isn’t this neat? I put a drop of white down, then purple, then white again, and dragged the white outwards to make a star-ish shape. Then I dropped some white and purple spots around. Beautiful!

allison-019-1024x768allison-017-1024x768

You can even make marbled hearts:

Start with a few drops of paint close together on a contrasting color…

allison-026-1024x768

Then drag your toothpick through the drops vertically: (Sorry, this example didn’t turn out too well, but trust me, it looks really neat when it works! 😛 The top two hearts are what they’re supposed to look like.)

allison-027-1024x768

If you swirl the paint in your palette before dropping it onto your paper, you can get more blended designs:

allison-024-1024x768

Or you can simply drop paint onto paint:

allison-025-1024x768allison-021-1024x768

allison-025-1024x768

allison-008-1024x768

The paint may take a while to dry since it’s pretty thick. When it’s completely dry you can hang up your canvas/sign your art, or make a “sampler” ATC of your experiments!

allison-039-1280x960

allison-040-1280x960
I especially love how this turned out. 🙂

allison-041-1280x960allison-042-1280x960allison-043-1280x960


What do you think? Have you marbled with paint before? I love seeing how each piece turns out – they’re so different but so beautiful.

***Allison***

Fairly Fun! {{Fair Entries 2016}}

For those of you (like Christian Homeschooler*wink*) who wanted to know how our county fair turned out and if we won any ribbons, behold, a fair post. 😀

First of all, these are the things I entered in the fair:

fair stuff 1.jpg

  1. Cross stitch cousins (from this post)
  2. Blue jay painting
  3. Clay dragon (see the Etsy listing here)
  4. Miniature clay doughnuts (from this post)
  5. Dorothy the doll (from this post)
  6. Clay fawn (I made this for my sister’s birthday a couple of years ago.)
  7. Clay rose earrings
  8. Clay rose necklace
  9. Painted rocks (from our room makeover)
  10. Quillow (Megan, my cousins, and I all took a sewing class for this!)
  11. Casey drawing

Sorry some of the things are kind of hard to see. :/

And of course I entered all the photos from this post. (Good gracious I use a lot of links in my posts.)

053-1024x768

Here’s another picture of the quillow. Have you ever heard of a quillow? It’s basically a 2-in-1 blanket and quilt. You can unfold it to make a blanket, stuff the quilt into the pillowcase to make a pillow, or display it like this. It’s super neat! Thanks so much, Gram, for bringing us to the classes and helping me fix my quilt. ♥♥♥

051-1024x768

This year was really fun and successful for me! I always love entering things in the fair, even though I don’t win ribbons for all my entries. It’s so exciting to search for your entries and look at other kids’ (and adults’) creations in the Exhibit Hall!

So, now for the ribbons I did win:

054-1024x768
Sheesh, Allison, what a mess. XD

I won a ribbon (1st, 2nd, or 3rd) for every entry except for my drawings and the baseball photo! Woohoo! I also won a sweepstakes ribbon for the clay category (mostly since I entered so many things and sometimes they were the only entries in their category XD ). That was really fun.

All together I won:

12 first place ribbons, 3 second place ribbons, 6 third place ribbons, 1 sweepstake ribbon, aaaannd a total of $72.00! That’s one great thing about our fair – they don’t just give you ribbons, they pay you too! What could be better than that? XD

What is your fair like (if you have one)? Did you enter anything this year? (I’d love to see a picture, if you did!) Did you win any prizes?

**Allison***

P. S. GUYS THE BABY BUNNIES ARE SO CUTE I CAN’T TAKE IT ANYMORE. Random truth.

Beauty from Ashes, Part 2

Beauty from Ashes (800x800).jpg

Beauty from Ashes is a short story I’m working on. It’s kind of a hybrid story between Cinderella and Beauty and the Beast because fairy tale medleys are fun. 😀

I’m so glad you guys liked the last part! (Click here to read it if you haven’t yet.) Thanks for all of your sweet comments. ♥ Are you ready for Part 2?

Just to refresh your memory, here’s an excerpt from the end of Part 1:

But the worst part was, I had promised, and my promise was backed by the terrifying threat of the Beast’s roar. I had to go back tomorrow, like it or not.

Oh. No.

_____________________________________________________________

Beauty from Ashes

Part 2.

Furious rage could not even begin to describe Druscilla and Lady Tremaine’s feelings toward me when I returned home single-shoed with only Anastasia’s roses in hand. I thought they would explode into tiny pieces. Even my frantic, tearful excuses and description of the Beast did little to calm them. I was sent to bed without dinner (though I had barely had lunch), and given twice as many chores for the next day.

When I awoke the following morning, I was more exhausted than when I went to sleep – Beast had tormented my dreams all night. By late afternoon it was nearly time to meet the Beast and I still had chores to do. I whirled the duster up and down the banister, polished the table in 30 seconds flat, and shooed a herd of dust bunnies frantically out the door. I could hear feet clumping down the stairs, but I didn’t wait for further instructions. I was out the door and in the forest in the time it takes Anastasia and Druscilla to pick out their cereal bowls.

I had one last chore – gathering those twenty white roses for Druscilla. This was the chore I dreaded most, for to complete it I had to meet the Beast once again.

I timidly entered the clearing, glancing this way and that for signs of the Beast. Nothing. I breathed a sigh of relief and started picking white roses, much faster this time. But just like the day before, I had only barely finished when I heard twigs crackling.

The Beast was here.

“I’m here. I came,” I managed to gasp as I cringed under his imposing glare.

“I see you succeeded in snatching a few more of my roses,” Beast frowned impressively. “I thought I had taught you a lesson the first time, but apparently you are slow to learn. WHY are you STEALING my ROSES?” Beast bellowed.

“I’m so terribly, terribly sorry, Sir Beast, Sir. I – I didn’t know they were your roses. You never told me!” I whimpered. “It’s just that… my sister needs these roses, I – I mean she wants these roses, very badly, and if I don’t bring them my mother is likely to shut me up in the house. Which means I can’t come back to see you.” I looked hopefully up at his face, searching for any signs of relent. Though his expression was harder than a stone chopping block, his words surprised me.

“Very well. You may take them on one condition: you must serve me for twenty days – one day for each rose. Meet me here each evening and I will put you to work. Or, if you would rather not…” Beast shrugged, “leave the roses – and your other shoe – with me.”

This was hard. Would I face the fury of my stepsister and stepmother and go barefoot for who knows how long, or face the Beast every day for twenty days? I buried my face in my hands in agony. I knew what I had to do, but I couldn’t bring myself to say the words.

“I will serve you for twenty days,” I whispered at last.

A tiny spark glimmered in Beast’s eyes. It looked almost like… hope, or gladness. But he only grunted and said, “Very well. Your service starts today.”

My shoulders sagged. I was far too tired to do anything properly, much less to serve the demanding Beast. But all I said was, “As you say. What is my task?”

******

Half an hour later I dragged myself home, picking bits of moss and leaves from my dirty dress and clinging to a handful of limp white roses. The Beast had ordered me to make a couch from wood, leaves, and moss. It was backbreaking work that he could have accomplished far easier than I, but he never lifted a finger to help. All he did was stare at me – or more like stare through me – the entire time, as if he were prying open my heart and searching for secrets. The Beast was a strange creature.

He only got stranger the next day. He sat on his couch and asked me question after question – who were my parents? Where did I live? Did I have any siblings? Was I good at sewing? Dancing? Painting? And many other questions, some normal and some unsettling. When I asked him why he wanted to know all this, he only shrugged and said that if I were to be his slave, he had better know some of my background. Secretly I wasn’t so sure. The Beast didn’t seem like one to care where I came from or who I was, as long as I did the things he required.

Instead of voicing my doubts, I began to question him. What was he anyway – a huge, hairy human or a talking animal? And if an animal, what kind, and how did he learn to speak? Where did he live? What was he doing here? How could I be sure that those rosebushes were really his? But though I bombarded him with questions, he remained stubbornly silent.

“Go on,” I prompted him, “it’s only fair that a slave should know something about her master. Why aren’t you answering my questions?”

Beast answered soberly. “Ella, girl, I do not answer because you would not believe me. The time has not yet come for you to know these things. I shall tell you soon enough, when the time is right and not before.”

I cocked my head in puzzlement. This was strange. It was like my father was talking to me. The Beast sounded almost wise, almost kind… Almost, but not quite. I shook my head. Would I ever understand this creature?

In the days that followed, I did a variety of tasks for the Beast. I brought him mushrooms, nuts, and other good things to eat from the forest; I tended his rosebushes; I entertained him with stories and sang to him songs from my childhood; and sometimes I simply walked through the trees with him, answering his questions and talking with him.

A strange thing began to happen. Each day Beast seemed to soften, each day he seemed more like my friend and less like my master, until finally we walked and talked and laughed together as naturally as a brother and sister. I could not fathom how this astonishing change came about or whether it was on his part or mine; I only knew that instead of dreading the daily meetings, I soon looked forward to them eagerly.

My eyes were bright with tears as I walked the familiar path to meet the Beast for the last time. Oddly enough, I would miss him very, very much. Who else could I pour out my troubles to? Who else would cheer me up when I was weary of life?

Who else would be my friend, the best friend I had ever had?

Beast looked sad and nervous too. There was an uncomfortable pause, then Beast said softly, “I have one last question and one last task for you, Ella, my dear. They will be the hardest of all.” Beast lowered his eyes and took a deep breath to steady himself. “I want you to answer honestly – you know me well enough to know that I will see through a lie.”

Beast reached out and held my trembling hands in his. My mind was racing. Why was he so anxious? He was frightening me. What was he going to ask me? I could think of nothing that qualified as “the hardest question of all.” He’d asked me everything, everything already. What was there left to ask?

Beast swallowed hard and looked me straight in the eye.

_____________________________________________________________

Mega-cliffhanger! Mwahahaha, I’m so cruel. XD It’s too bad you already know the background fairytales, or it would be super suspenseful. 😛

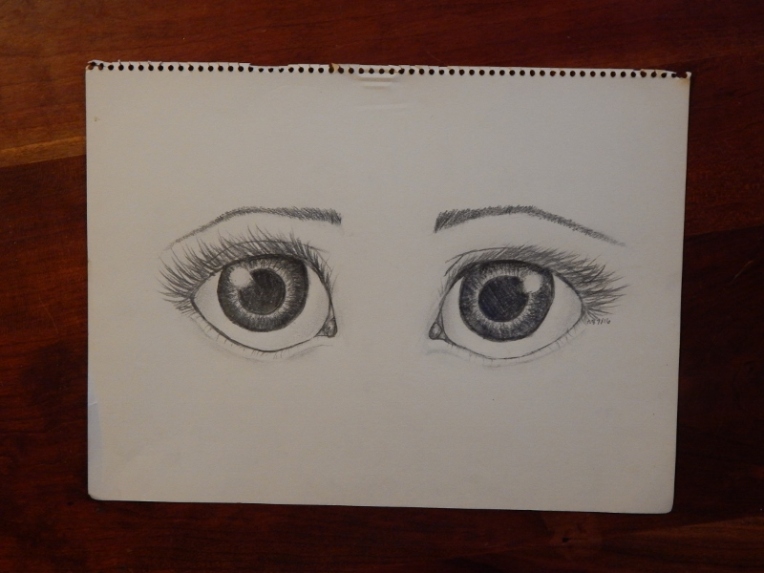
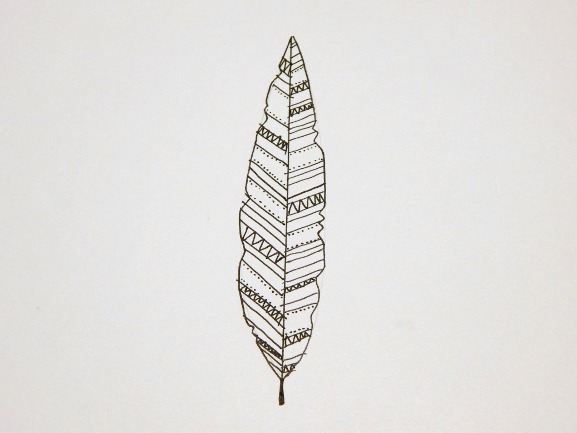
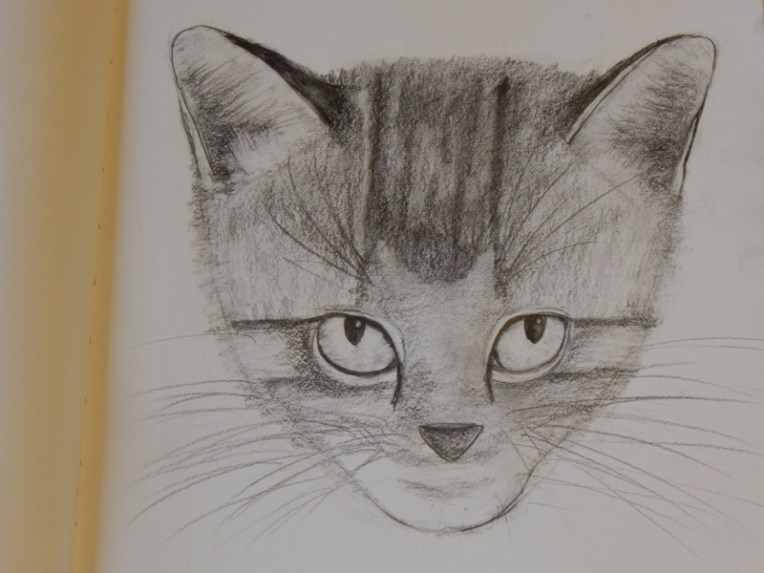
Oh, and since I couldn’t quite find a picture of Ella as I imagine her, I drew one. I think it turned out pretty well – except that her eyes are a little too big. XD I meant them to be big, but not that big. XD Also, this is not how Ella looks in her normal daily life. She looks like this when… well, you’ll see. 😉

Cinderella.jpg

I hope you enjoyed this rather long second part of Beauty from Ashes. There’s more to come!

***Allison***

P. S. You only have until September 10th to submit questions for the Sisters Q&A! I’m sooo excited to answer them. 🙂

P. P. S. I have a good idea for my first entry for Grace‘s TIWC! 😀 The deadline is the 8th, so I’ll post that soon.

Art Lab, Episode 11: Colorful Cacti

(I pretty much just copied and pasted this from the Art Lab blog. 😉 )

Hello, dear readers! I’m back with Episode 11 of Art Lab. Today I’m going to show you how to concoct some colorful cacti. (That was fun to write.)

This is the gorgeous inspiration I found:

Pretty!:

{via}

I’m going to use a canvas and acrylic paint for the first piece of art.

Begin by painting the background of your picture. I scooped up both white and blue paint on my brush to make a more textured background.

colorful cacti 1

Now you need to populate your desert. Here are some ideas for cactus shapes: (And yes, I am aware that these cacti look rather sickly. Maybe their desert was extra dry this year or something. XD

colorful cacti 2

Paint your cacti the same way as the background – blending together different colors of wet paint onto the canvas.

colorful cacti 3

And finally, embellish your plants! Add dots, dashes, and beautiful blooms. Ta-daa!

colorful cacti 4

I also made these ATCs:

I had fun painting the flowers with the one on the left. So pretty! The one on the right was inspired by an actual cactus we have that looks kind of like that.

cacti.JPG

I hope you enjoyed today’s prompt. If you were inspired to make art from this post, we’d love to see it! Get the details on how to send in art on our Art Gallery page.

***Allison***

Drawings and Such

Hey, guys! We’re going on vacation tomorrow! We’ll bring the computer along but I’m not going to write posts, though I might schedule some before I go. 🙂

Anyways, I really like drawing, so I thought I’d show you some of my recent art.

First some ATCs…

002 (800x600)
“Crazy Quilt”  I made this by gluing on magazine strips, then “sewing” it with white gel pen.
003 (800x600)
“Sleeping Fox” Isn’t he so cute? I like how the marker texturing turned out – I don’t know if you can see it on his body, but I added extra dashes over the first layer of marker. 
004 (800x600)
“Little Robin Redbreast Sings a Tune” I got this idea from a cute watercolor bird I saw on Pinterest.
005 (800x600)
“Bird Puddles” Ha ha, that sounds kind of gruesome. 😛 XD I basically painted watercolor splotches and drew little birdies on top.

This weird tree drawing idea I also found on Pinterest. I modified their tutorial a little bit. 🙂

006 (800x600)

And last but not least, my favorite of all of these! A drawing of eyes. (Also from Pinterest. XD ) I’ve drawn from this tutorial before and they turned out really good!

001 (800x600)

Which drawing was your favorite?

***Allison***

P. S. We almost couldn’t use our camper for the trip. An axle broke this morning, and Dad couldn’t seem to find a replacement. At breakfast Dad prayed for wisdom about our trip, and before he even finished the phone started ringing. The guy calling had an axle for sale! It was really amazing – kind of a mini-miracle! Thank you, God!!

Room Makeover!

Welcome to the long awaited room tour! Goodness gracious this post took a while to get up. I have been wanting to write this for weeks!

Guys, you are going to love the before and after. SQUEEE it’s so pretty!! It looks like a totally different room. Are you ready? Here we go!

*

*

*

*

*

*

*

*

*

*

*

*

before and after (1024x512).jpg

Isn’t that simply amazing? Both of those pictures were taken at the same spot, but they look completely different!

We had 30 year old wallpaper in our room, so we had to take down the wallpaper, plaster over nicks in the walls, sand the plaster, then paint the ceiling, trim, and walls. It was a lot of work – it took a whole week – but it was so worth it! I absolutely love the paint color and the decorations!

A few notes before we proceed to the room tour: I didn’t list the prices for every single thing in our room, just most of the stuff we got recently. Also, the prices are rounded.

Now we can get to the good part! Let us begin with the bed section. First off, I love the bedspreads! They are simple but beautiful, and their simplicity makes them versatile. (If you’re wondering, my bed is on the left and Megan’s is on the right.)

after (7) (1024x768)

Bedspreads // $27 each – Target (Note: I rounded all of these prices. )

*****

These lovely pillows tie in our canvasses and handmade quilts with the bedspreads.

Watercolor Flower Pillow // $7 – Hobby Lobby
Bird Pillow //  $10 – Hobby Lobby

*****

I’m very proud of our upcycled wooden crate. XD It was broken and rough to begin with, so we wood-glued it together, cleaned it, sanded it, and painted it. It works perfectly as a bedside stand!

after (12) (1024x768)

White Flower Wall Hanging// $8.50- Hobby Lobby
Lampshade // $5.50 – Walmart
Lampstand // $12 – Walmart
Crate Bedside Stand // DIY

 *****

Megan and I each decorated a canvas to put above our beds. The first canvas is mine and the second is Megan’s. 😉 I painted mine with watercolor and gesso and wrote in the words with Sharpie and marker. Since Megan’s canvas had more words, we printed them out in a nice font and transferred them to the canvas using this tutorial. (The pencil rubbing part is the transferring part.) Then Megan Sharpied over the words and added confetti from the paint chips we collected while searching for a paint color.

after (10) (1024x768)

after 11 (1024x768)

Above-bed Canvasses // DIY

 *****

We got some really nice ombre curtains from Walmart. They’re opaque enough that we don’t need blinds, but they’re also sheer enough to let in light. And if you’re wondering, that speck in the hanging plant is a little stuffed owl. XD

(Sorry about the really bad lighting here. 😦 )

001 (1024x768)after 14 (1021x766)

Curtains // $10 per panel – Walmart
Feather Print // $16- Hobby Lobby
Bonsai Tree // $12- Walmart
Hanging Plant // $16 – Walmart

 *****

The mantel is one of my favorite spots. I adore the fox print especially! We spray painted the flowerpots gold to add a extra pop.

after (2) (1024x768)

Fern // $5.00 – Walmart
Fox Print // $22 – Hobby Lobby
Ivy // $5.00 – Walmart

 *****

I also love this next spot. It’s sophisticated yet cozy. The white faux-fur cube is one of my favorite purchases – it’s a comfortable seat and a storage chest!

Funny story: My littlest sister was writing a wish list while we went shopping, and  she wrote “fuse cyoob” for the fuzzy cube seat. Isn’t that adorable? You have to love little kid spelling. XD

after (3) (1024x768)

(Horrible pictures again, I know. :/ )

after 15 (705x941)after 16 (1024x768) (768x1024)

Faux Fur Cube // $50 – Ross
Bible Verse Canvas // $12 – Hobby Lobby
Mini Palm // $10 – Home Depot
Purple Swirl Canvas // DIY

*****

Moving on to the dresser… The bunting banner I made myself (remember this tutorial?), and I also hand-decorated the gold rocks around our room. We spray painted smooth river rocks gold, then I either hand lettered words on them with Sharpie, or dotted them with white paint. They turned out really well!

after (5) (1024x768)003 (1024x768)002 (1024x768)

Bird Canvas Set // $4 each – Walmart
Orchid // $13 – Home Depot
Mint Clock // $10 – Walmart
Succulents (in the blue pot) // $4-$5 each?? – Home Depot
Bunting Banner // DIY
Gold rocks // DIY

*****

And lastly but not leastly, we needed some new rugs since we took our big blue carpet away. Behold!

Chevron Rug // $16 – Walmart
Teal Rugs // $19.50 each – Walmart

*****

And thus concludes my room tour! I hope you enjoyed it! Are you going to redecorate your room anytime soon? Have you redecorated recently? What was your favorite part of our “new” room?

***Allison***

P. S. WordCrafters 2 is coming right along! Nicole just recently finished her chapter – read it here. Hmm, Katri seems more and more suspicious, isn’t she? I had no idea!

Fabulous Feathers: Draw-It-Yourself

Greetings, friends! XD

Janie, here is the feather tutorial you asked for! And here is a DIY/drawing post for those of you who wanted one according to my blog survey. (By the way, thank you SO much for taking that, guys! I really appreciate it.) I do indeed love to draw, and I’d be happy to post art-related stuff more often if you so wish. 🙂

Drawing these feathers is actually pretty simple. The key idea is “random.” Unevenness gives the feathers a whimsical, natural look.

  1. Start by drawing a straight line. Next, draw the outline of the feather. Basically you’re going to make  an elongated teardrop shape with a few triangular chips and dips taken out of it. 🙂 (Chips and dips? I thought this was about feathers, not food!) Draw slanted lines from the inside to the outside of the feather as shown. Space them randomly – sometimes far apart and sometimes close together.-Allison(room) 024 (640x480)
  2. Now you need to make some accent stripes. Fill in a few random stripes with zigzags or line them with dots, or add any pattern you wish. Looking good!-Allison(room) 025 (640x480)
  3. Time to color! Again, color the feather randomly. I personally think they look best when you use only two or three colors and leave some stripes white – but feel free to experiment!-Allison(room) 026 (640x480)
  4. Show off your art! Draw a few feathers on cardstock to make a pretty poster for your bedroom. Three or so feathers in a line would look charming on the front of a thank-you card. You can even cut them out and hang them up as a garland!

Here are lots of other feathers I made using this technique:

-Allison(doll, mystery pictures, bunnies) 040 (800x600)-Allison(doll, mystery pictures, bunnies) 042 (800x600)

I really like that type of doodly drawing. Thanks for reading!

***Allison***

P. S. Isn’t it hard to describe how a food tastes? Usually I just end up comparing it to another food, or calling it sweet, sour, or salty. XD Speaking of which, I think it’s impossible to describe salt with any other word than “salty.” XD Come on, English language, don’t fail me now!


Random Pictures and Other Fun Stuff

Hello, and welcome to this rather random post. (Thus the title.) But hey, occasional random posts are good for the soul, am I right? (Uh no, Allison, you’re wrong. Eh, who cares. XD )

Cows…

-Allison(rocket, kittens) 006 (1024x768)-Allison(rocket, kittens) 009 (1024x768)

Flowers…

-Allison(rocket, kittens) 041 (1024x768)

Baby bird…

-Allison(kitten, baby bird) 002 (1024x768)

Feathers I drew and printed out and colored and cut out and punched holes in and hung on vases for decorating tables at our church… (*Gasp, pant, wheeze* Phew! Perhaps that wasn’t quite grammatically correct. XD )

-Allison(doll, mystery pictures, bunnies) 040 (800x600)-Allison(doll, mystery pictures, bunnies) 041 (800x600)-Allison(doll, mystery pictures, bunnies) 042 (800x600)

And last but not lease, a drawing I did of our kitten, Casey! I rather like it. 🙂

-Allison 025 (800x600)

And that’s about it! I hope you enjoyed this random little post! 😀

***Allison***


Art Lab, Episode 8: Scribble Art-Starters

scribble art starter (800x800) (2)

Hello, hello! 😀 Today I have a fun idea-generator drawing technique to show you. If you don’t know what to draw, this might help!

Technique: Scribble Art-Starters

Begin by closing your eyes and drawing a random squiggly pattern on your paper or ATC. Open your eyes and connect both ends of the line if they’re not already connected. You should have a very strange looking blob on your paper. Here’s my scribble:

fish drawing 1.jpg

Next you have to use your imagination to turn your random squiggle into a picture. (Hint: the simpler the squiggle, the easier the drawing. But you may want to do a complicated squiggle for a challenge, right?) Turn it upside down or look at it from a different angle if you’re stuck. Does it look like a bird? A flower? A person?  What do you think my scribble looks like?

I thought mine looked like a fish, so I turned my squiggle into an underwater scene:

-Allison(hike) 156 (800x600)

Do you see how it works? Here are a few more scribble doodles for inspiration:

Heh heh, it’s kind of addicting. 😀

So there you go – a really easy and fun way to bust “artist’s block” if that is even a thing. XD

Have you ever done this? Do you think you’ll try it?

***Allison***

P. S. I first posted about squiggle drawings in this post. (Wow, that was almost 2 years ago!)