How to Edit Photos, Part 3: Editing Portraits

How to Edit Photos, Part 3 (800x800)

Hello, folks! 😀

I’m back with another edition of the photo editing series I’m doing! 😀 (Click here to see part one, and here to see part two.) Today I want to go over how to use PicMonkey to touch up a portrait of a person, as well as some clever tricks to use the touch-up tools in unexpected ways. I’ll also talk about how to use PicMonkey to create the perfect book character portrait for those of my blogging friends who love writing. 😉 I hope you find this helpful!

To begin with, let’s go over some common problems and how to fix them with the tools in PicMonkey’s “Touch Up” tab.

  • Blemishes: Well obviously you can use the “Blemish Fix” tool, but you can also use the “Clone” tool if that doesn’t work (because sometimes it doesn’t). If Blemish Fix doesn’t work and you don’t have Royale, you can fix small blemishes with the “Draw” tool from the Effects tab. Set the hardness to zero and use the dropper to select the skin color surrounding the blemish. Then paint over the blemish, like you’re using concealer.
  • Erasing Flyaways and Frizzy Hair: I learned this tip from the PicMonkey blog! Use the “Wrinkle Remover” tool to erase that annoying halo of frizz around your subject’s head. Wrinkle Remover softens whatever it’s painted on to, so it basically blurs the stray hairs (and wrinkle lines) into their surroundings. On a related note, you can shape eyebrows with wrinkle remover too – just don’t overdo it! XD
  • Brightening Eyes and Other Shiny Things: The “Eye Brighten” tool is one of my favorites in the touch up tab because it’s so versatile. Use it to, duh, brighten peoples’ eyes, but also to brighten the eyes of animals and pets. Cat’s eyes, especially benefit from a little brightening to make them pop. Eye Brighten is good for other shiny things too, like jewelry, cameras, and watches, that are shiny in real life but are dull in the picture. Oh, and one more thing! Paint Eye Brighten onto the eyelashes, eyebrows, and any other parts of the face you want to sharpen and darken.
  • “Ironing” Wrinkly Clothing: You can actually smooth out wrinkles in clothing with Wrinkle Remover too! Imagine that. 🙂
  • Whiten Eyeballs: You can brighten the whites of your subjects eyes with Teeth Whiten! You can also use Clone to erase blood vessels or other blemishes.

Now that you know a few tricks, let me show you some examples.

before after.jpg

I have to say, I did use the Exposure tab first (mainly Highlights), since this photo was so dark to begin with. But after that, I used  a little bit of blemish remover/clone; some eye brighten (for eyes, camera, and watch); wrinkle remover to tame Megan’s flyaways, blur the background, unwrinkle her shirt, and smooth her eyebrows;and I think some airbrush too. Looking good!

before and after.jpg
photo credit via abarefootgal.wordpress.com


Here I used wrinkle remover again to erase my flyaways and a few wrinkles in my shirt; and then eye brighten on my eyes, eyebrows, and Lily’s eye. 🙂

before and after.jpg

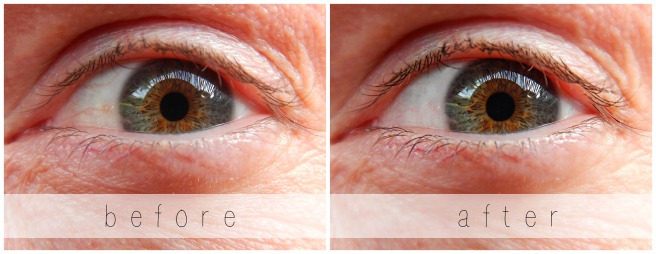
This is my Dad’s eye. 🙂 I chose not to erase the wrinkles completely, but I did smooth them just a tad. I also used Teeth Whiten and Clone to whiten the whites of his eyes, Mascara ( XD ) to darken his eyelashes, and Eye Brighten to brighten his eyes and darken his eyelashes as well.

before after.jpg

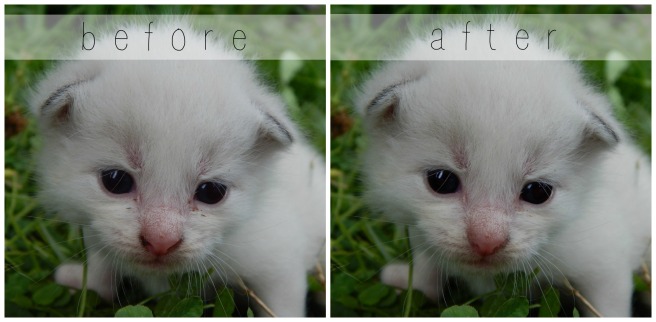
Here’s an example of using “Touch Up” to edit photos of your pets. This little kitten was so cute, but it’s face was kind of dirty. The only things I used here were Blemish Fix and Eye Brighten.

Now for the other part of the post…

How to Create the Perfect Book Character Portrait With PicMonkey

What happens when you know exactly what your character should look like, but you can’t find any pictures on Pinterest to match? That’s a terrible problem. 😛 But never fear – here’s how to fix it. Start with the best photo inspiration you have of your character, the photo that’s the closest thing to the picture in your mind. Try to find a picture where the structure of the face and hair is right, even if the colors are wrong. Then change the color of the character’s eyes, hair, lips, skin, etc. on PicMonkey!

Here’s an example I did. I’ve been trying to find the perfect picture for a character I have in mind, but I just couldn’t find it. This was a close one, but the eyes and eyebrows needed to be darker and the hair lighter. I touched this photo up on PicMonkey, and voila! (original photo via)

Aeryn before and after

I used Highlights and Clone to lighten her hair, Eyebrow Pencil to darken her eyebrows, Spray Tan to turn her irises brown, and Mascara and Eye Brighten to darken her eyes and eyelashes. It’s a lot of fun to edit pictures like that because they turn out so different than the original!

Before we finish, here’s a few miscellaneous tips:

  • Don’t Overdo It! This is one of the most important things to remember when editing portraits. You might be tempted to make your subject’s skin look perfectly smooth and their eyes look super shiny, but that looks fake. Stick to realistic edits unless, like for book characters, you’re purposely making them look different.
  • Go Royale: Unfortunately, a lot of the Touch Up tab is Royale. If you take pictures of people a lot, you might want to consider upgrading to Royale to get these and many more features. I have Royale, and I love it! It is, however, 30 something dollars a year, so I would recommend thinking about how much you’ll use it before buying it.
  • Improvise: If you don’t have Royale, you can often concoct your own Touch Up tools from various free effects and features elsewhere in PicMonkey. (For instance, using “Draw” instead of Clone.) The more you use PicMonkey, the more you’ll be able to master it.

So that’s about it! Many of the tools I didn’t talk about are self explanatory, so have fun experimenting by yourself! 🙂 If you have any questions, I’d be happy to hear them I’ll try and help you the best I can.

Thanks for reading!

***Allison***

How To Edit Photos, Part 2: Adding Effects

How to Edit Photos, Part 2 (1280x1280) (800x800).jpg

Hello, my friends! 😀

I’m so happy that you guys liked the first part of this series! (If you missed Part 1 or would like to review it, click here.) Are you ready for Part 2? Today I’m going to show you how to use some beautiful and fun effects, along with a few tips and tricks as well.

Again, I’m going to be working with the PicMonkey editing site, so go ahead and open that up on your web browser and choose the photo you want to edit. Last time we used the Basic Edits section of PicMonkey, but today we’re going to use the Effects tab. It’s represented as a little sparkly wand symbol on the left hand sidebar of the PicMonkey Editor, just below the Basic Edits tab.

Alrighty, let’s do this!

How to Add Effects

To be honest, I don’t use effects that terribly much, but there are a few very helpful tools in the effects section of PicMonkey – and all of the effects are just so fun to play with! I’m going to edit a picture and walk you through the steps so you can do it too.

Here’s our starting picture. ♥


To begin with, I used the Focal /soften tool. This is a very useful effect, especially if you don’t have a DSLR or if your camera doesn’t allow you to adjust aperture. See, by adjusting the aperture to a smaller or lower f-stop, you can make the subject sharp and in focus while the background is beautifully soft and blurry. Personally, I LOVE this effect, and so do a lot of other people. It looks professional. But if you take photos with your phone or a little pocket camera, it’s not easy to get a blurred background. But that’s why you’re here, my friends! 😉 Let me show you how…

First, find the “Focal Soften” Tab. It’s toward the bottom.

edit-focalsoften-1227x520

If you’re a little overwhelmed by all the different sliders, don’t worry! Trust me, it’s not as complicated as it looks. I’m pretty sure you could all figure it out by just playing around with the sliders, but in case you want some more detailed information, here it is. 😉

The Blur slider simply adjusts how soft or blurry it is around your subject. Tip: Be careful not to add too much blur or the effect will look fake. Focal size adjusts the size of the part of the photo which is sharp, or in focus. Edge Harden determines how distinct the edge is between the blurry and non-blurry parts of the photo. Tip: I suggest normally sliding the edge hardness to zero or close to zero. This provides a smoother, more natural transition. And lastly, the Fade slider controls how much of the whole effect, Focal Soften, shows up on your picture.

Okay, next I used the “Boost” effect.

edit-boost-1215x513

Tip: A little “Boost” can go a long way. You will quickly see this if you play with the slider. I used 8% boost for my picture, just to make the colors more vibrant.

I also added a teensy bit of the HDR effect.

edit-hdr-1216x512

This is yet another effect to use sparingly – although it’s really fun to play with the sliders and create weird and wonderful artistic effects. HDR is basically a more interesting, advanced form of the “Sharpen” tab in Basic Effects.

Lastly, I finished it off with another of my favorites: the Miniature effect.

edit-miniature-1232x523

Now, as you can see by that little yellow crown up there, this effect can only be used by Royale members. Like I mentioned in Part 1, Royale is an upgraded version of PicMonkey that gives you access to more effects, more graphics, and generally more features all around. I have Royale and I love it! You really get a lot of fun and useful stuff when you buy the package, including this Miniature effect. Tip: If you’re not sure whether to get Royale or not, you can always try out PicMonkey’s free trial!

Ahem, getting back to the effect… The Miniature effect is kind of like a combination of Focal Soften and Boost, but it’s a little different from either. For one thing, you can choose whether to make the focal shape linear or circular – in other words, make the in-focus part of the picture a rectangular section or a circular section. For landscapes and such, it works best to use the linear option, but for close-ups and individual objects, use circular. Adjust the Boost and Impact sliders to control the saturation and blur of the effect respectively.

Alright, I’m finished! Here’s the before and after photo: (before on the left and right on the right side)

before-after-2-2-1280x640
So pretty!

I’m going to go through these next photos a little faster now that you know basically how the effects work.

Black and White

The classic B&W. 🙂 I like to use this effect when 1.) my photos are cluttered or have a distracting background, and 2.) when I want the photo to have a special, nostalgic feel. PicMonkey seriously has like 7 different black and white effects, and they’re all a bit different. Tip: Start with classic Black and White, then add some toned-down Super B&W or Tri-X to make your photo pop. If you use the Fade slider on Super B&W or Tri-X without first making the photo black and white, you’ll end up with a bunch of washed out colors instead of true black and white. Which, incidentally, is another neat editing technique of its own.

Here are some black and white photos I edited.

tag

As you can tell, this isn’t completely black and white. If you click the little paintbrush symbol on the Black and White tab, a little menu with even more sliders pops up! Choose “Effect” at the top of the menu to paint on the effect you’re using, and “Original” to erase it off. I erased the black and white effect off of only the cupcakes here, for a fun pop of color.

tag

This is an example of B&W used to create a nostalgic or special atmosphere. Black and white is great for preserving special memories or sweet moments like this. Isn’t is adorable? ♥ (By the way, the original picture was from this post.)


Clone

This is a VERY useful tool, but sadly, it is a Royale feature. 😦 Clone can be used to erase unwanted items right out of a picture – from power lines to trash – as long as the unwanted object is fairly small. Simply click on the part of the photo close to the unwanted object, and start erasing. This tool takes a bit of practice to master, but it is quite helpful once you do. Take this photo, for example:

allisonvacation-52

Gorgeous Niagara Falls, right? And annoying blue people, huh? Well we can whisk those people far, far away with the Clone tool. Ta-daa!

edit-clone

Isn’t that amazing? I simply copied the bushes and rocks from around the people and painted over all that blue.

Other Tools and Tips

  • Two other very useful tools which I didn’t show are “Dodge” and “Burn.” Both are located at the bottom of the Effects page, and both require Royale membership to use. Use Dodge to brighten specific areas of your photo; use Burn to darken specific areas of your photo. Tip: Dodge is helpful when the face of your subject is dark or cast in shadow.
  • A really neat feature which PicMonkey added recently is the ability to create your own effect by layering other effects together. It’s a little button labeled “Save custom effect” up at the top of the Effects tab. But… you guessed it, it’s a Royale feature too. I actually don’t use it that much anymore, but it’s really fun to play with. 🙂 Tip: Mix up your own custom effect to provide the photos for your blog or business with one cohesive (and personalized) look.
  • Be creative! I encourage you to try out all the effects in the tab and play around with the sliders. Even if you don’t have Royale, PicMonkey at least lets you preview the Royale effects.
  • One last tip: have fun with editing, but don’t go overboard! Sometimes over-edited photos are much worse than the original. Think of the effects like make-up – use them to enhance your photo’s natural beauty, not plaster them on until your photo is unrecognizable and fake-looking. Unless, of course, you’re doing an artistic effect on purpose.

Phew! That was a lot to take in, but I hope you guys found it helpful! Let me know if you have any questions about that, and I’ll do my best to answer them. 🙂

Have fun editing!

***Allison***