
If you know anything about me, you know I love being creative. Over the past few years, I’ve filled our home with cute DIY projects. And I want to share some of them with you today!
Whether you’re looking for gift ideas, easy ways to brighten your home, or inspiration for your next craft night, this post has you covered. Enjoy! 🙂
Note: This post contains affiliate links. If you purchase something through my link, the price won’t change for you, but I’ll get a small commission for advertising, and you get to support this blog for free!
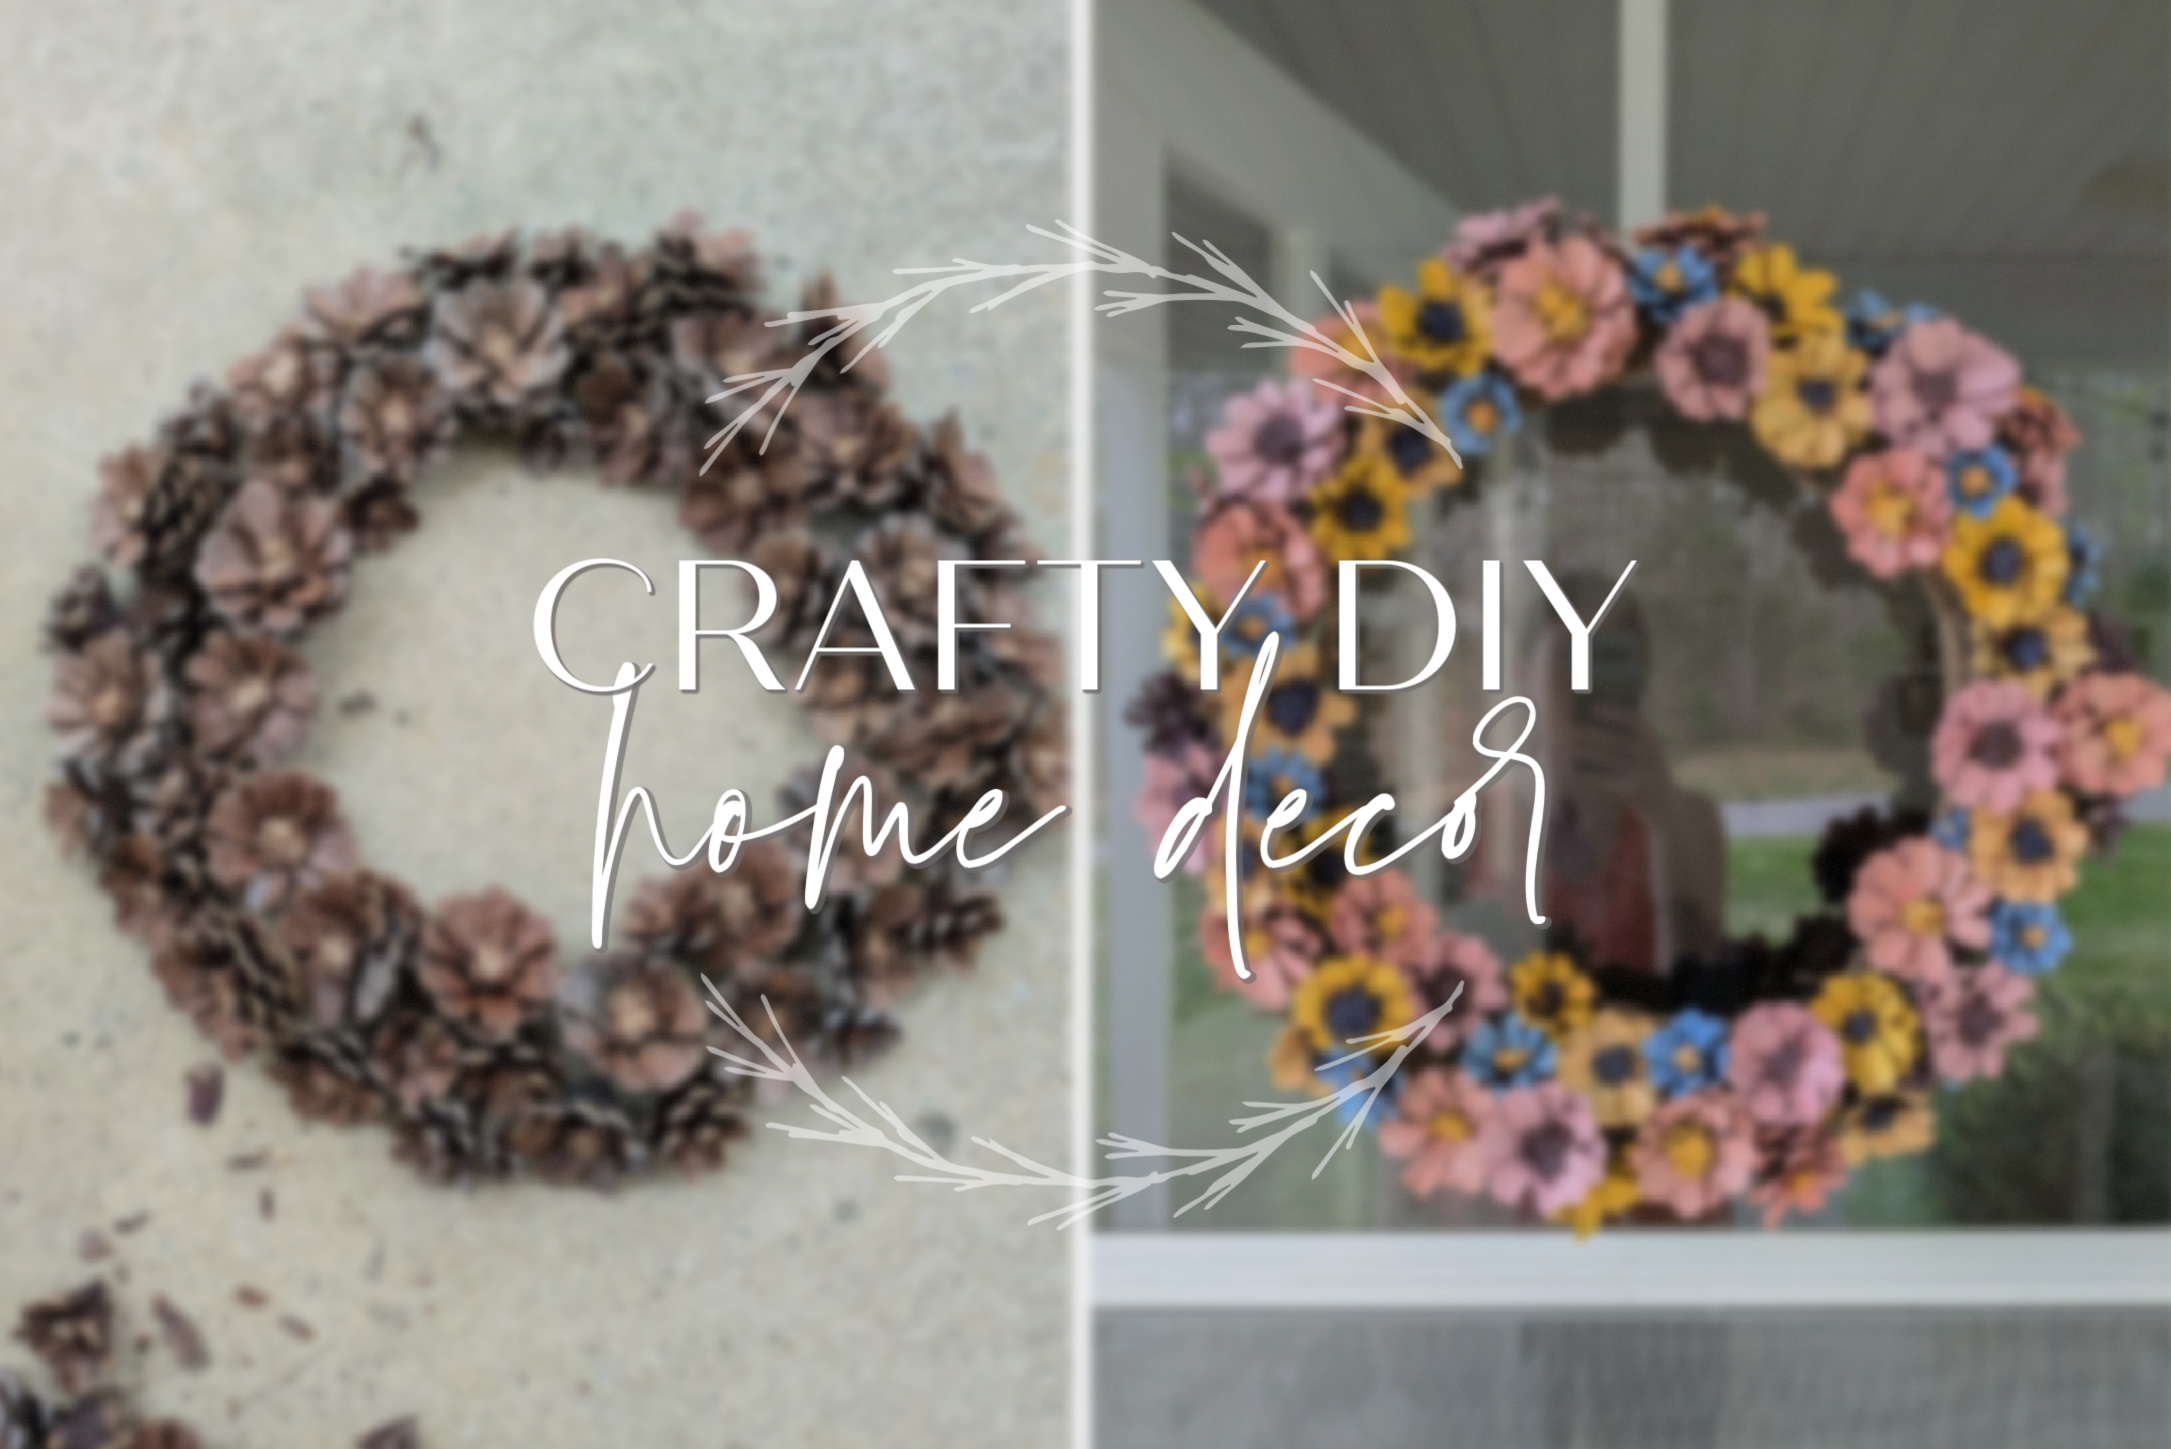
PAINTED PINECONE WREATH
Starting off with a DIY I wasn’t sure if I’d like or not: a pinecone wreath. It ended up so bright and cheerful. I saw this idea on Pinterest and realized my neighborhood had more than enough pinecones to pull this off.
I used a garden pruners to chop off the top and bottom of each cone, leaving the flower shape of the middle section. (Fair warning: this part will make your hands sore, especially if your pruner isn’t sharp…) Then I painted each flower with acrylic paint and hot glued them to a grapevine wreath form. I recommend placing the flowers before painting/gluing them to make sure you have enough.

CROCHETED POUF
I found the softest chenille yarn at a thrift store for an amazing price, and decided to make a pouf for our living room. I modified a pattern to make a huge version.
The main idea is to start with a magic circle and increase the number of stitches each round until you make it as wide as you like. Then crochet a few regular rounds, followed by decreasing stitches in each round until you close up the pouf. Before I got to the end, I stuffed it with various blankets and pillows languishing in basement storage. A great way to save money for this project – stuffing is pricey!

DIY Magnets
This is one of the crafts I did with my nieces and nephews on our recent family vacation. The girls especially had a lot of fun with it.
I used this magnet kit plus my own art. The magnet kit makes it super easy to create these: just stick the art to the magnet, and glue everything to the glass bead. The glue does tend to blur or bubble the art just a bit, so an alternative would be to stick the paper straight to the magnet and use as-is without the glass dome.

CROCHET SCRUBBIES
My great grandma used to make and sell these. They are quick projects, and super useful for washing dishes that are nonstick or a little more delicate, but which still need some scrubbing power.
The technique to make these is much like the one for the pouf. Crochet into a magic circle, increase each round, crochet a couple rounds of plain single crochet, then decrease until closed. The secret is to use nylon netting fabric (like this) to create the exfoliating texture. (You can also use these in the shower!)

Crochet scrap blanket
I made this years ago using a bin of scrap yarn I was given. It turned out so huge that I ended up having to fold it in half to fit on the armchair – it was too big draped over top, as you can see. But I love it!
I used just one stitch throughout – you can choose any stitch you find pretty – but crocheted with two strands held together: one colorful and one white. The white yarn along with the ombre color arrangement made the whole thing cohesive, despite the random scraps. I also added a white border around the whole thing to finish it off nicely.

PAINTED CANDLESTICKs
I have several of these around my house, mostly for decoration, though you can still burn them. This is a great craft night project for a group, or a relaxing DIY to do yourself.
It’s pretty simple: all you need is acrylic paint and a paintbrush. It’s a little tricky to paint on a small, round surface, but if you take your time you can create some elegant and lovely candles. I used white taper candles, but you could use any color. I’ve also seen people paint the details with melted candle wax instead of paint.

Painted bass guitar
My husband got a bass and electric guitar that were rather cheap and scratched up. He wanted me to paint them to spiff them up a bit, and I gladly obliged.
All I used was acrylic paint for the flowers, and then Mod Podge to seal the design. Surprisingly, the paint has held up amazingly well even after a couple years of playing in our church worship team.

Macrame flower pot hanger
This is another easy and useful gift idea. I have too many plants and not enough places for them in my house, so I hang some of them at the windows.
All you need are wooden rings (like this kind), and some sturdy string. You can get macrame specific rope, but here I just used jute twine. There are tons of macrame tutorials on Pinterest and the internet, so I won’t specify the technique here. But you can do a lot with just one or two types of knots.

LIVING WREATH
Another fun thing to do with your houseplants: make a wreath! To be honest, I ended up taking this down because I didn’t want to keep replenishing the water and taking care of it, but I think it could be really cool. You could even use a little flowerpot with soil rather than a glass jar.
I made a super simple macrame holder for a half pint jar, then stuck several propagation vines into the water. I carefully wove them around a wire wreath form to complete the look. I don’t love fake silk flower wreaths, and this is a really neat alternative!

crochet toy basket
I actually made this out of t-shirts! It would be nicer with some wire or wooden skewers in it to hold the sides up, but it works well enough and is soft and pliable enough for Sophia to manage without breaking it or hurting herself.
I first cut up several t-shirts into thin strips which I used as yarn. I once again started with a magic circle and increasing rounds, then crocheted several standard rounds. To make the handle, I simply chain-crocheted a few stitches without anchoring them to the basket, then connected again and kept going around, creating a loophole.

cardboard papier mache
I’m not sure if I’d recommend this craft because it was VERY labor intensive, but I do really love the results! I’m using these containers for holding art supplies and supplements, currently.
I started by tearing old cardboard boxes into small pieces and soaking them overnight in a bucket of water. Then I squeezed out most of the water and blended everything to a pulp with my blender. I poured the cardboard pulp into a bucket, mixed it with glue and salt (and I think some cornstarch or flour…?), and pressed the mixture into containers lined with plastic wrap. After MANY hours of drying, I cut off the edges, filled in any holes, and painted them beautifully. 🙂

cardboard plaster shelves
I worked on these for several weeks, goodness. I do really like the results though! I used command strips to stick them to the wall, and two are holding up perfectly fine weeks later, but one has fallen down, so I guess I need to add more strips to that one…
Another Pinterest-inspired craft using the heaps of cardboard we have in our basement. You score lines into cardboard to curve it, then strengthen it with thick walls. Once the structure is all hot-glued together, I covered it with papier-mache to smooth and strengthen it. The secret ingredient is joint/drywall plaster which instantly turns it from trash to Anthropologie, hehe. I papier-mached some mushrooms all over as well, and painted everything with acrylic. Such cute wall decoration!

Painted wooden chairs
I found a couple of wooden chairs at Goodwill and decided to give them a makeover. I was originally going to sell them, but haven’t worked too hard at that yet, so they’re currently sitting in my basement. 😛 I do have another one I made earlier that looks lovely in our living room.
I heartily recommend only buying already painted chairs unless you’re willing to spend hours sanding the wood. Either way, I used a fresh coat of spray paint as a base, then acrylic paint to decorate with flowers. I finished with a sealer.

CUSTOM phone case
This isn’t exactly home decor, but it’s a cute artsy idea nonetheless. I always use the Etsy shop OhSoPrettyCases to print my own art onto high-quality phone cases. They’re so much fun to create and use! You can also buy this art piece as a postcard on my Etsy shop.

Pin the image below to save these ideas for later!

I hope you guys enjoyed this fun post! Which of these craft ideas was your favorite? What is something you’ve created recently?
Thanks so much for reading, my friends, and have a lovely day!
***Allison***


Love your creations! Especially the spotted chairs and the huge crocheted piece that you didn’t know what to do with! It looks fab on the bed. But, ya know, Allison, the best creation that you have made is standing looking out of the window with her cute chubby arm and sweet swirl of hair! How darling is this! Thank you! Love, Wendy
LikeLiked by 1 person
Thanks so much, Wendy! Aww haha you are exactly right – Sophia is my very best creation. 🙂 I look forward to crafting with her one day.
LikeLiked by 1 person
I love, love the miniature alcoves… I do best with short projects, never finished a quilt or crochet beyond doilies. An awesome collection. Thanks for the inspiration.
LikeLiked by 1 person
I love how they turned out too! I have made several quilts and long projects, but they’re not my favorite either, haha. Thanks for stopping by and reading!
LikeLiked by 2 people
SO fun! I love ALL of these ideas, so excited to try a few out! Thank you for sharing, Allison! 🙂
LikeLiked by 1 person
Well YAY, that makes me happy! Happy crafting, Joanna! 😀
LikeLiked by 2 people
Eek! I’m late in commenting, but I so enjoyed this post, Allison!
Goodness! They’re all so beautiful I don’t think I could choose a favor. Your crochet skills are top-notch and your paintings are lovely! It’s so special to have homemade-with-love pieces in your house. 🙂
Thank you for sharing, friend! Many blessings to you and your family!
LikeLike
Aww thanks for the lovely comment! I’m delighted you enjoyed the post, Valentine. 🙂 Yes, I feel like handmade decor adds a special touch to any home. Blessings to you too!
LikeLike
I love all of the art you create! I’m not too crafty but I love the pinecone wreath and think I could actually pull that one off! Like you, I don’t love the artificial flower wreaths and they are so expensive! I made my current wreath with some sunflowers from Hobby Lobby and glued them onto a grapevine wreath so surely I can paint some pinecones. I also really like the blanket you made with scrap yarn. It’s beautiful!
LikeLike
If you try the pinecone wreath you’ll have to let me know how it goes! Sunflowers would make a beautiful wreath. I’ve also thought about making one with real, dried flowers. Thanks for the comment – so glad you enjoyed these ideas!
LikeLiked by 1 person
I will let you know how it goes. 🙂
LikeLiked by 1 person