
Halloo, guys! I’m excited to present a simple tutorial for drawing faces! 😀 I’ve heard a lot of you say “I CANNOT draw people” or “faces are SO hard,” and you know what? I kinda agree. People can be really hard to draw. But you can do it! Today I’m going to show you an easy way to draw a face with just a pencil and paper, and then I’ll show you some different combinations you can use to get all sorts of interesting characters. 🙂
So. To begin, here’s how to draw an average, boring face without looking off a photo of a person. XD (I – and probably you too – can draw a better face when looking off of a picture, but sometimes you just want to make up something, right?)
Ahem.
Technique: Drawing Faces
Step One:
Sketch out an upside-down egg shape for the face and two short curved lines below for a neck. A grid like this is nice if you need help with the placement of the features (like I do). Just draw a vertical line down the middle of the face and a horizontal one between a half and a third down the face. You can see that my sketch is far from perfect, but that’s okay. We’ll touch it up as we go.

Step Two:
Using the grid, draw two oval or almond-shaped eyes. (You can add more grid lines if you like, but you don’t need to.) Eyes are usually smaller than you think, at least in my case. I drew these a bit too big. Getting them symmetrical is hard, but you know what? In reality, no one’s eyes are perfectly symmetrical – look in the mirror!

Step Three:
One common mistake made when drawing eyes is to draw the iris as a whole circle. Unless you are surprised or unusually pop-eyed, you won’t be able to see the whole iris. So make your circle go off the eyeball, like this:

Step Four:
Draw a tiny circle towards one side for the highlight, and a bigger, filled-in circle (or dot) for the pupil. Also draw a curved line above and below each eye for the eyelids.

Step Five:
Draw the eyelashes. This can be pretty tricky, and I think I drew too many eyelashes here. From far away, you can only see a few individual spikes of eyelashes, not a whole fringe. (Again, look in the mirror if you need help.)

Step Six:
Heh heh, this would usually be where you color in the irises, but I kind of forgot about it until step ten. XD You can skip to there now if you’d like or just do it later.
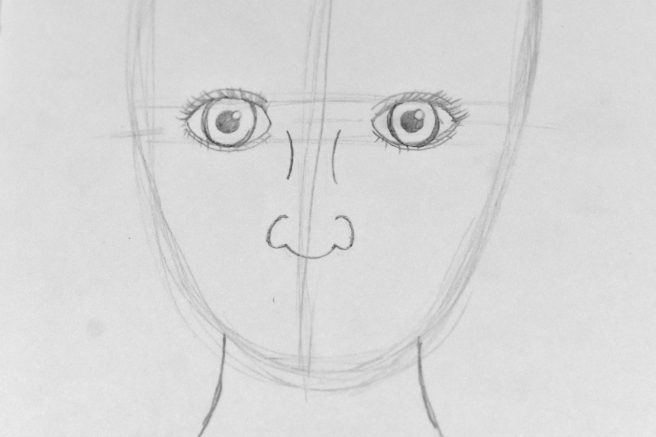
Anyway, now we need the nose. Draw two curved lines (kind of like you did with the neck) for the bridge of the nose, and two parentheses-like curved lines below it. How far apart you make them determines how big the nose is, as well as how far down on the face you put them.

Step Seven:
Curve your parentheses around a bit more to look like “C’s” facing each other. Then connect the bottoms with a wide curve or “U.”
Step Eight:
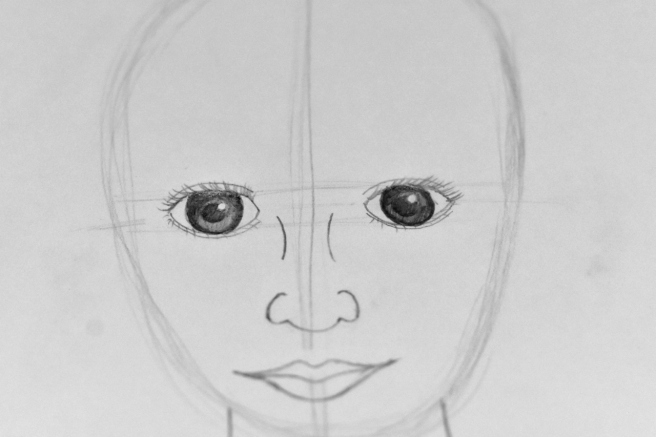
For the top of the lips, make a flattened “M” shape, which I think looks kind of like a flying bird. 🙂

Step Nine:
Connect the two ends of the “M” with a long curve. You can make it almost flat or very arched depending on how full you want the lips to be. Draw a line in the middle that echoes the curves of the top lip line.

Step Ten:
Now I remembered to color in the eyes. XD A simple way to do this is to color a dark line around the outside of the iris and fill it in with lighter pencil. Make sure to darken especially the top of the iris to make it look more realistic.
Step Eleven:
Now for the hair, which I am pretty terrible at. XD Oh well, you can tell it’s hair at least.
Using the face shape sketch you did at the very beginning, curve the hair around the head like so. (I decided to make the head a little shorter than I had originally sketched.) For this hairstyle, I kind of drew two elongated teardrop or comma shapes that meet at the middle line of the face grid.
Also now is the time to define the face shape at the jaw and chin. You kind of just have to play around with this part and experiment. A more round, curved jawline will look like a younger face, and a sharper, more angular jawline will look older or more masculine.

Step Twelve:
Start shading the hair. WAIT, DON’T PANIC BECAUSE I SAID SHADING. This is very simple. Draw darker, closer together lines beside the neck and at the top of the head, and lighter, farther apart lines for the rest of the hair. Don’t draw many lines at all at the top sides of the head, which will make the hair look more shiny and highlighted. Leave a little gap where the two sides of the hair meet for a part. Or just look at the picture and figure it out for yourself. XD

Step Thirteen:
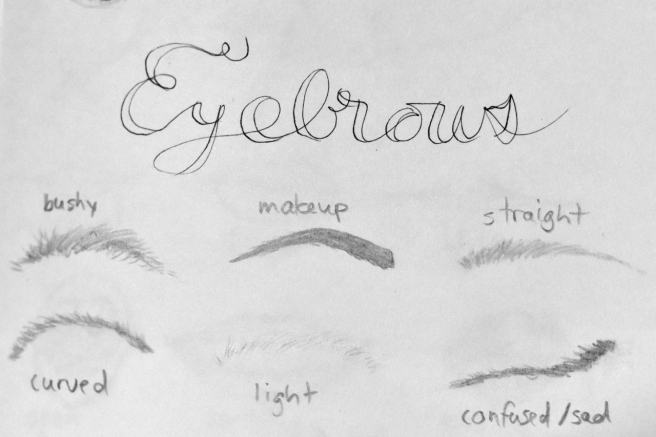
Finish shading the hair. Also *facepalm* I almost forgot the eyebrows. XD Oh well, you can add those sooner or later, it doesn’t really matter. But you should add them or the face will look kind of weird and blank. Eyebrows are simple: just draw a bunch or really short, slightly curved lines. Or you can draw just a single curved line for an even simpler, less realistic version.
Lastly, erase any grid lines and smudges, add shading around the face and under the neck if you want to (you don’t have to), and you’re done! Ta-da!
To tell the truth, this isn’t my best portrait. The face is too round, the eyes are too big… but that’s alright. This is what you have to do – if it doesn’t turn out good the first time, do it a second… and a third, and a fourth. 🙂

Now since you know how to put everything together, here are some ways to change up the facial features. It’s so fun to try different combinations!
Here’s another Art Lab post I did on how to draw eyes: Episode 23.


Have fun mixing and matching! Also before you go, I wanted to show you a colored pencil face drawing I did off of different pictures. You can tell I do a lot better when I look off of something. XD
Which little cutie is your favorite?

Well, I hope you found this tutorial helpful! Would you like me to do another face tutorial, like maybe how to do colored pencil portraits or profile portraits or an easier or harder version? What do you want to learn how to draw? Maybe I can do the next Art Lab from one of your suggestions!
Thanks for reading, dears, and have fun drawing!
***Allison***


Your artwork is amazing, Allison! And those girls are super cute. 🙂
LikeLike
Aww, thank you, Charis! Yes, I like them too! 😊
LikeLiked by 1 person
This was a great post, Allison, and super helpful! I’ll have to keep the email of your post in my inbox so I can go back to this post when I want to. 🙂
And are those really your drawings at the bottom of this post(not that I don’t believe you)? They’re amazing! Even if I tried, I don’t think I’d be able to make my colored pencils color that darkly.
I would like to see any of the things you suggested, but I think it would be cool for you to do a tutorial on how you draw a whole person, as well.
~Sassafras
LikeLiked by 1 person
Wow, thank you sooo much, Sassafras! I’m really glad you found it helpful, because I wasn’t sure if it would be good or not. But yay!
Aww, that made me smile. 😊 Thank you so much! Yes, I did draw those faces! Yeah I probably wouldn’t have been able to draw them with normal colored pencils, but again, Prismacolor colored pencils are just amazing!
Ooh, and thanks for the suggestion! A tutorial for a whole person would be fun. 🙂
LikeLiked by 1 person
You’re very welcome, Allison!
Oh, maybe I need some Primsacolor colored pencils then… 😉 I actually just ordered some required art stuff for my classes in the Fall, but I didn’t need any colored pencils.
LikeLike
You really do! XD I think anyone who’s interested in art should have them. 😜
LikeLiked by 1 person
l LOVE it ❤
LikeLike
Why thank you!
LikeLike
Oh my goodness! That was SO good. I can’t wait to get drawing!
LikeLike
Wow, thank you SO much, Enni! I hope your drawing turns out well! Could I see it if it does?
LikeLiked by 1 person
Sure! I just finished it! How exactly do I show you?
LikeLike
Ooh, yay! Well, you can email it to me at artlabblog@gmail.com if you’d like. 🙂
LikeLiked by 1 person
Okay, great!
LikeLiked by 1 person
Just did!
LikeLike
YAY! Let me go check…
LikeLiked by 1 person
:DDD
LikeLike
I replied!
LikeLiked by 1 person
I replied back! XD
LikeLike
I replied back to your reply back! XD
LikeLiked by 1 person
As always your drawings are fabulous! A colored pencil tutorial sounds wonderful! One of the many things that I have trouble drawing are horses. Maybe you could do a tutorial on them on day, unless you already have and I missed it.
~ Megan Joy
LikeLike
Aww, thank you. 🙂 Ooh yeah, maybe I could do a horse tutorial! Nope, I haven’t done one yet, although I did post a drawing I did of a horse in this post: https://afarmgirlslife.wordpress.com/2017/05/22/the-art-lab-episode-25-art-inspiration/
Thanks for commenting, Megan!
LikeLike
looks cool will check this out.
LikeLike
Thank you! 😀
LikeLike
This was SO HELPFUL! Also, I love the curly-haired cutie.
LikeLike
Aww YAYAY. I’m so glad it was helpful! And thank you, hee hee!
LikeLiked by 1 person
This was very helpful! And yes more face tutorials would be much appreciated! And also could you do a tutorial on that really cute fox you did in Art Lab Episode 25? 😀
LikeLike
Thank you, Sylvia! And ooh yeah, thanks for the Art Lab suggestions!
LikeLike
This is so helpful and simple!!!! As for which kid is my favorite, it’s either the one on the farthest left, or the redhead! They’re all pretty cute though! 🙂
How do you smudge pencils for shadows and things? I use a Q-tip.
LikeLike
Yay, thanks so much, Olivia!
Also I usually just use my fingers, but I didn’t use anything to smudge on this picture. I usually like Prismacolor colored pencils for drawing shaded things.
LikeLike
That was an amazing tutorial! I loved to see the process! Thanks so much for all of the helpful information 🙂 As for my favorite little girl, they are ALL super adorable, but my personal favorite is the the middle one! It literally looks like you took a picture of her and edited it to make her slightly cartoonish! Amazing job!!
LikeLike
Wow, thanks so much! That’s so kind of you! Yes, I really like the middle girl too. 🙂
LikeLiked by 1 person
This is so helpful, thank you so much! And OHAL;GJAL;KGJAS ALL THE LITTLE KIDS ARE SO CUTE!!!
LikeLike
YAY I’m so glad it was! Aww hee hee, thank you, May. 🙂
LikeLiked by 1 person
You are a really good artist! I am trying to be but……. well lets say I need some work!]
Thanks for the tips!
LikeLike
Aww thank you, dear! Well just keep practicing and I know you can do it. 😀 ♥
And my pleasure!
LikeLiked by 1 person
🙂
LikeLike
Ditto! XD
LikeLiked by 1 person
You’re an amazing artist!
LikeLike
Aww, thank you!
LikeLiked by 1 person
This is great! You are good at drawing faces! The example tutorial girl’s hair is really good! I like drawing people, I ought to try this out! Great tutorial!
I think my favorite colored pencil girls are the first three! (Which is most of them, but oh well 😉 ) The curly-haired one especially!
~Gracie
LikeLike
Thank you so much! Ha ha, really? I’m glad you like it! And thanks again!
Hee hee, I agree. 😉
LikeLike
Niiiiiice!!!
LikeLike
Thank youuuu! 😀
LikeLiked by 1 person
Yw! <33
LikeLike
I like the middle cutie!
LikeLike
Thank you! She’s my favorite too! 😀
LikeLiked by 1 person
Amazing!
LikeLike
Thank you!
LikeLike
Wow, you are really good at this!!!
LikeLike
Aww, thank you so much!
LikeLike
Wow!
LikeLike
😀 Thank you, Lucy!
LikeLike
Thanks for sharing this, Allison! This was really helpful. 🙂 Also, those girls are super cute!
LikeLike
My pleasure, Zielle! And thank you! 😀
LikeLiked by 1 person
😀 You’re welcome!
LikeLike
Wow, thank you so much for this tutorial! It really helped me!! Would you mind making a tutorial about how to draw hair, because I really want to learn that and you can draw so good!! And the girls are so cute!!! ❤
LikeLike
You’re so welcome, Olivia! Ooh, a tutorial for hair would be fun, but I’d have to work on practicing it because I’m not that good at hair. But maybe I can!
Thanks again, Olivia!
LikeLike
You did a great job on this tutorial! Drawing faces can be really complicated, especially when you do different angles…I find I always make my heads too long and my eyes too big in the first draft… ;D
-Emma-
LikeLike
Thanks, Emma! Oh I agree! Ha ha, that’s kind of what I do too. 😉
LikeLiked by 1 person
Wow! This was awesome! I loved it! Also, the little kids were so cute! I loved the third one from the left! You draw so well! I’d love to read your next drawing tutorials! 😀
LikeLike
Yay, thanks so much! 😀 And thank you! I really like her too. 🙂
LikeLike
Oh my goodness! You are a beautiful artist! You’re drawings are so realistic, Allison. This tutorial has really helped me! And, the little girl with the Afro is my favorite. XO
LikeLike
Aww, thank you SO much! I’m really glad it helped you! Also she’s my favorite too. 🙂
LikeLiked by 1 person
Nice Post! I like the structure and the way you explained a technique and added a photo. The fact that you explained shading through a photo is impressive! It’s really hard to do. As for your art, it’s a really pretty portrait! Nobody can be perfect after all. Lastly, I just want to ask, how do you make noses? It’s so hard.
LikeLike
Wow, thanks so much! That was very kind. ♥ And ooh yeah, noses ARE hard. Do you mean profile noses or straight-on noses?
LikeLiked by 1 person
Straight-on noses
LikeLike
Okay! Well I like to draw them like I showed in this post, with the two slightly curved lines for the bridge of the nose, and two parentheses-like curves connected to a shallow horizontal curve underneath. Depending on the angle of the face, you don’t even need to draw nostrils. 😛 I also put a picture in this post of several different straight-on noses I drew, if that would be helpful. Also, I partly learned to draw noses from this tutorial: https://www.instagram.com/p/1i6IfgJFE1/
Hope that helped!
LikeLike
Thank you so much! I really can’t get a nose to look good because it comes off as too harsh or dark most of the time or it just looks slanted. I’m going to check out this link and try your technique. I hope it’ll help me too!
LikeLike
You’re very welcome! Yes, I feel you. XD It also helps to shade, but of course that’s harder to do than just line drawing.
LikeLiked by 1 person
Finally someone who understands! Though I know how to shade but it’s the drawing and the fact that I press to hard and erase multiple times that ruins my work.
LikeLike
Ha ha! Oh yeah, when you press hard and then erase it still leaves marks. That’s super annoying, I know. It might help to use a pencil with a softer lead, such as a 5B or really any number on the B side. Do you have any drawing pencils like that or do you usually just use a normal HB pencil?
LikeLike
I do have a whole set of shading pencils ranging from 9F to 9B. But shouldn’t I use the F pencils because they’re lighter so they’re easier to erase?
LikeLike
Oops! I meant the B pencils would be good for shading. Sorry about the confusion! But also in my experience soft lead is easier to erase than hard lead, I don’t know why. I guess you could do a test of both and see what works best?
LikeLike
You are an awesome drawer. Are you a professional artist.
LikeLike
Aww, thanks so much! Nope, I’m not, but I’m working on starting an Etsy shop for my art! 😀
LikeLike
Fantastic. Allison!! Great and awesome work. My wishes
LikeLike
Thanks so much! 🙂
LikeLike
This was a REALLY helpful post! 😀
LikeLike
WOOHOO! I’m so glad to hear that! 😀
LikeLike