

Hello, dears!
I absolutely LOVE the art we’re going to do today, but first of all… THANK YOU THANK YOU, GUYS, for all of the splendid birthday wishes. Whether it was a gift, a card, an email, or a comment, whatever it was – IT MADE MY DAY! MANY TIMES! You guys are SO SO SWEET and I am beyond blessed to call you my friends. ❤ (And yes, I am going to do a post about my gifts. 😉 But you’ll just have to wait for that, hee hee.) That thank you was way too short and small, but I’m guessing you want to see the rest of the post so I’ll stop now. BUT thank you one last time for making my birthday a wonderful day. 🙂 ❤ ❤
AHEM. Time for the art! I think this might be my favorite piece of art I’ve done for Art Lab, or at least one of my favorites! Here’s the stunning art inspiration for today:

HOW NEAT IS THAT? :O After pondering for a while, I came up with the idea of making the design into a constellation-type doodle with a watercolor background. I think the finished result looks gorgeous! Ready to start? Alright!
1. Selecting a canvas depends on your supply of both patience and time. You’ll need both for this project. 😉 If you have a limited supply of the aforementioned, I would suggest making this an ATC. If you’re bored and want to spend a while just making art, use a sketchbook page.
If you like clean white borders as much as I do, put strips of washi tape around the edge of your paper.

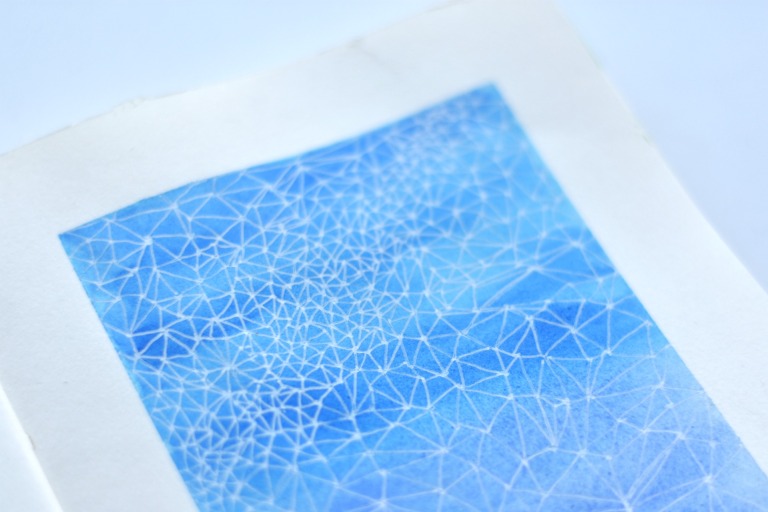
2. Paint a graded wash of watercolor, starting with dark blue at the top and fading into purple and then pink at the bottom.

3. Using a white gel pen, make a diagonal band of densely clustered dots across the top of the page.

4. Fill the rest of the page with dots, spreading them further and further apart from each other as you move away from the first band of stars.

5. Now for the fun (but tedious) part! Connect the dots. You don’t have to connect every dot to every other, but that’s what I did. For maximum impact, you’re going for a bunch of triangles – if an area has more than three sides, you missed a dot. Don’t cross over any lines or it will get too muddled.


6. Once you near the right bottom corner, take a break and sketch in the outline of a tree on a hill. (I should have done this before I started the stars, but I didn’t. I recommend learning from my mistake. 😉 ) Make an elongated cloud shape on a trunk, and “cut out” a few holes in the leaves and branches for extra realism.

7. Mark the sketch with a bunch of dots to connect later. Don’t do them too close together, but the fewer dots you use, the more geometric your tree will be.

8. Connect the rest of the dots.

9. Now take a black brush pen or Sharpie and color in between the lines. 😉

10. Ta-daa! Now for the great reveal…

SOOOO PRETTY!


I really love how this turned out, and I hope you guys do too! Do you think you’ll make this? If you do, I’d love to see it! Click here to see how to send it in and add it to our Art Lab gallery.
Thanks for reading, dears, and have a lovely day!
***Allison***
P. S. Not all the pictures are showing up on my computer, but I THINK that’s just the slow internet. Can you guys see everything alright?


This was so cool/Thanks for showing the step by step process.Added to my things to try list.:-)
LikeLiked by 1 person
I’m so glad to hear that – it was my pleasure!
LikeLike
Amazing! connecting the dots..I love this art.
LikeLike
Thank you so much! 😀
LikeLike
Amazing work!
LikeLike
Thank youuu!
LikeLike
Lovely art..
I liked this very much.. 😄
LikeLike
I’m so glad you liked it! Thanks. ❤
LikeLiked by 1 person