The Art Lab, Episode 64: Simple Nativity Scene

Hello, dears!

Can you believe it’s less than THREE WEEKS until Christmas?? I’ve been playing Christmas music and making fires in the fireplace and loving the Christmas decorations we put up (which I’ll hopefully post about soon!). Anyway, in honor of the season, today I’m going to show you guys a tutorial on how to make easy but beautiful Christmas-themed art.

Continue reading

Advertisement

The Art Lab, Episode 62: Inktober 2018

Hello, dears!

Welcome back to another Art Lab post! Today I’m going to be showing you my drawings for Inktober 2018. Inktober is a challenge to draw one pen or ink drawing each day for the month of October. You’re supposed to follow the “official prompts” which I’ll show you in a bit, and then share your art with others.

I’ve never done this challenge before, although I’d heard of it, but one of my lovely readers asked if I was doing it, so I decided to try it! I’m glad I did. 😀 Even though I didn’t strictly follow the rules (it was close to the middle of October before I had time to start), I did use all the prompts and drew something every day when possible. 🙂 Continue reading

The Art Lab, Episode 49: Popsicles Forever

Hello, dears!

Welcome back to another episode of The Art Lab! It’s a bit late because I kind of got the posting schedule confused but ANYWAY, here we go! Today I’m going to show you how to draw cute, summery popsicles inspired by some popsicle stamps Megan bought at the post office the other day. (They’re forever stamps – thus the strange post title. 😛 ) Here’s our art inspiration for this post:

{via}

And here’s what you’ll need to re-create it:

  • Some sort of paper to draw on (I used an ATC)
  • watercolor crayons (you can also use watercolor colored pencils or just plain watercolors)
  • a pencil
  • brown colored pencil (optional)
  • a normal or white gel pen (optional)

Ahem. We are now ready to start the tutorial.

  1. Sketch out three popsicle shapes + corresponding popsicle sticks on your paper. The shape is up to you, but I like making ones with a flat base that taper slightly up to a rounded oval or square top. If you want, draw a bite taken out of one of them. popsicles forever (2)
  2. Sketch in some details on your popsicles. There are SO many options for this, so have fun and be creative! I mainly did varying degrees and sizes of squiggles to separate the different colors (I mean flavors) later.popsicles forever (3)
  3. I penciled in the popsicles darker than they should have been so you guys could see them. If your sketch is like mine, erase it for the most part until it’s barely visible. You don’t want to see pencil lines under the paint later on. Next, choose a limited color scheme of colors that go well together and won’t make brown if they get mixed. I chose a summery palette of warm colors + white.popsicles forever (4)
  4. Loosely color in your sketches with your crayons (or whatever you’re using). Cover the space, but don’t worry about getting it perfect. For the middle popsicle, I got an ombre effect by blending gradually less and less coral with more and more white.popsicles forever (5)
  5. Now the fun part: add water and watch the magic! If you want to blend colors, I suggest starting with the lighter colors and blending into the darker. If you do the opposite, the lighter color might disappear under the more dominant darker one.popsicles forever (6)
  6. Draw two parallel lines in the center of the popsicle, about the same distance apart as the popsicle stick is wide. (This is the bump where the popsicle stick is inside the ice.) Use a darker color (I used red), and blend it out with water to soften the shadows.popsicles forever (7)
  7. Next we’ll add shadows to the popsicle sticks. When you’re drawing from a reference, it helps to think in terms of simple shapes. If you look at the stamps, the shadows on the sticks are basically brown triangles. So make brown triangles! You can also faintly outline the whole stick in brown. You can certainly use your watercolors for this part, but I used a brown colored pencil for more precision. popsicles forever (9)
  8. Finally, add some details with a white gel pen. I added squiggles to the first, shiny highlights to the second, and cute sprinkles to the third, but you can add whatever you want.popsicles forever (10)

Ta-daa! Step back and try to admire your work of art without eating it. It doesn’t taste as good as it looks, trust me.

popsicles forever 10

If you make art inspired by this post, we’d love to see it! Send us a picture at theartlabblog@gmail.com and we’ll add it to our gallery on The Art Lab website.

What do you think of this art idea? Did you get the new popsicle stamps? And what is your favorite popsicle flavor?

***Allison***

P. S. Made some art and now you’re bored? Well I have some good news: The Summer Bored Games have started! Check out Clara’s post here to start completing challenges! And thank you SO much to everyone who signed up – we now have over 40 participants!

The Art Lab, Episode 44: Gel Pen String Art

featured image 11

Hello, dears!

I absolutely LOVE the art we’re going to do today, but first of all… THANK YOU THANK YOU, GUYS, for all of the splendid birthday wishes. Whether it was a gift, a card, an email, or a comment, whatever it was – IT MADE MY DAY! MANY TIMES! You guys are SO SO SWEET and I am beyond blessed to call you my friends. ❤ (And yes, I am going to do a post about my gifts. 😉 But you’ll just have to wait for that, hee hee.) That thank you was way too short and small, but I’m guessing you want to see the rest of the post so I’ll stop now. BUT thank you one last time for making my birthday a wonderful day. 🙂 ❤ ❤

AHEM. Time for the art! I think this might be my favorite piece of art I’ve done for Art Lab, or at least one of my favorites! Here’s the stunning art inspiration for today:

I really like this pattern and how it’s growing and evolving while I’m drawing it. #doodle #doodling #drawing #teckning #pattern #mönster…

{via}

HOW NEAT IS THAT? :O After pondering for a while, I came up with the idea of making the design into a constellation-type doodle with a watercolor background. I think the finished result looks gorgeous! Ready to start? Alright!

1. Selecting a canvas depends on your supply of both patience and time. You’ll need both for this project. 😉 If you have a limited supply of the aforementioned, I would suggest making this an ATC. If you’re bored and want to spend a while just making art, use a sketchbook page.

If you like clean white borders as much as I do, put strips of washi tape around the edge of your paper.

art 1

2. Paint a graded wash of watercolor, starting with dark blue at the top and fading into purple and then pink at the bottom.

art 2

3. Using a white gel pen, make a diagonal band of densely clustered dots across the top of the page.

art 3

4. Fill the rest of the page with dots, spreading them further and further apart from each other as you move away from the first band of stars.

art 4

5. Now for the fun (but tedious) part! Connect the dots. You don’t have to connect every dot to every other, but that’s what I did. For maximum impact, you’re going for a bunch of triangles – if an area has more than three sides, you missed a dot. Don’t cross over any lines or it will get too muddled.

art 5

art 6

6. Once you near the right bottom corner, take a break and sketch in the outline of a tree on a hill. (I should have done this before I started the stars, but I didn’t. I recommend learning from my mistake. 😉 ) Make an elongated cloud shape on a trunk, and “cut out” a few holes in the leaves and branches for extra realism.

art 7

7. Mark the sketch with a bunch of dots to connect later. Don’t do them too close together, but the fewer dots you use, the more geometric your tree will be.

art 8

8. Connect the rest of the dots.

art 9

9. Now take a black brush pen or Sharpie and color in between the lines. 😉

art 11

10. Ta-daa! Now for the great reveal…

art 12

SOOOO PRETTY!

art 13

art 16art 14

art 15

I really love how this turned out, and I hope you guys do too! Do you think you’ll make this? If you do, I’d love to see it! Click here to see how to send it in and add it to our Art Lab gallery.

Thanks for reading, dears, and have a lovely day!

***Allison***

P. S. Not all the pictures are showing up on my computer, but I THINK that’s just the slow internet. Can you guys see everything alright?

Hand Lettering + Font Inspiration

Hello, dears!

Unfortunately I couldn’t make my Art Lab post on Friday, but I have time (and data XD) to do it today! In this post I’ll show you a few tips and tricks on lettering, plus show you plenty of font inspiration to copy or use to think up your own fonts. (Because I usually run out of ideas after, like, three fonts. XD) So. Ready? GO!

Technique: Hand Lettering

Hand lettering is super fun, and also very useful for when you want to spiff up an envelope or gift tag or any number of things.

Fonts

Let’s start with one of my the most common and prettiest fonts in handlettering: fake calligraphy. Lovely name, isn’t it? 😛 That’s because it allows you to get a calligraphy-like effect without using any special calligraphy tools. It’s also super simple to write. See?

lettering 1.jpg

Step One: Write out your desired words in the neatest cursive you can.

Step Two: Find the downstrokes. Downstrokes are the places in a letter where you move your pen down the paper, like the little pink arrows show in the picture.

Step Three: Widen and color in the downstrokes to get the look of a calligraphy pen. Ta-daa! Pretty, isn’t it?

This is a great base font, especially when paired with a simple sans or serif.

DSC_3220.JPG

So basically sans doesn’t have the little “tags” on the ends of the letters and serif does. I like writing all caps sans and all lowercase serif. 🙂

And now, here are a bunch more simple fonts I wrote out to look through and use as inspiration or copy yourself. Which is your favorite?

Accents

Now that you got some fonts under your… um, pen XD, it’s fun to add little accents and flourishes to fill in the space beside the lettering. Here are a few ideas to get you started, and you can find a bunch more on Pinterest and the “Doodly Accents” section of PicMonkey. 🙂

DSC_3221

Inspiration

Still need some more ideas to get your creativity flowing? Here are a few of my recent (and not-so-recent) lettering pieces.

You can hand letter with any medium you wish! Here I used my watercolor brush pens which are super fun for lettering.

envelope 8
Quote from Jane Austen’s Emma

For this one I used a blue notebook marker + a blue ballpoint pen. I love adding vines to letters, but it does take a bit of time and patience. 😉 Another fun thing to do for fonts with thick, solid bars of color like below is to add zigzags or circles or other patterns inside the bars for more interest.

DSC_2629
Quote from Nancy Pearcey’s Total Truth

This is the first page in my second bullet journal. I like how the mix of colored pencil and ballpoint pen looks together. 🙂

Not quite the right season for this, but hey, it’s lettering! XD I think it looks really neat to overlap some letters, like I did with the ‘y’ and the ‘o’. Also a little extra line of a different color beside the downstrokes adds a shadow effect and makes it look more special.

art (1280x1280)

And lastly, a lovely Bible verse that I copied completely in blue ballpoint pen. (By the way, these Pilot G2 pens are practically THE BEST PENS EVERRR. They write super smoothly and you can get them in a range of point sizes.)

Bible journal 5 (1272x1280)

That’s all I have for today, so hopefully you’re inspired by now. 😀 If you did make some hand lettering inspired by this post, we’d love to see it! Check out how to help us fill our art gallery here.

***Allison**

The Art Lab, Episode 38: Spaghetti Mountains

Hey, guys! How’s life? Mine’s good, and currently smells like pizza baking in the oven. (It’s movie night with homemade pizza. 😉 ) Wait, that was the timer… HOLD ON.

Okay, we’re good. Ha, that was an interesting coincidence. ANYWAY, less food and more art now, eh?

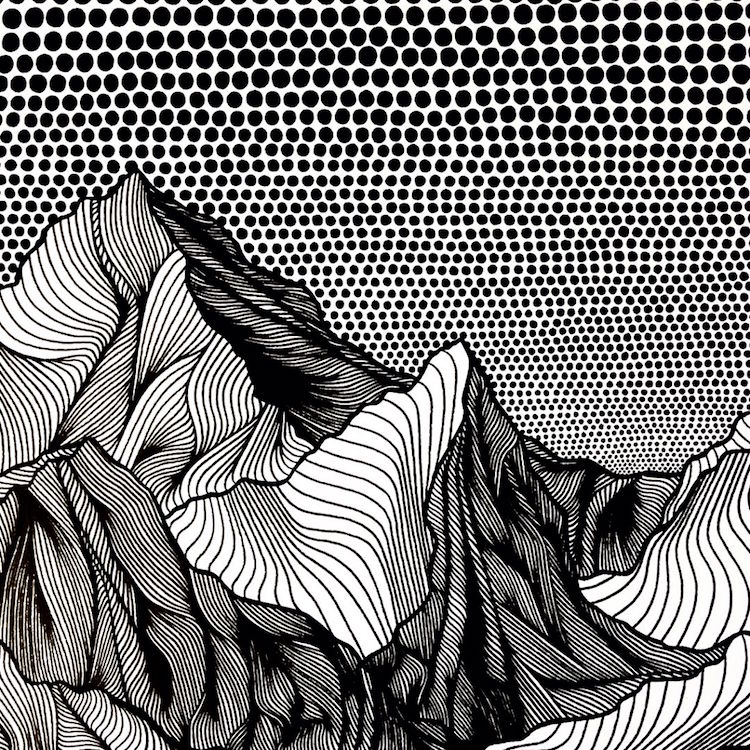
Oh wait, I forgot about the title. XD Maybe we’re not done with food yet… Today I want to show you how to draw “spaghetti mountains,” what I decided to call this certain doodling technique. 😛 I think it looks so neat in the end, and it’s quite fun and relaxing to draw.
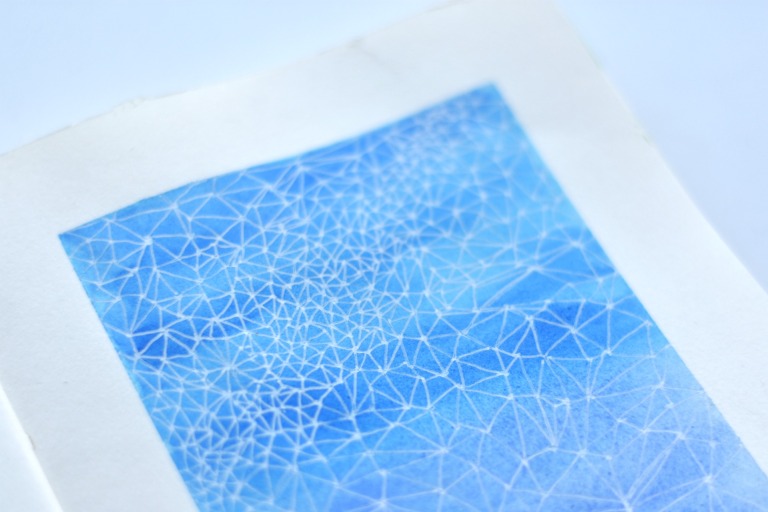
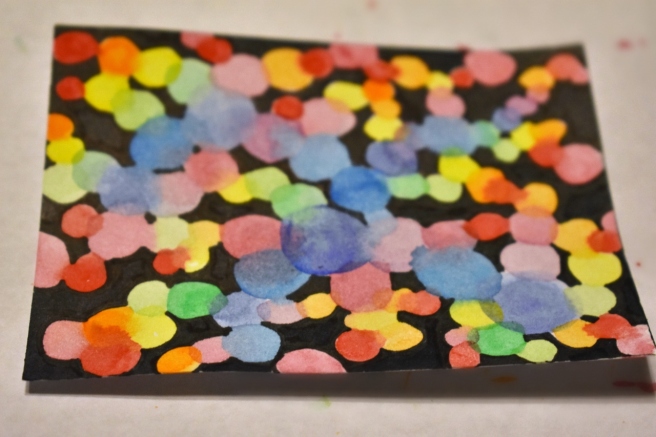
Art Inspiration:

Pointillist Line Drawings of Mountains by Christa Rijneveld

{via}

Isn’t this gorgeous? I love it! I made a similar piece using this as inspiration, and also made you guys a little tutorial if you’d like to try it yourself. 🙂

Materials Needed:

  • Paper, an ATC, canvas, etc.
  • Black pens or markers (I used varying sizes of Micron pens + a black brush pen)
  • A white gel pen (optional)
  • Some time

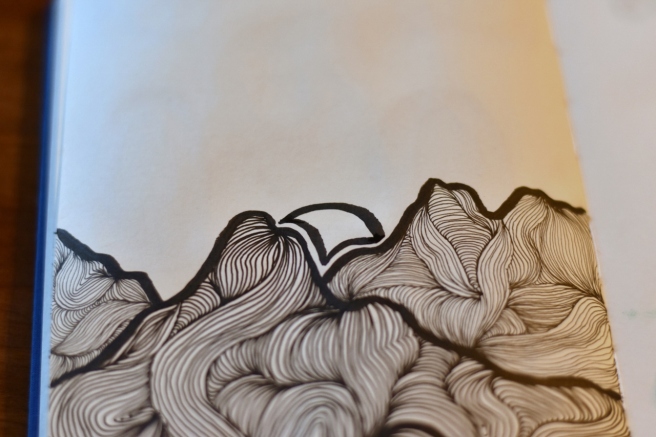
1. Draw some jagged lines for mountain ridges with your thickest pen (I made the lines thicker later). Make some ridges in the background and foreground.

art 1 (915x1280)

2. Take your second thickest pen and start filling the first mountain with “spaghetti.” XD Draw some curvy lines that all start and end at the same point, and follow each other closely. Like so.

art 2 (1280x854)

3. Add more spaghetti in a different direction, and connecting to the noodles you already drew.

art 3 (1280x854)

4. Keep adding more spaghetti in all different directions until you fill the whole mountain ridge.

art 4 (1280x854)

5. Now for the ridge behind it. Use a slightly thinner pen to show perspective, because things (like spaghetti) look smaller when farther away.

art 5 (1280x854)

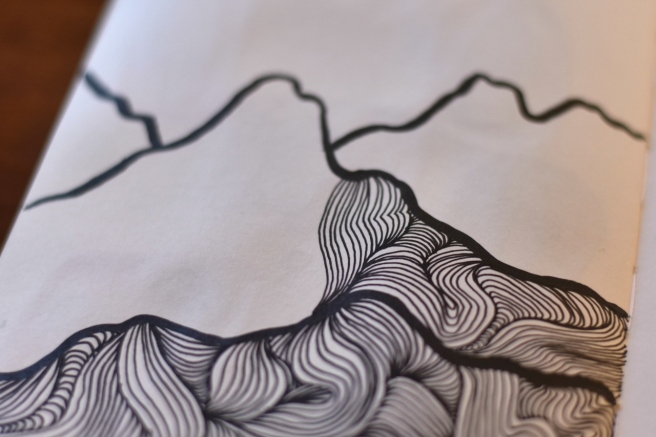
6. Keep it up! After you finish that ridge, move onto the one behind, using a thinner pen each time and making the lines close together. Doesn’t it look so neat thus far?

art 6 (1280x1280)

7. Add a sun behind the last ridge. I left a white space, but you wouldn’t have to. 😉

art 7 (1280x854)

8. Next we’re going to make the “rays” of the sun. Using your thickest pen, fill in the space above the sun with rows of dots or ovals.

art 8 (1280x854)

9. Make the dots in each new row bigger than the last…

art 9 (1280x854)

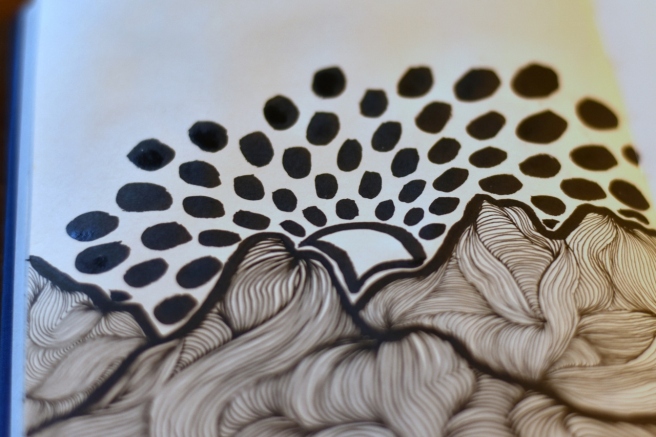
10. Ta-daa! You’ve filled the whole page!

art 10 (1280x956)

11. You can definitely leave it like that, but I added a bit more embellishment with a white gel pen. First I colored in the sun black, (weird, I’ve never seen a black sun before, have you? XD), and then rimmed it with dainty white dots.

art 11 (1280x854)

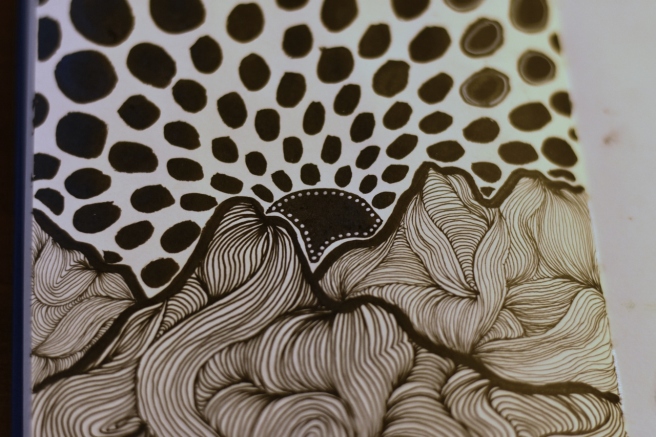
12. And lastly, I added some white circles to the black dots, just to break things up a bit.

art 12 (1280x854)

13. Ta-daa! You’re finished!

art 13 (856x1280)

What do you think? I think… strange but neat. 🙂 I hope you get a chance to try this, because it’s quite fun and I love the end result.

Thanks for reading, dears! Now go make some art. 😉 Oh, and if you DO make art inspired by this post, we’d love to see it! Check out this page to see how you can help us fill our gallery.

Have a great day, guys! I hope I haven’t made you too hungry… XD

***Allison***

The Art Lab, Episode 34: Watercolor Art

Heyyyyy, guys, and welcome back to Art Lab! Today I’m going to show you three super simple and fun techniques for creating art with watercolors. These ideas are great for art-starters, warm-ups, or even as finished pieces. I used ATCs for my canvas, but you can use whatever paper you like (though watercolor paper works the best, if you have it). Also note that you can use watered-down acrylic paint instead of watercolors if you need too.

Alright, let’s do the easiest (and perhaps most fun) first. 🙂

Technique #1: Magic Islands

I discovered this one by accident and I just LOVE doing it!

1. Lay down some plastic wrap and drop some water in one corner. Dip your wet paintbrush in watercolor and mix it into the water.

art 1 (1280x887)

2. Load up your brush with the diluted paint and splatter it onto the plastic wrap.

art 2 (1280x936)

3. Lay a paper of some sort on top and smooth it out, then pick it up (obviously 😛 ).

art 4 (1280x853)

4. Wait for the paint to dry, then trace around the splotches with pen.

art 5 (1280x859)

5. And you’re done!

art 6 (1280x854)

I think this technique looks like islands, don’t you? This would be a fun way to make a map:

art 7 (1280x948)

Technique #2: Bubble Maze

This technique produces a fun and striking result. The translucence of the watercolor lets you see the colors overlap which makes a really neat effect.

1. Start by painting some dots. Overlap them and attach them to other circles so that the colors bleed into each other.

art 11 (1280x847)

2. Continue adding dots of different colors until the page is mostly filled.

art 12 (1280x884)

3. Fill in the white areas with black Sharpie or pen. And you’re done!

art 13 (1280x853)

Technique #3: Splatter Trees

This is a great way to give the impression of leaves without drawing ever single leaf.

1. Splatter different complementary colors (I used fall colors, but you can use whatever you wish) onto your paper. Try to keep it roughly in a tree shape, but don’t worry if the splatters get a little out of control.

art 8 (1280x954)

2. After the foliage is dry, use a slightly damp brush and brown paint to add in some branches and a trunk. Don’t draw all the branches the tree has, just a few poking out for effect. 😉

art 9 (1280x892)

3. Add some grass and a few dots of fall color if you’re doing an autumn tree. And you’re done!

art 10 (1280x853)

And there you go! Three fun and simple ways to make some watercolor art.

art 14 (1280x853)

Which technique was your favorite? If you make art inspired by this post, we’d love to see it! Click here to learn how to help us fill our art gallery!

***Allison***

P. S. Hannah and Buttercup have joined the Art Lab team! Thank you so much, girls. ♥ Check out their first posts on the Art Lab blog and drop them a comment! 😀