
As you might already know, I l♥ve making things out of polymer clay. I especially like making miniatures, whether it be a little snowy owlet or miniature doughnuts like I’m going to show you today! (The links will take you to my Etsy shop listings.) I’m also going to give you a tour of my clay “studio” that I share with my sister.
First, the doughnuts. The basic doughnut is super simple to make, and then, of course, you get to embellish it – yay! 🙂
- Mix it. Unless you already have the perfect doughnut colored clay, you’re going to need to mix up a batch of doughnut batter. I think I used white, dark brown, light brown, orange, and red clay for my mix.
- Cut it. If you are making more than one doughnut, you’ll want them all to be the same size. I first rolled my “batter” through a pasta machine on the thickest setting, then folded that sheet in half to make it even thicker. I used a mini-Sharpie lid to cut circles out of the dough. Don’t worry about making the circles pretty – we’ll work on that in the next step.

- Shape it. This step is easy. Roll the circles into smooth balls and press down lightly with your finger to make nice rounded cakes.

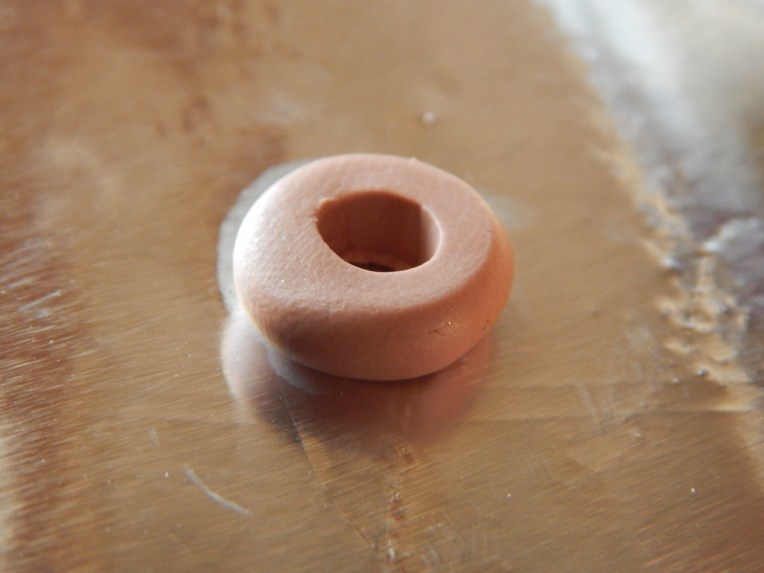
- Hole it. I cut a hole in the middle of my doughnuts with a straw, although if your doughnuts are a different size, you may need to use something else. Make sure the hole is in the middle, or the doughnut will look lopsided… kind of like the doughnut below. 😀
- Decorate it! Yay, the fun part! You can add glaze, sprinkles, chocolate covered sardines, whatever you want. (Although if you offered me the last kind, I think I would pass. XD) Here some of the 36 doughnuts that I made. Yes I made every single sprinkle on those doughnuts by hand. And yes, it took a while. I glazed some most of the icing with a gloss glaze that makes it look much more realistic. XD Go here to see my Etsy listing of these doughnuts with a picture of each flavor.


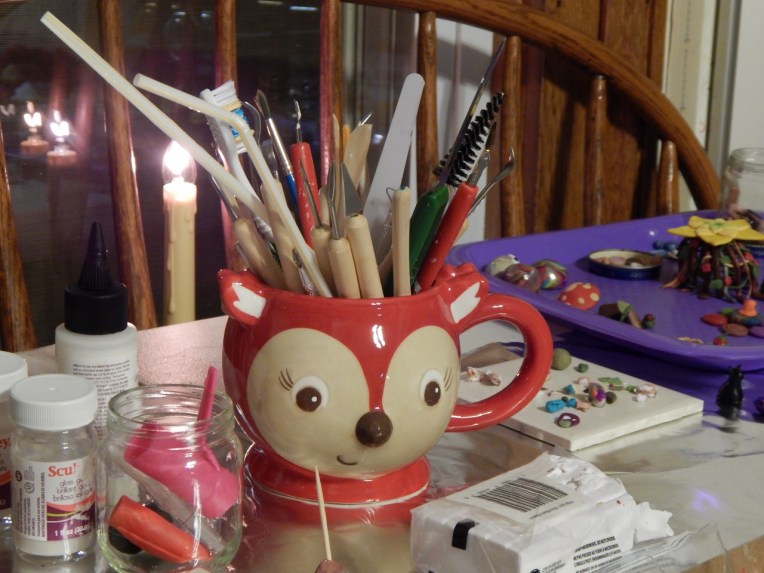
And now the clay studio! I set up a table in our school room, covered part of it with tinfoil, and arranged all of our clay stuff neatly on top. It’s really nice to have a designated place to work with clay. (Click here to see my sister’s version of this tour.) The anatomy of a clay table:


And thus ends my tiny tour. 🙂 I hope you enjoyed this clay-y post!
***Allison***


Those are so cool, Allison!:D
LikeLike
Thank you! 😀
LikeLiked by 1 person
These are adorable! How did you make the white ones look like they have powdered sugar?
LikeLike
Thank you! I rolled the doughnut batter into a ball, covered it with a thin piece of white clay, made it into the basic doughnut, and textured the white clay with a toothbrush. Wow, that was long! 😀
LikeLike
Or, you can scrape the tip of a white color pencil to make white powder (to have a somewhat melty powdered sugar look)…or use chalk pastels 🙂 learned that somewhere hehehe try it 😉
LikeLike
That’s really neat! Thanks for the tip! 🙂
LikeLike
Good tip, Allison, I’ll try your trick, too 😉 thanks!
LikeLike
OHH! I love your tutorial! 🙂 And the finished doughnut photos are amazing. 😀
LikeLiked by 1 person
Thank you and thank you again! 😀
LikeLiked by 1 person
I Need to show this to my little sis!
LikeLike
Aww! 😀
LikeLike
You are really good with clay! The donuts look super delicious!
-Catlover02
LikeLike
Aww, thanks! I really enjoy it. 🙂
LikeLike
ERMEGERDNESS! Those things are adorable. Man, if I had to money, I would totally buy a set. But, unfortunately, I do not have that money to spare. 😢
Loved the photos! 🙂
~ Suzy
LikeLike
Aww, I’m really glad you liked it! Ha ha! That’s just fine. XD
LikeLiked by 1 person
*Licks lips* If only I could go to the doughnut shop right now……..
XD I WANT DOUGHNUTS!!!! EEE! They look SO SO REAL!!! HOW do you DO that!?!?! 😀 They’re SO great! XD
LikeLike
Thanks so much, K. A.!
LikeLiked by 1 person
Hehe! You’re welcome!
LikeLike
Oh my goodness! Those are SO amazing! Now I’m hungry. XD You are very talented!
-Clara ❤
LikeLike
Thank you so much, Clara! Hee hee! I’m glad you liked them. 🙂
LikeLiked by 1 person
You’re welcome! 😉
-Clara ❤
LikeLike
Your so great at making stuff. So adorable 🙂
LikeLike
Thank you so much, Rebekah!
LikeLike
Your welcome😊
LikeLike
Awesome tutorial 🙂 your donuts look so real! looks yummy hahaha
and thanks for the tour 🙂 haven’t thought about covering the table with aluminum foil…hmm…I’ll try that too hehehehe
LikeLike
Thank you! And thanks for commenting!
LikeLike
Awesome tutorial Allison!
LikeLike
Why thank you! ♥
LikeLike
😁
LikeLike
Great things over the tiny little things
LikeLike
Thank you! 😀
LikeLike
Super cute donuts Allison!!
LikeLike
Thanks so much! 😀
LikeLike