The Amazing Chicken Egg

School starts for us this week, only it didn’t really start: we don’t have much time for school, because we have to gather eggs. 😦 We recently got a new flock of chickens for our chicken houses, and we have to weigh almost every egg they lay.  And there are thousands of eggs per day.  I’m not kidding.  We have about 24,000 chickens right now and we have to gather about 16,000 eggs a day.  That’s A LOT OF EGGS!  And it takes A VERY LONG TIME to pick them each off of the conveyor belt, weigh the ones that might be too heavy or too light, and put them in egg flats.  Thankfully our family only has to do it for about 3 hours a day, because we aren’t the only ones working there.  (Speaking of family, my sister Megan made a post about the actual chicken houses and chickens over on her blog.  See it here.)

Anyway… during all those hours we find some pretty strange chicken eggs.  I’ll bet you never even knew that chickens could lay eggs like the ones I’m gonna show you, but I assure you, they do.  All of these eggs were found in one of our 3 chicken houses, from the same breed of boring ‘ol white chickens.  Shall we begin the science lesson for today?

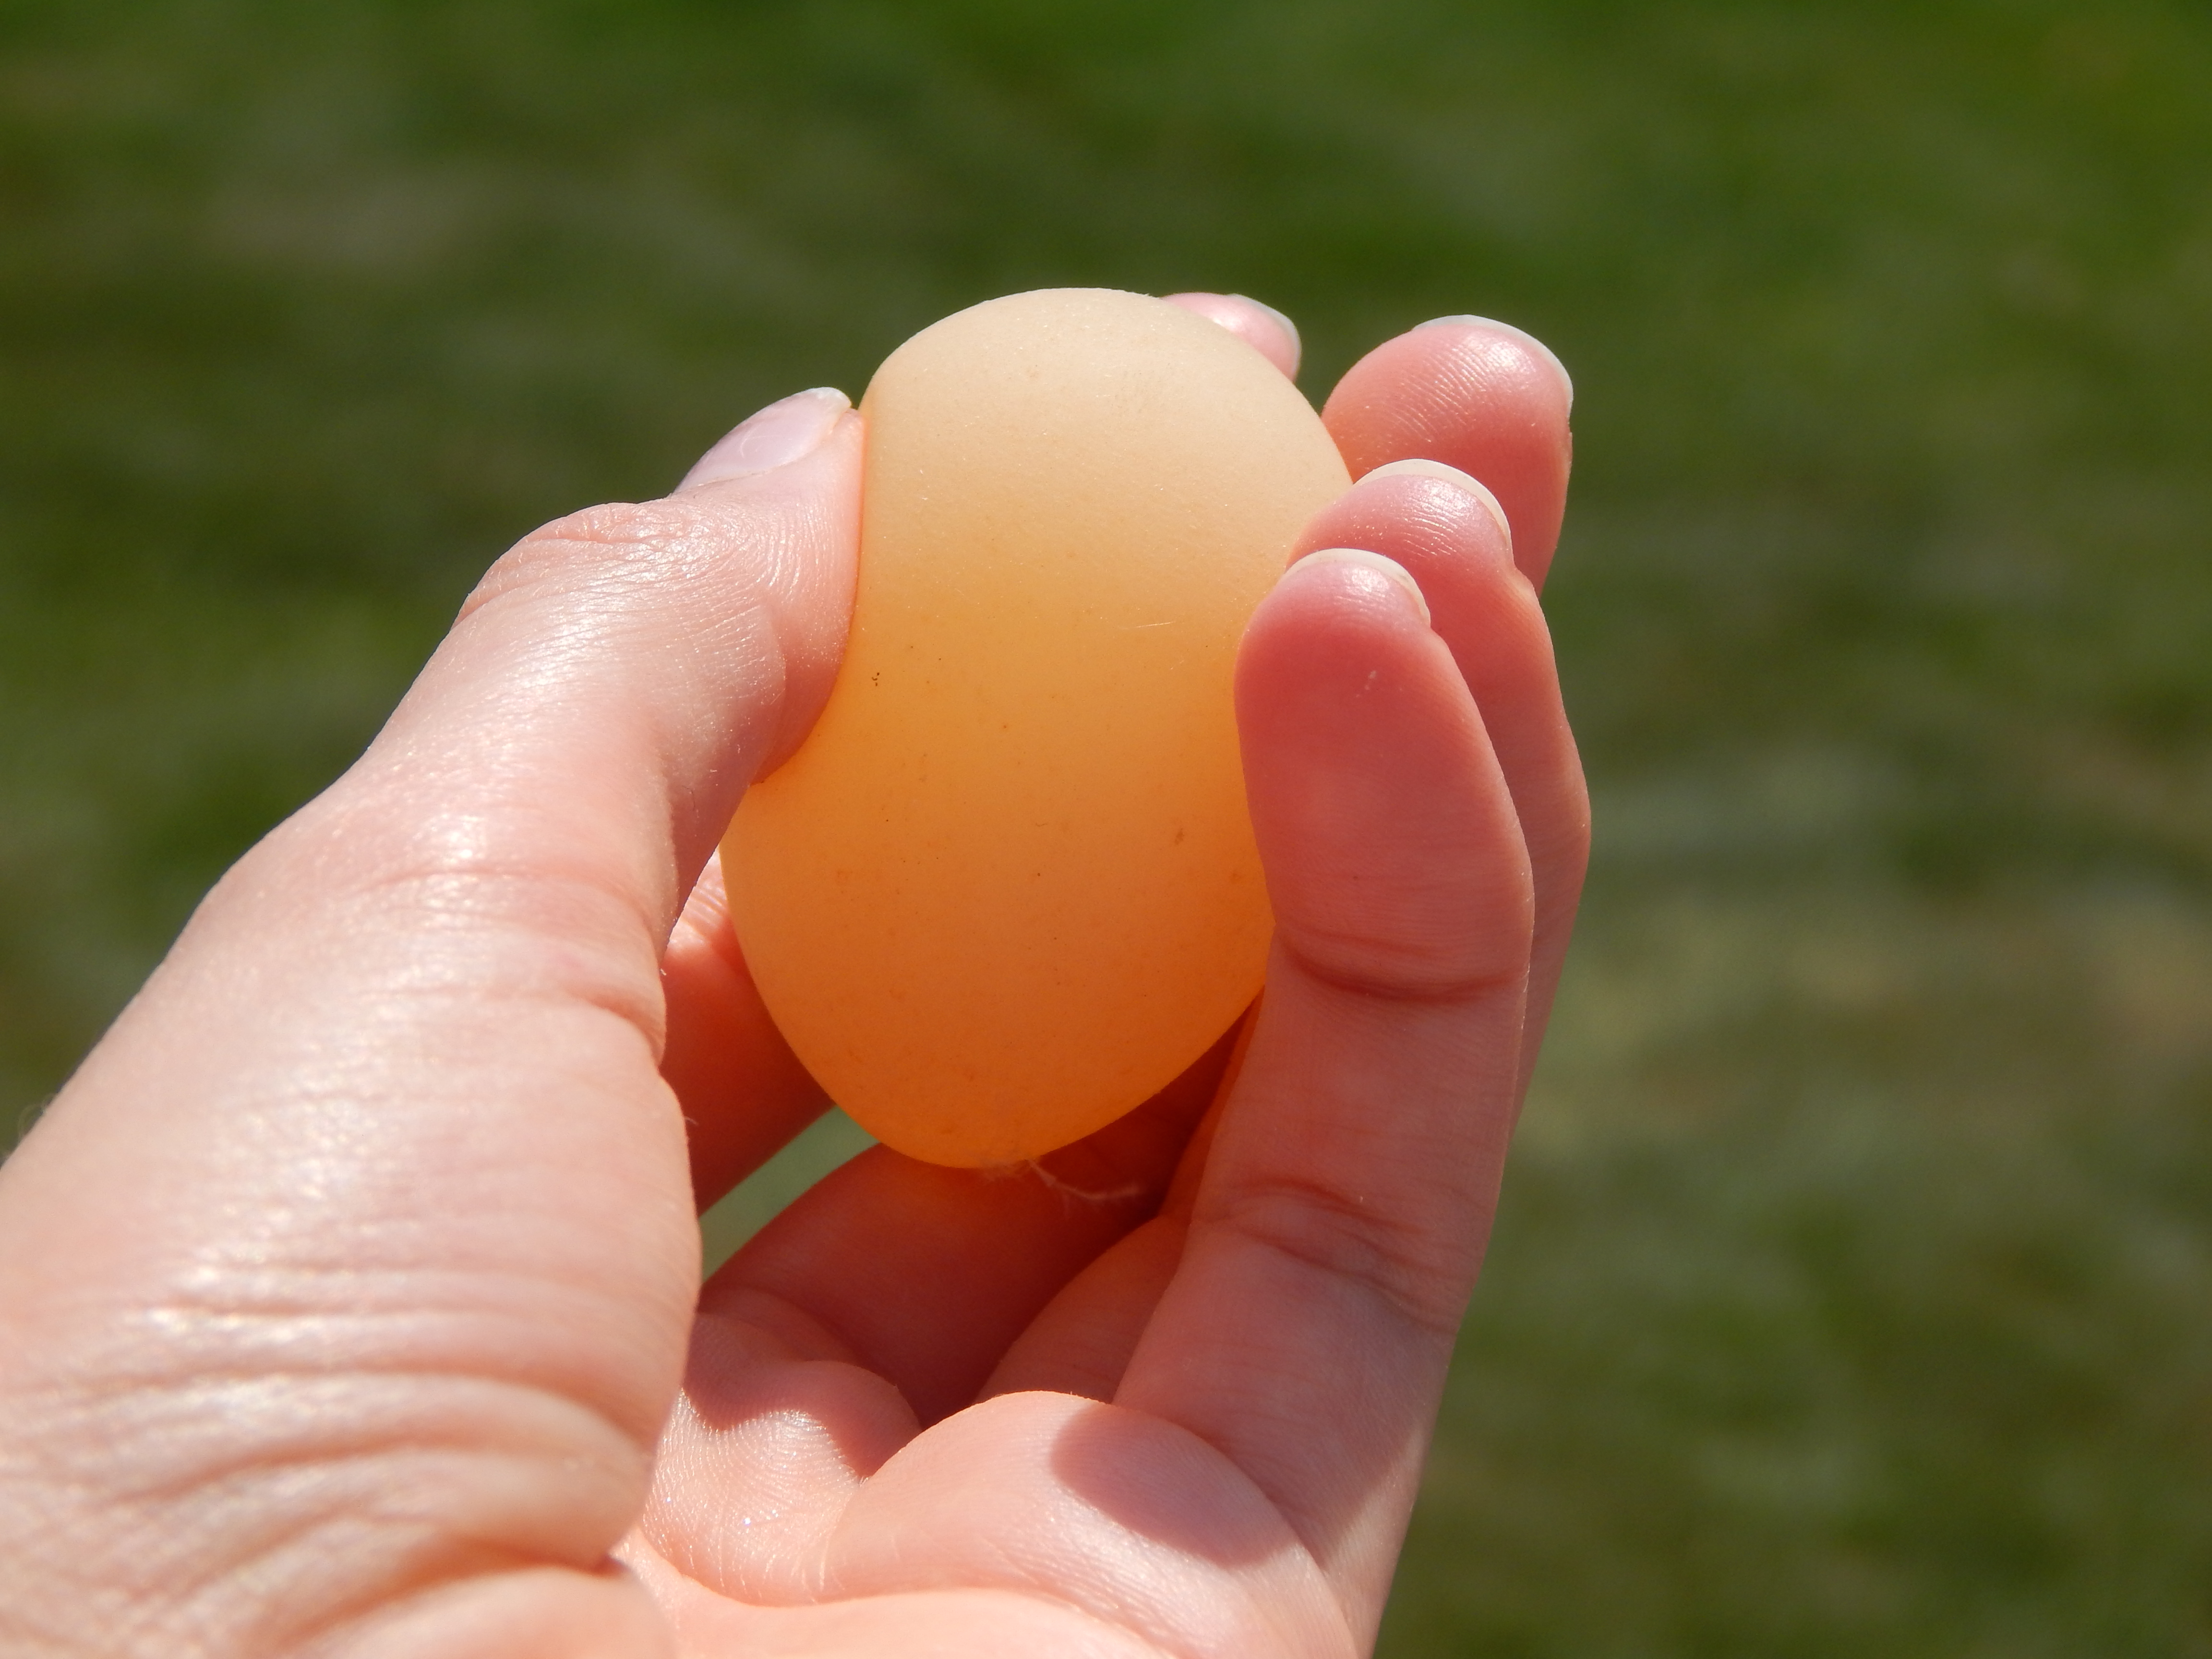
Let’s start with size.  There are big eggs, and there are small eggs.  And then there are HUGE eggs and tiny eggs.  Here are the two latter sizes together for comparison.

-Allison(eggs) 001

The big ‘ol guy weighed in at a hefty 4 oz.  (The eggs you buy at the store are about 2 oz.)  The tiny egg is only 0.2 oz.!

Now for shape.  Some eggs are almost round, some are pointy.  Some eggs are short, and some are long.  Here’s a long one.

-Allison(eggs) 004

Eggshells are also different textures.  There are a few wrinkly ones, a few warty ones, but mainly smooth ones.  There are mostly hard-shelled eggs, but once in awhile we get a softshell one (or two).

-Allison(Megan's B-day Party) 034 -Allison(Megan's B-day Party) 035

Another strange one:

-Allison(eggs) 003

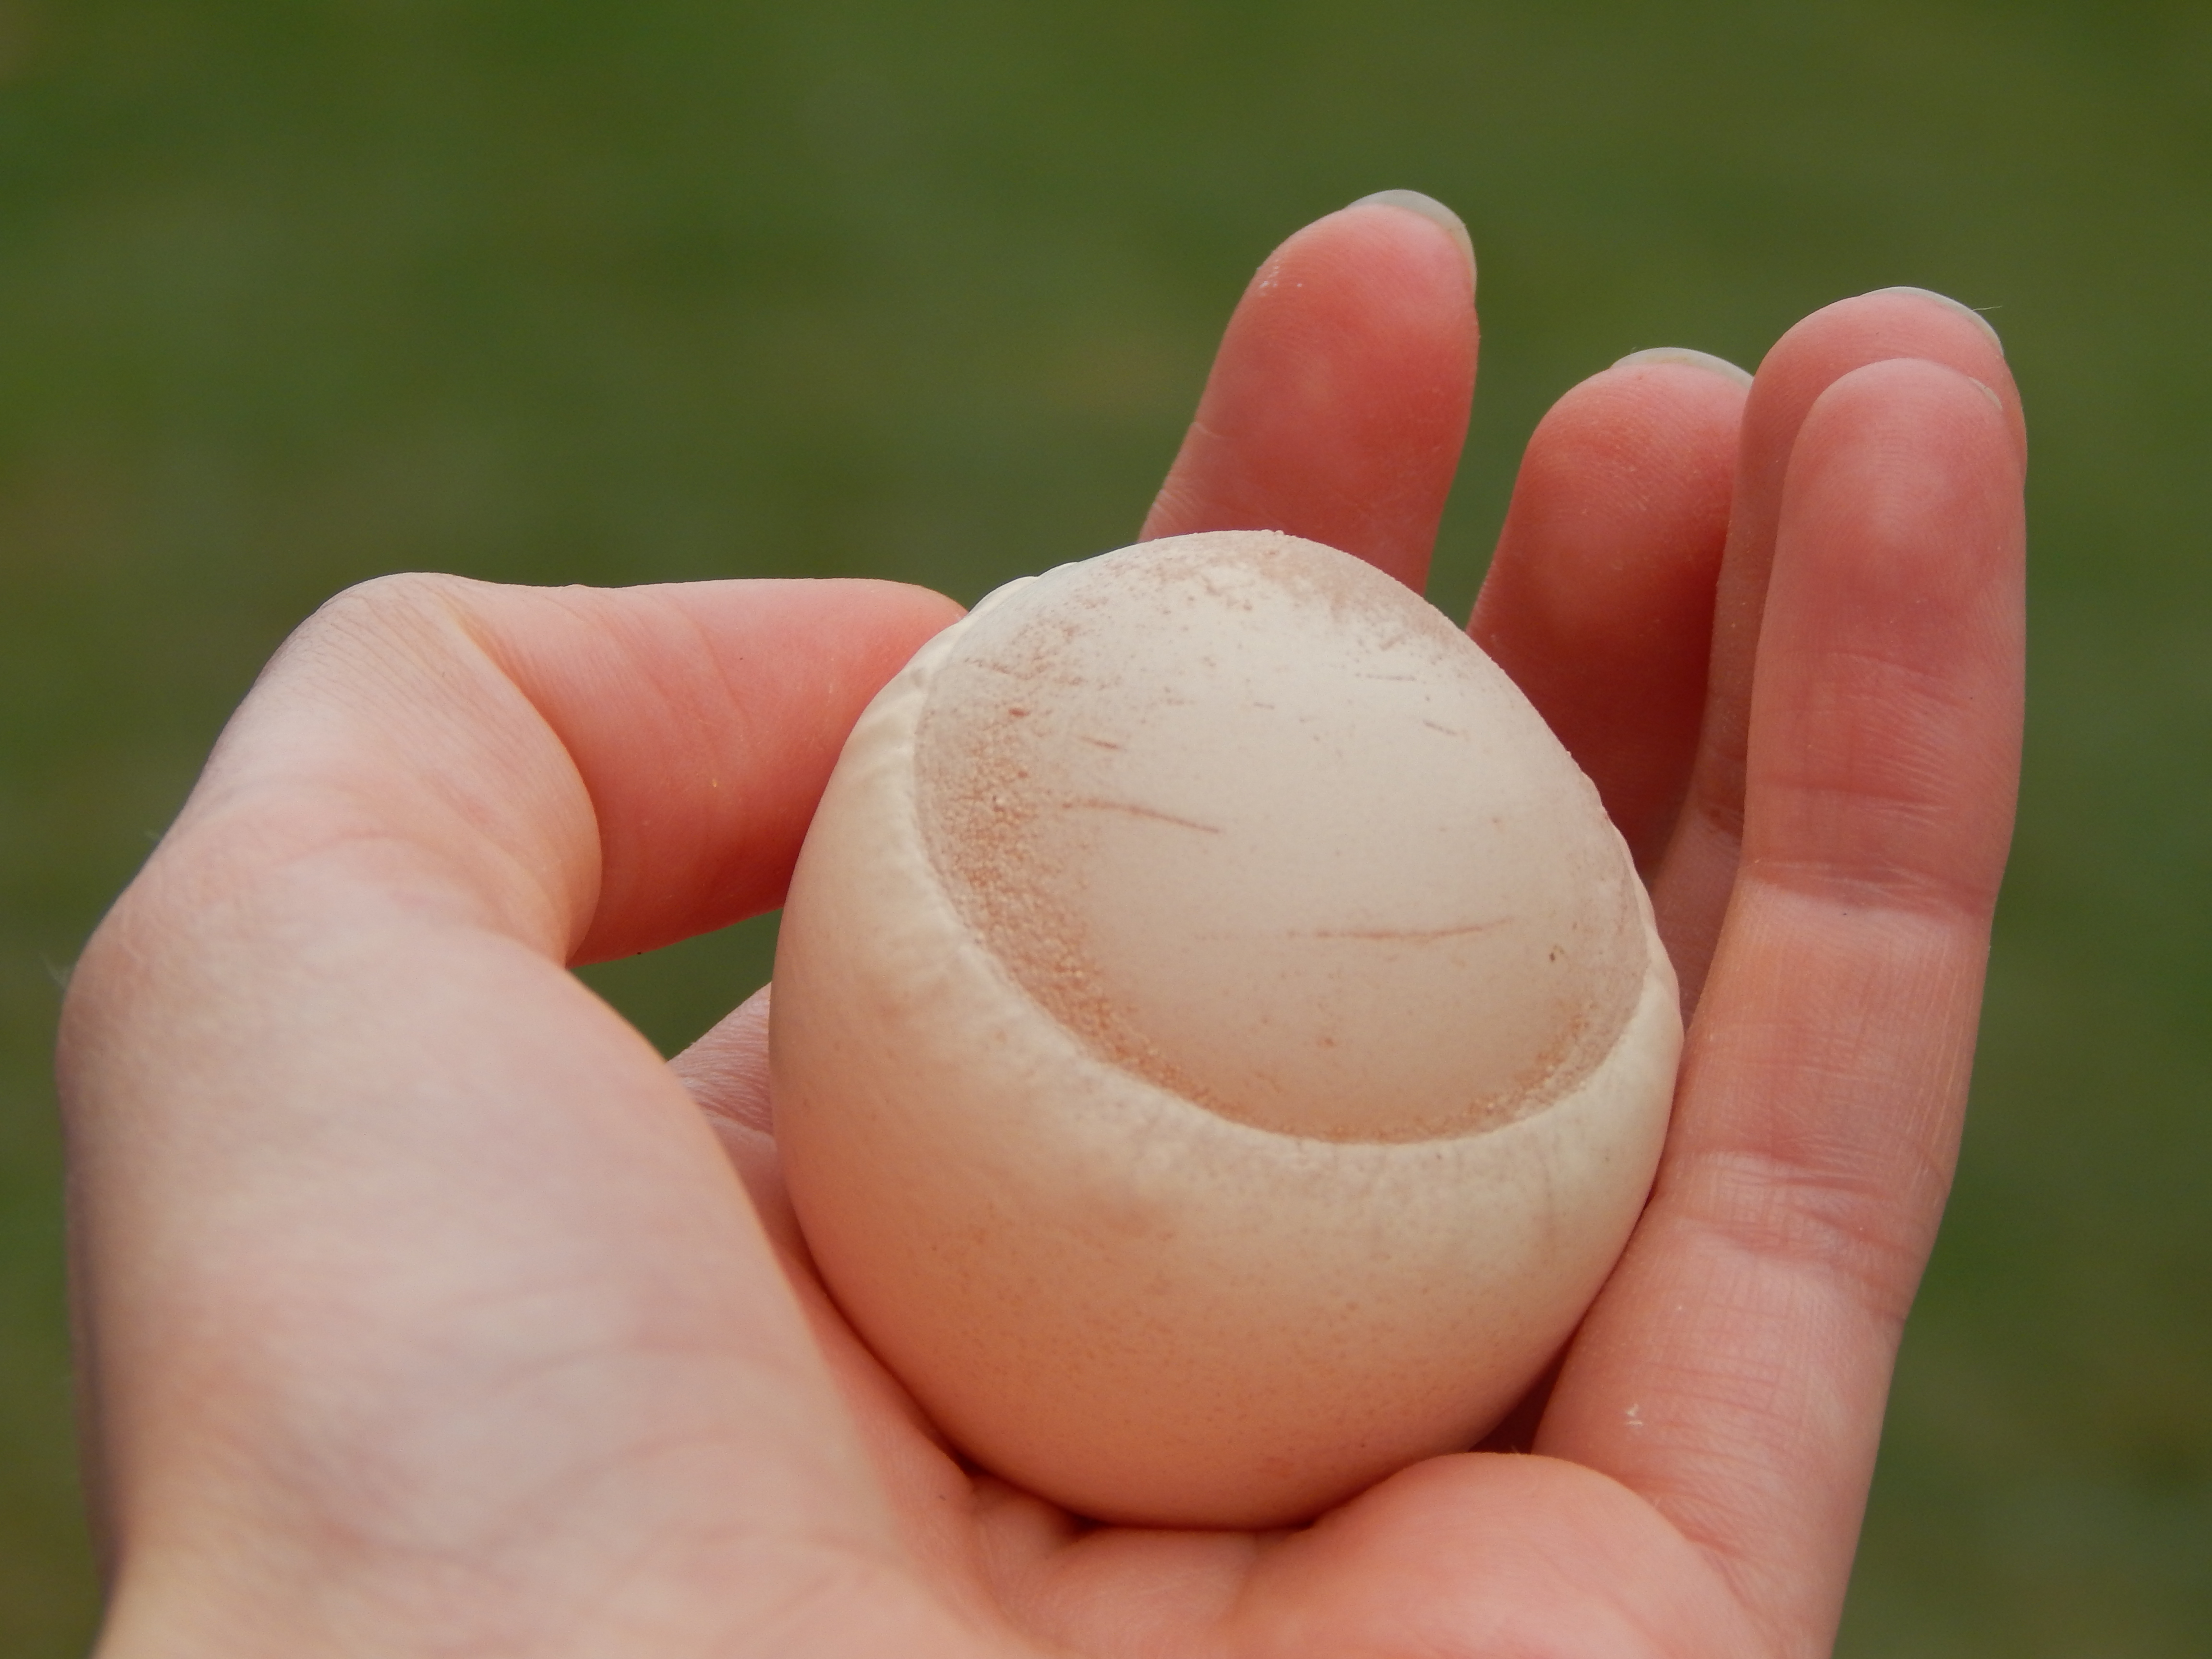
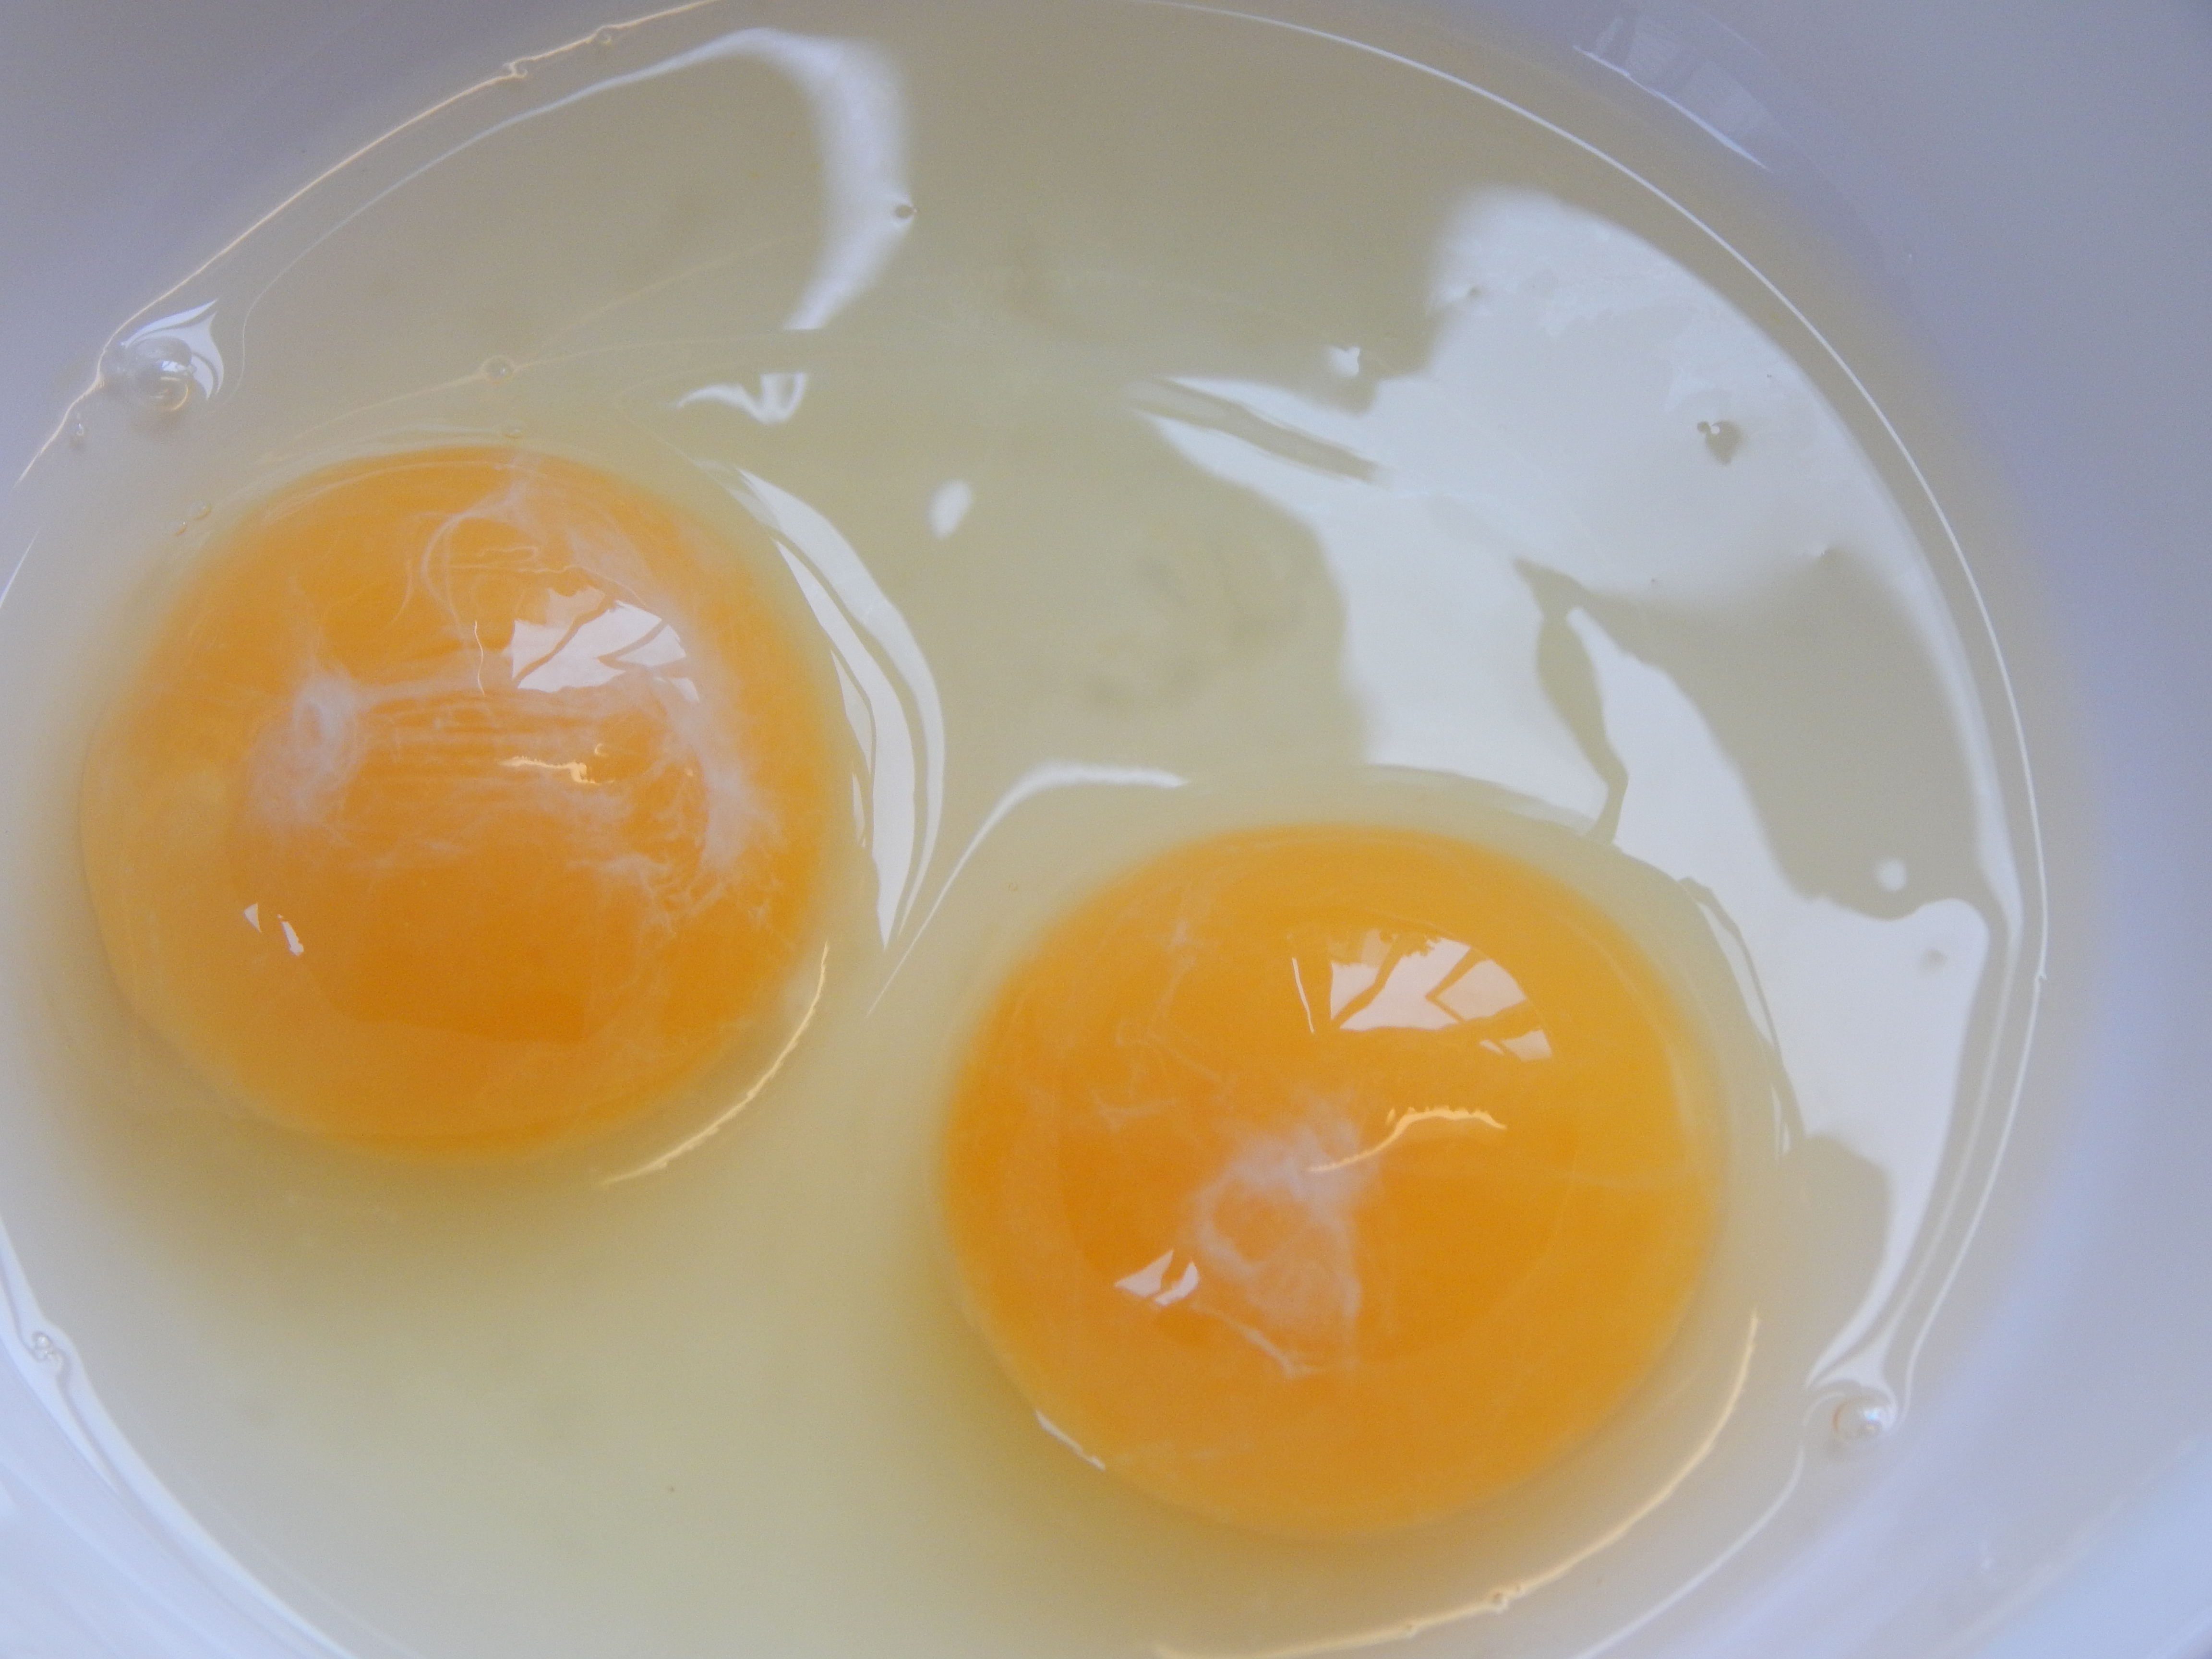
Not only are the eggs strange on the outside, but they can also be strange on the inside.  Remember the huge egg in the first picture?  This is what was inside it:

-Allison(eggs) 002

two yolks and a tiny softshell egg!  I have never seen this before.  Two yolks are pretty common – we call eggs with two yolks “doubles,” and those are mostly the eggs we eat.  (Sometimes this is problem, like when you make a recipe that calls for 3 eggs.  Uhhh, one and a half doubles? ☺)  But I have never seen an egg with two yolks AND a softshell!

Here is a picture of what’s inside a double.

-Allison(eggs) 006

Pretty boring, right?  But here is an egg I found already cracked open on the belt:

-Allison(Megan's B-day Party) 033

A softshell with another softshell inside it!

And last but not least, we have the triple.  A fairly rare egg that has – can you guess? – three yolks.

-Allison(eggs) 005

The list could go on and on, but those are the only kinds I took pictures of, so I guess I’ll stop there. 🙂

So are you surprised or what?  It’s astounding what diversity there is in one kind of chicken egg, let alone in the whole world.  What an amazing God it took to create everything!

***Allison***

Woodland Birthday Party

My sister Megan’s birthday was yesterday!  She chose to have a woodland themed party with hedgehogs as the “life of the party.” (Hee-hee!)  I thought I’d go through the decorations for the party and how we made a few of them.  (Megan didn’t especially want to do all the decorations, so I got to make most of them – hooray!)

The colors of the theme were green and brown.  For the decorations, I hung up twirled green and brown streamers and green balloons.

-Allison(Megan's B-day Party) 052

I also drew and cut out some forest floor type things like toadstools, grasses, and pebbles.  It would have been better to make the toadstools out of red paper, but we didn’t have any. 🙂

097

Meet Mr. Hedgehog, the gift guy.  I designed him; Megan painted him.  Megan also had the great idea to use him to show the guests where to put gifts.

-Allison(Megan's B-day Party) 053

The table was really fun to decorate.  We got the tablecloth, plates, napkins, and cups at Party City (which was FUN, by the way!).  My mom made the cute cake, I made the hedgehogs, and Megan made the labels for the “Dew Drops” (water) and “Twigs” (pretzel sticks).  I found the ideas for twigs, dew drops (which was originally named “Morning Dew”), and hedgehogs from Pinterest.

-Allison(Megan's B-day Party) 054

-Allison(Megan's B-day Party) 055

-Allison(Megan's B-day Party) 056

Here’s a tutorial on how to make this cute little hedgehog for snacking on. (Poor guy!)

-Allison(Megan's B-day Party) 051

For one hedgehog you will need

**************************************

A pear

Whole, black olives

Grapes

Toothpicks

Whole cloves

**************************************

First, peel the top of the pear for the hedgehog’s head.

-Allison(Megan's B-day Party) 046

You can try sticking a whole olive on the tip of the pear, but it worked best for me to cut the olive in half.

-Allison(Megan's B-day Party) 047

Stick two whole cloves above the nose for eyes.

-Allison(Megan's B-day Party) 048

Now make him prickly!  Skewer a grape onto a toothpick, then stick the toothpick into the unpeeled part of the pear.  I put the skewered grapes on in rows.  I started with a row next to the head, then progressed all the way back to give him the proper rounded shape.

-Allison(Megan's B-day Party) 051

Such a prickly little guy!

Now for the party favors.  I like to make things out of polymer clay, so I made clay hedgehogs for favors, along with little bags to put them in.  At the end of the party, the guests each got to “adopt a hedgehog.”

-Allison(Megan's B-day Party) 001

-Allison(Megan's B-day Party) 003 -Allison(Megan's B-day Party) 004

So there are a few ideas for a woodland party.  I hope I’ve given you some inspiration!  (And thanks for letting me decorate for you Megan!)

***Allison***

The “Favorite Meals” Planner

Sounds exciting, right?  A meal planner!  Wahoo!  Ok, maybe not so much.  But this isn’t just your ordinary meal planner, it’s a way to keep track of your family’s favorite recipes, see how you modified the recipe, where it came from, and more, all at a glance.  Let’s take a looksee, shall we?

DSCN7580

Let’s use the chocolate pudding page for an example.  (The pudding is delicious, by the way!)  At the top we have the title of the recipe, then we have a dot with the category of the recipe (whether it is a main dish, side, dessert, etc.).  The little book symbol shows where to find the actual recipe, whether it’s from your stash of 50 cookbooks, or collected from the internet.  The little hearts show you how much your family likes the recipe – a little or a lot!  My family rated the chocolate pudding 5 stars, er hearts.  I told you it was good!  The little wavy line underneath the hearts is where you’re supposed to write the date you first made it, but, uh, I couldn’t remember, so I just wrote a little wavy line. 🙂  Next we come to the notes section.  This is where you write down any changes you made to the recipe, the best way to serve it, etc.  And we’re finished with the tour!  Here’s an example page just in case you didn’t catch everything.

DSCN7581

Happy planning!

***Allison***

Tutorial: Personalized Name Photo Card

Today I will show you how to make a name-letter-photography-accordion-card-thingy.  Umm, let’s try that again.  Today I will show you how to make a personalized name photo card.  Much better.  See, it’s this neat card that you accordion-fold, then paste pictures of letters onto it so… *sigh* this isn’t going too well.  I guess I’ll have to show you a picture.

-Allison(name picture card, game) 006

Ahh, there we go.  That is what we’ll be making today.  If you want to make another name or word besides “Grandaddy,” you may have to fold and assemble more or accordion folds, depending on the number of letters in the word.  As you can see, “grandaddy” has nine letters (I know right, I can count all the way up to nine!) so I needed nine blank rectangular sections of paper – one for each letter.

Let’s get started!

You will need:

Paper – if you have any long, stiff paper like brown craft paper or thick wrapping paper, you could use that, but I will show you how to make this out of just plain cardstock.

• A camera

• A printer (or some method of getting your photos on paper)

Scissors or a papercutter

Tape or a glue stick

Colored pencils, markers, etc. if you want to decorate or write on the front of the card

Now then, here’s how to make it.

  1. Take pictures of things that look like letters.  I found my “n” on an inside wall of a barn, the “a” from the lower half of a pair of vicegrips, and the “g” from a bungee cord.  For some of the letters I used a beach towel for the background.  (Please don’t use my actual pictures, but I certainly don’t mind if you use them for inspiration.  If you have any questions, feel free to ask me in the comments.)
  2. Turn the pictures black and white. Black and white or sepia tones just make the pictures more uniform, and lets you focus on the letter instead of the background.  I turned mine black and white on my camera, but you can use a photo editing program if you want.
  3. Print and cut out your pictures.  I pasted my pictures onto a Microsoft Word document.  Then for each picture I right clicked on the photo, clicked “size and position” on the pop-up, changed the height to 2 inches, and pressed enter.  And hopefully you already know how to cut out pictures.-Allison(name picture card, game) 001
  4. Prepare your card.  For this step I cut a sheet of cardstock into 3 equal pieces, and accordion folded each piece into 3 equal sections, with a little extra tab on the end.-Allison(name picture card, game) 002
  5. Assemble your card.  Put tape on the little tab at the end of two of the accordion folded sections, and cut the tab off of the last one.  Use the taped tabs to connect all of the folded sections into one long piece.  Now tape or glue the letter pictures onto each blank rectangle on one side of the paper strip.
  6. Decorate your card.  Using whatever materials you wish, decorate the other side of the card.  The front of the card, the part that you see when you fold it up, will be on the back of the first letter (in my case on the back of the “g”).-Allison(name picture card, game) 005
  7. Put on the finishing touches!  Fold the card so the message is the first thing you see (like in the picture above), with all the letters following in order when you open it up.  And you’re done!

-Allison(name picture card, game) 007 -Allison(name picture card, game) 006

This is a great gift for anyone, and you could even do the words of a bible verse, random words like “family,” “I love my cat Snuffles,” whatever!  It would also be neat to take pictures for all the letters in the alphabet (which would be super hard) and leave the letter that begins your name colored instead of black and white.  Have fun with this!

***Allison***

Cuteness Overload!

I finally got around to posting some very exciting (and cute!) news – I got ANOTHER BUNNY!  Yes, I know I already have two bunnies, but I saw this little gal at the fair and I just couldn’t resist.  How could you resist such sweet fluffiness?  I named her Willow.  And here is her profile:

Breed: Mixed Breed (3/4 Jersey Wooly, 1/4 Mini Lop)

Color: Charcoal

Name: Willow

Gender: Female

Age when bought: ???? Maybe about 2 months?

Unfortunately, Honeybunny despises Willow, and she kept nipping her, so I had to pen Honeybunny up in a cage all by herself.  😦  And now Honeybunny is really mean to all of the other bunnies, so I am going to sell her.  She really isn’t that bad when you hold her, she just does not do well with other rabbits.

This must be the time to buy bunnies, because my friend and her mom each got a Holland Lop Rabbit.  SO CUTE!  Don’t worry, I took pictures of them too. ☺   Now enough of me talking, let’s get to the pictures!

*********************************************************************************************************************************

♥♥♥ Willow ♥♥♥

She is absolutely adorable, and easy to hold.  Unfortunately my camera doesn’t take superb pictures of her, maybe because it has a hard time focusing on all the black fluffiness.  At least you can enjoy what’s here, but trust me, she is better in real life!

-Allison(Willow) 003 (1280x960)

-Allison(Willow) 006 (1280x960)

-Allison(Willow) 007 (1280x960)

DSCN7522 (1280x960)

DSCN7523 (1280x960)

DSCN7526 (1280x960)

DSCN7527 (1280x960)

DSCN7531 (1280x960)

DSCN7542 (1280x960)


And now for Snickers and Yoshi (they’re both boys by the way), my friends’ bunnies.  I took these pictures with my dad’s phone which has a really good camera.

~•~•~Snickers~•~•~

IMG_20150823_194821868 (1280x720)


IMG_20150823_194858690 (1280x720)

IMG_20150823_194916973 (1280x720)

IMG_20150823_195628578 (1280x720)

IMG_20150823_195843671 (1280x720)

IMG_20150823_200127031 (1280x720)


►◄►◄Yoshi►◄►◄ (I didn’t get as many pictures of him because he was mostly in hiding. ☺)

IMG_20150823_195140974 (1280x720)

IMG_20150823_200040047 (1280x720)


And here they are snuggling together.

IMG_20150823_194713220 (1280x720)


I might make a slideshow of these pictures and put them on my YouTube channel.   Are you overloaded with cuteness yet?

***Allison***

P.S.  This is my 100th post!  Hooray!

Make Your Own Game! Part 2: Spinners, Spaces and Cards

(See the first installment in this series here.)  Today we’ll look at some ideas for the spaces on the board, as well as cards and spinners for your game.  Definitely change the symbols and graphics if you want to, and uh… be sure to make your spaces and board neater than I did here! ☺

*******************************************************************

This is a fun little space I call a “spring space.”  When you land on it, you get to move your playing piece ahead to the next spring space.

-Allison(name picture card, game) 008If your board game has cards, you can make spaces where you pick up a card when you land there.  Just draw a square with the graphic on the back of your cards inside it.  (You’ll probably want to make a more interesting graphic than my boring ol’ “T.” ☻)

-Allison(name picture card, game) 010It’s fun to have money, coins, or tokens in a board game.  They can be the point of the game (whoever gets the most by the end of the game wins), you can buy something with them to help you, whatever!  You can have a specific way to earn coins, or have coin spaces on the board.

-Allison(name picture card, game) 013

A board game can’t have only good spaces – it needs some suspense!  One “bad” space is a go-backwards space.  Write how many spaces you’re supposed to go back on top of an arrow pointing backwards.

-Allison(name picture card, game) 009

A really exciting space is the shortcut.  The shortcut spaces (there are two) are where you find out if you can use the shortcut or not.  On the first space, write the numbers 1, 2, and 3, and on the other one, 4, 5, and 6.  When a player lands on a shortcut space, they must roll the dice.  If they roll any of the numbers shown on the space, they get to use the shortcut, but if they don’t, too bad for them.  Sometimes using a shortcut is bad, because if you land on the space at the far end of the shortcut and you have to use it, the shortcut takes you backward.

You can either have the player jump to the other end of the shortcut all at once, or divide it into spaces so that they still have to roll their way across.

-Allison(name picture card, game) 012 -Allison(name picture card, game) 011

A few more spaces I didn’t draw here:

Roll again

Pit (which makes you lose something like a coin or a turn.)

Now for cards.  I can’t really help you much here, because the kind of cards you make really depends on your game.  They could make you answer a question or do a certain thing in order to move ahead on the board, they could be superpowers to help you, they could be anything!  But as for making the actual cards, I think the best way is to either cut them out of cardstock with a paper cutter, or print them onto cardstock from your computer.  The nice thing about printing them is that you can design a nice graphic that will look the same on all of your cards.

You can make a spinner by printing out a pie graph divided evenly into the number of spaces you need, and pasting it cardboard.  An alternative to printing a spinner is drawing one.  Cut a square piece of cardboard and divide it evenly into the number of spaces you need.  Trace a circle onto the square, and cut it out.  For the spinner, cut a rectangle that comes to a point like an arrow at the end from cardboard.  Punch hole in the middle of the arrow and the spinner-board.  Put a brass-brad through the hole, but be sure to leave some room between the head of the brad and the arrow.

****************************************************************

Whew, that was a long post!  Hopefully it helps if you ever want to make your own game.

***Allison***


Vacation!

We are just home from a wonderful vacation at the beach.  Well, it was partly at the beach – first we drove down, sightseeing on the way, then we stopped at the beach with our friends for a couple of days, and then we drove home.  Of course I took my camera, but… IT STOPPED WORKING because first my brother accidentally dumped it onto the sand because he didn’t know I had put it in a towel, and then it got splashed with water. 😦 😦  Thankfully I had already gotten a bunch of pictures, so I can still show you some. (Oh, and I ordered a new camera that is hopefully coming by tomorrow!)

****************************************

On the way down we stopped at Mount Airy, the inspiration for the set of The Andy Griffith Show (which our family loves.)  It wasn’t quite like we expected, and the places were kind of scattered around, but it was neat.

There was an Opie’s candy shop,

DSCN7015

and of course the Mayberry Sherriff’s office and jail.  The jail didn’t look quite like it does in the movie when you went inside, but it looks like you’re actually in the movie when you look at the pictures.

FSCN7031

We also got some delicious ice cream.  My sister and I shared this (huge!) banana split.

DSCN7034

Next we dropped in at our cousin’s new house, where we found a big fat toad.  We also went to look at their farm, but I didn’t bring my camera there.

DSCN7134 DSCN7137

Toad – meet kitten, kitten – meet toad.

DSCN7141

And finally, Amelia Island!  We saw some beautiful marshland there,

DSCN7184

not to mention the many other beautiful spots, like this lake.

DSCN7315

The trees in the Southeast are draped in Spanish moss and sometimes covered in ferns.

DSCN7183 DSCN7174

The beach house was a veritable reptile and amphibian collecting center!  We saw and/or caught green anoles, geckos, toads, tree frogs, and a garter snake.  (The snake, by the way, was in a closet in the house!)

DSCN7241 RSCN7270 DSCN7269

Now for the beach.  (Where, beside the fact that my camera stopped working, I lost my goggles.  But it was really fun anyway!)

The beach there was not crowded at all, there were lots of shells, and the water was WARM, actually WARM!  That’s amazing to me because we have never been to a warm beach, we always go to the northern beaches if we go at all.

DSCN7320 DSCN7322

Some of the shells were coquinas.  We gathered about two cups of them one day, and made some delicious soup with them.

On our way home we didn’t do much sightseeing, but we did stop at Hilton Head.  And that’s it!

Have you ever been to Amelia Island?  What’s your favorite vacation spot?

***Allison***

The View From Below

Hey guys, I’m back from vacation!  (The beach was AMAZING, in case you were wondering.  But more about that in a later post.)

This week, right after we came home from vacation, the fair is going on.  I am entering dear Miss Lily (!!) and my sister Carmen is entering her bunny Diamond.  I am hoping they come home with ribbons!

*********************************************************************************************************************************************

Have you ever wondered what it would feel like to be a blade of grass, or a flower, or a bug looking up at the big world above you?  This is what it might look like to be a dandelion about to get eaten.  What a frightening monster!  Oh wait… it’s just Lily. ☻

DSCN0052

***Allison***