The Art Lab, Episode 23: How to Draw a Realistic Eye

I am so excited to show you guys this episode of Art Lab! As you may know, I absolutely love drawing and photographing eyes, so I thought this would be a fun post to do. 🙂

Art Inspiration:

The inspiration for today is this amazing tutorial (also shown below). The end result seriously looks like a photo, doesn’t it?

The reflection is what I have trouble with...:

AHHHH, I love it! Mine looks more like a drawing and less like a photo, but I’m still quite pleased with how it turned out. 😀

DSC_0627 (800x533).jpg

It was sooo much fun to draw! Today I’m going to show you a few tips and tricks I’ve learned from this and other tutorials and help you avoid some common mistakes. Now I am NOT saying I don’t make mistakes, because I do, and plenty of ’em! When you make a mistake you can’t fix, sometimes you just have to figure out what went wrong and start over. I know you’ve heard this about 2 billion times in your life, but seriously: if you want to get good at something, art included, just keep practicing! Sometimes you have to fail once or several times before you succeed.

Mistake #1: Eyelashes

Eyelashes can be incredibly hard to draw, am I right? They give me a lot of trouble sometimes. But here are some things to keep in mind that might help.

  • Most people’s eyelashes are not perfectly straight and thick like American Girl Doll eyelashes. It’s a sad fact of life, my friends. (Actually, maybe not so sad – that would be kind of creepy. XD ) Look in the mirror: eyelashes cross over each other and are often bunched together in little clusters.eye 11 (1280x853)
  • Lashes aren’t as thick and dark at the top as at the bottom. Press your pencil down hard when you start at the base of the eyelash and not as much as you curve the line upwards.
  • Peoples’ bottom set of eyelashes can actually be pretty long (or not, depending on the person). Draw them lighter and more sparsely than the top set. And again, they aren’t perfectly straight and thick. I think eyelashes in the bottom set cross over each other especially much. (Look at the “Art Inspiration” at the beginning of this post for an example.)

Mistake #2: The White of the Eye

Often people leave the white of the eye just that – blank white. But the truth is, your eyelid and eyelashes cast shadows on it, so it’s not perfectly white. Shade and smudge around the inner edges of your eye to make it really pop.

eye 12 (1280x853)

Now that you know what to avoid, I wanted to do a little tutorial for you guys. I already showed you the super amazing, super realistic tutorial for the art inspiration, but it was a bit hard to follow, wasn’t it? This tutorial should be easier to follow, even if it’s not as amazing. 😉

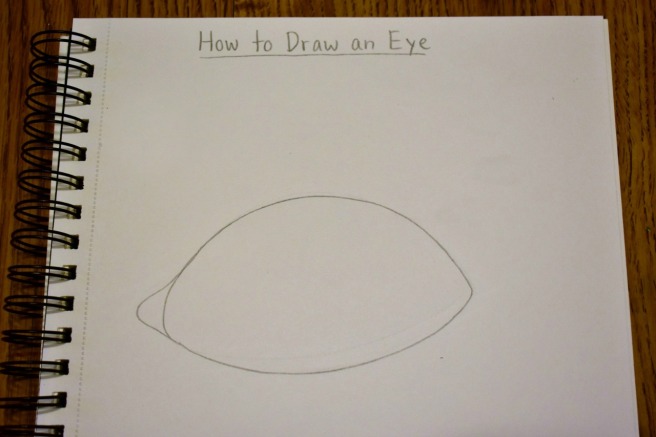
Step 1: Draw the shape of the eye. It’s a rounded almond shape, wider or thinner depending on the person. Don’t forget to add a rounded triangle thingy for the tear duct.

1

Step 2: Draw the iris, pupil, and highlight. (I just did a simple circle highlight for this tutorial.) Don’t draw the iris as a complete circle because you can’t see the whole iris in real life unless you’re opening your eye really wide. Sketch out the pupil until you find a satisfactory size – a too-small pupil can end up looking kind of weird.

Now add a curved line for the eyelid on top and another curved line at the bottom.

3

Step 3: Every person’s iris is different, but for this tutorial I went with sort of a starburst pattern. It’s okay if it isn’t perfect because it’s not always perfect in real life! Add a bunch of irregular dark lines coming out from the pupil.

5

Step 4: Color in the pupil the darkest you can and try to pull out the dark pigment into those lines surrounding it.

6

Step 5: Ooh, this is an exciting step! Finish the iris by adding more dark, inward pointing lines around the outside of the iris. Shade the top of the iris darker – remember those shadows! I smudged the pencil a bit in the middle of the iris where the starburst was to blend everything together.

7

Step 6: Woohoo, looking good! See what a difference those shadows make? Shade the top of the eye, the corners of the eye, and the tear duct. Smudge the pencil with your fingers to smooth out the shading.

eye 8 (1280x853)

Step 7: Add the eyelashes, and ta-daa! For extra credit and realism, you can shade the skin around the eye too, which I didn’t show here. (Note: Oops, the eyelashes didn’t turn out as well as I had hoped. I think I should have made them darker, longer, but not as close together. Remember what I was saying about making mistakes? Heh heh. XD Oh well, better luck next time!)

9

And there you have it! I hope this post was helpful to all you wonderful artists out there. 🙂 Do you have any tips for drawing eyes to share with me and the other readers?

Happy drawing! 😀

***Allison***

P. S. If you want to see another fun tutorial for drawing eyes, be sure to check out Anika’s post here! Her tutorial is super easy to follow (unlike mine maybe, heh heh) and shows you how to draw pretty, colorful eyes with pen and watercolors. I especially love all the expressions she did with the eyes at the end. XD 😀


Art Lab, Episode 21: Wuzzing Contest

the-wuzzing-contest-poster-800x800

Yay, it’s time! I’m so excited to show you guys all the creative entries for this contest. They were all so fun to see!

So here’s how this will work. I’m going to show you each contestant’s entry and their Wuzzing’s profile, then at the end of the post you can head on over to The Art Lab blog to vote for your favorite Wuzzing. Please judge fairly and don’t vote for your own Wuzzing! If everyone did that, it would kind of defeat the purpose. 😉

Alrighty then! (Just so you know, I’m not going in any particular order. 😉 )

Danielle’s Wuzzing

danielles-wuzzing

Profile:

His personality: He is a gentle creature. He is always sleepy and loves to eat scrumptious bugs. He is not a big fan of viciousness, but he defends himself spectacularly well when he has to. He is a bit prideful and vain when it comes to himself. Actually, he is very prideful and vain when it comes to himself.

What he looks like: He is only a foot tall on all fours with tall, silver horns to make him seem a bit bigger. He has tiny, fuzzy, silver wings that are tipped with sharp black points. His eyes are silver and are as big as a baby cows’. His snout is similar to that of a cow, but his sense of smell is fifty times stronger (to smell those scrumptious bugs). His ears are as big as a lion’s and can hear for miles around. He has shiny metallic hooves and a long fuzzy, silver tail that is tipped with a tiny flap. He is a deep metallic indigo blue, with a black belly.

Favorite color: Indigo blue (obviously)

Favorite food: Moths, especially the fuzzy ones, but he also likes glazed donuts.

Favorite Wuzzing: Himself (Duh)

Very creative, Danielle! I love his sleepy expression. XD

Clara’s Wuzzing

claras-wuzzing

Profile:

Name: Wuzzing

Height: 5 inches tall.

Hobbies: Bouncing off of things, exploring, and making art

Favorite food: Mini marshmallows

More Info: Wuzzings are often found hiding in human homes – making messes, hiding under beds, and slipping in and out of sight. When socks and buttons go missing, it’s most likely the case that the Wuzzing has been at work. They are extremely clever creatures and can create total havoc in your home if they wish to do so.

Despite the Wuzzing’s mischievous nature, they can make surprisingly loyal and lovable pets if tamed correctly by a human. Here is what you must do:

The trick is to provide plenty of hiding places for your local Wuzzing. Empty drawers, dusty shoe boxes, and large purses make excellent hiding places.

Once you have figured out which hiding spot he prefers, make a big show of leaving your Wuzzing’s favorite food (mini marshmallows) in front of his hiding spot while being sure he is watching you. If you step back and stand very still, he will venture out to eat, keeping his eyes on you as he munches. Once he is finished, he will retreat into hiding.

Repeat this process for about one week, standing a little closer to his hiding place while he eats each day. Eventually, you should be able to get him to eat right out of your hand. Soon, he will come bouncing out to meet you, climb into your pockets, and ride on your shoulder. At this point, you can choose to create a pillow fort for your Wuzzing to live in, as this is their preferred lodging. Your Wuzzing will have lots of fun bouncing around inside of his squishy fortress. Wuzzings don’t make much noise, but they do make happy squeaky sounds if you scratch them behind their horns. They make ideal pets in small homes.

Wuzzings love to travel and can fit comfortably in the pocket of a backpack or inside a purse. Your friends will be shocked and amazed when you show them your tiny, fuzzy pet! Just be sure to keep lots of marshmallows handy – Wuzzings have an appetite not unlike that of a dinosaur.

If you’ve noticed odd noises, missing buttons, or the strange disappearance of all of your marshmallows – take a look around your house and see if a Wuzzing has decided to call it home!

IT IS SO FLUFFY, CLARA! XD

Arunima’s Wuzzing

arunimas-wuzzing

Profile:

Name: The Wuzzing

Description: Tiny creature with white fur with teal and turquoise edges. It has little lavender hearts on it’s ear. It has yellow arms and legs.

Location: Flower Gardens

Diet: Grass

Sound: Makes a sound like wzzz wzzz 

Hops around

Safe to keep as a pet

Magical Abilities: can hop very high and can produce light

Aww, your wuzzing is so sweet, Arunima!

Mukta’s Wuzzing

muktas-wuzzing

Profile:

Meet Penelope, my hand-painted Wuzzing.

She loves squishing and petting, but if you poke her in the eye, I can’t guarantee yours will stay in its socket. 

Penelope’s natural habitat is anywhere warm and humid, but if your place is cold, you might as well reserve a warm corner in a cupboard for her. Her favorite food is boiled algae or ostrich eggshells, but she isn’t very fussy about food so any leftovers will do. Penelope is patient but stubborn. She may look like a harmless fuzzball, but if you put a toe out of line you may find your finger bit clean the next moment.

It’s sooo adorable and squishy, Mukta! I want to squeeze it. XD

Mirra’s Wuzzing

mirras-wuzzing

(The profile is on the picture.)

So cute, Mirra! I love how you did a completely different take on the prompt.

Allison’s Wuzzing

allisons-wuzzing

Profile:

Habitat: open meadows, near a source of freshwater

Diet: wildflowers (especially buttercups), grass seeds, wild strawberries, mushrooms

Size: 2-3 inches tall

Call/Sound: a soft “wuzz, wuzz” from which they get their name

Description: Wuzzings are tiny, furry marsupials with large eyes and no legs or arms whatsoever. They move about by rolling with their ears tucked against their body and their eyes closed. Adult female wuzzings have a small pouch to hold their babies in, while male and juvenile wuzzings are pouchless. Wuzzings change colors gradually as they mature. When born, baby wuzzings (or fuzzlets) are a deep purple, but they gradually change to blue, then green, yellow, orange, and red. Orange and red wuzzings are rarely seen because wuzzings tend to have a short lifespan. The picture above shows, from left to right, an adult male wuzzing, a slightly younger adult female wuzzing, and a baby fuzzlet.

Wuzzings’ fur serves many uses. Its water repellent quality enables the wuzzing to float on water and so repopulate itself in different areas. It’s also helpful for collecting food: adult wuzzings roll over the flower or mushroom or whatever they are collecting to bring it down to the ground, then grasp it with their small teeth and roll back to their den.

Wuzzings are harmless and fun to pet, but they are extremely timid and hard to catch. If you do happen to find one, approach it softly from behind and scoop it up quickly and gently. The wuzzing will probably curl into a ball to protect itself, but eventually it should uncurl in your hand if you stroke it.

Heh heh. I had a lot of fun making my wuzzing!

Gracie’s Wuzzing

gracies-wuzzing

Profile:

The Wuzzing is a friendly, fluffy creature, who can be found meandering in open fields and meadows. He is quiet and somewhat timid, but very curious. He will happily invade your space if he deems you friendly enough, and is a big advocate of hugs. So if you ever come across a Wuzzing, feel free to skip over and give his soft, furry self a bear hug. Just be warned: he might determine you to be his new ‘bestie’!

I love how unique yours is, Gracie! He reminds me of a fluffy Dr. Suess character!

**********

Weren’t those amazing? And so creative! Whether you win or not, I want you guys to know that I loved them all, and I’m so happy you entered. ♥ I think all the participants deserve a round of applause and a virtual bag of chocolate, don’t you? (Oh wait, I’m a participant too… yay! XD )

And now… are you ready to vote for “Best Wuzzing”? If so, kindly click here. 🙂 (The poll is at the bottom of the post.) Choose the wuzzing you think was the most adorable, creative, or interesting! May the best Wuzzing win! 😀

********

We had a lot of fun with this contest, and I hope you guys did too. Make sure to visit the Art Lab blog on March the 3rd to see who won!

***Allison***

Bedroom Update

Hey, guys! It’s been quite awhile since Megan and I did our room makeover, and I thought I’d do a post of some of the updates and changes we’ve made since then. (To see the original makeover, click here.)

The two main changes are updating the dresser area and adding a bookshelf. They look so pretty!

This is the bookshelf corner. We repainted an old bamboo bookshelf that my Dad had when he was a boy, and it looks so pretty now. The flower wall hanging is from Hobby Lobby, and I don’t know where Megan got the “laugh” wall hanging. (I told Megan it’s too bad it doesn’t say “read” instead of “laugh.” XD )

dsc_0169-1280x853

dsc_0195-853x1280

dsc_0215-1280x853
The bookshelf has three of my favorite series: The Penderwicks, The Mysterious Benedict Society, and…


dsc_0212-1280x853
The Keeper of the Lost City series. 🙂 Have you read any or all of those? Which one is your favorite?

Moving on now to the dresser area. We added a mirror, a new plant, two new vases… actually pretty much everything on top of the dresser is new. 🙂

dsc_0226-1280x960

dsc_0203-1280x853
I made these roses for decorations for a church potluck, and saved them to use in our room afterward. They’re made of paper streamers wrapped and twisted around a wooden skewer.

dsc_0204

dsc_0202-1280x853
More roses in a neat lantern Mom gave us.
dsc_0224-1280x853
Isn’t that twisty vase neat? (Ahem, excuse the leaves that have been chewed by a cat. XD ) I got the vase and the oil lamp from my grandparents, and the fox was a gift to Megan, the alarm clock is from Walmart, and the gold stones are painted by me. 🙂

Now for some random updates around our room.


dsc_0161-1280x853
I love our mantel decorations! The fox frame and mushrooms are from Hobby Lobby, and the hedgehog was a gift to Megan.

dsc_0198-1280x853

dsc_0168-1280x853
The reading nook or whatever it’s called…
dsc_0179-1280x853
The beautiful fern is from my grandma.
dsc_0182-1280x853
This plant is also from my grandma.
dsc_0220-853x1280
FUZZY CUBE! The cube and solid purple pillow are from Ross, and I made the patchwork pillow. (It’s actually a quillow – a quilt in a pillow.)


dsc_0223-1280x853
What an adorable little hedgehog! This was yet ANOTHER of Megan’s gifts. XD
dsc_0230-1280x853
Air plants are so neat! Why are my fingers neon pink in this picture?


dsc_0227-853x1280
Here’s our painted crate bedstand. Not much has changed here except the things we keep in it.

And last but not least, two pictures of our bedroom in general.

dsc_0221-1280x853dsc_0200-1280x853


*Happy sigh* I still love our bedroom so much, even now. I hope this gave you some inspiration if you are looking to redecorate your own bedroom! Do you have any redecorating tips to share? What is your favorite part about our bedroom? What is your favorite part or decoration about YOUR bedroom? Do you like interior design?

***Allison***

Some Recent Clayations

Hey guys! Today I – oh wait. IF YOU ARE MALLORY, DON’T READ THIS POST UNTIL AFTER YOUR BIRTHDAY! XD Ahem. This post may, um… contain some classified birthday material. 😉

But anyway, as I was saying: today I wanted to show you some of my recent polymer clay creations! (To see my previous clayation posts, click here, here, and here.) Making clay miniatures is one of my favorite hobbies. 🙂

Let’s start with a hippopotamus, because it’s really fun to say. XD I made this hippo for my little sister’s birthday, and she really liked it! She has a safari themed room, and she wanted some more hippo things for it. 😛 Basically it’s just a shallow bowl with a hippo head and legs. Oh, and I brushed it with triple-thick glaze. Kinda cute, huh?

hippo-2-800x533

hippo-1

hippo-3

Next up, we have a cute wittle bunny. I used a brown artist’s pastel to shade her ears and face.

bunny-1

bunny-2
For some reason I like taking pictures of my creations in my hand. You can see the size of the thing better, and it just looks more cute and personable somehow. 🙂

This is a miniature of my old camera: a Nikon Coolpix L830. Which I would HIGHLY recommend, by the way. 🙂

camera-1-1280x853camera-2-1280x853

A yummy looking doughnut…

doughnut

And some coffee (or tea or hot chocolate) to go with it. 🙂

coffee-1280x853

I made this thingy quite a while ago. I meant to use it for a hair clip, but I just never got around to finishing it.

flowers-1280x853

Aww, I love how this little guy turned out!

owl-1280x853

These are clinging earrings: basically the front of the earring is the dog’s head, and the back part is his body.

puppies-1

I also made similar earrings, but with a scottie rather than a schnauzer. 🙂 Such cuties!

scottie-earrings-1

Yet another little pup…

puppy-1-1280x854puppy-2-1280x853

Okay, this is rather random. I felt like making an octopus one day, so I made an octopus. XD He’s holding on to a blue pebble for dear life.

octopus-4

I made one of these pendants for my Etsy shop because I made one for myself that I love and wear often.

rose-bouquet-pendant-3

Last but not least, this is my current masterpiece. 😛 My cousins wanted me to make a “mad King Herod” to go with their nativity scene. (You know how he would have been furious since the wise men didn’t obey his orders?) So behold. XD He’s pretty tall – about 8 inches, which is much bigger than what I usually do, but I’m very pleased with how he turned out!

dsc_1008-853x1280dsc_1010-1280x853dsc_1031-1280x853

 I hope you enjoyed this post!
Which clayation was your favorite? Do you like to make things out of polymer clay? If you’ve never tried it, you really should! It’s a lot of fun. 🙂
***Allison***

Christmas Things, 2016

I suppose you could say this is a Christmas haul post, but for some reason I don’t like the sound of “Christmas haul.” I don’t know why, really… I kind of have weird opinions. XD Anyway, I know I have fun looking at other blogger’s posts like this, so I decided to make one myself. 🙂 But it’s not only going to be a “haul” post: I wanted to show you the gifts I made as well as the ones I received. 🙂

Are you ready? Let’s do the former first and the latter later, shall we? Wow, that was fun to say.

~ Giving ~

I guess I’ll go youngest to oldest. For Carmen, my littlest sister, I didn’t exactly make her a gift. She got an American girl doll for Christmas, because to our delight and surprise, Megan won Maddi‘s amazing giveaway which Megan entered specifically with Carmen in mind!! (And yes, Carmen loves the Maryellen doll we chose for her. ♥) So my present to Carmen was letting her use any of my AG doll things she wanted. 🙂

For my brother Jeff, Megan and I picked out this hilarious book at Books-A-Million. XD He’s always a little… hmm, how shall I put it… rowdy with our cats, with the result being they kind of hate him, ( XD ) so Megan and I thought he would get a kick out of this book – and he did:

dsc_0817-1280x853

For my sister Megan, she asked me to make her some clip-art for her blog design “business” since she prefers the computer part to the drawing part. 😉 So I put together this binder for her.

dsc_0812-1280x853

dsc_0815-1280x853

dsc_0811-1280x853

For my brother Logan and my Dad (and actually for my aunt and uncle too), I made some candied pecans using this recipe. Our whole family loves them, and I don’t make them very often, so I like to use them as gifts. They are seriously SO GOOD! And super easy too! I wrapped them up in a decorative paper cone thingy for all of them, but unfortunately I didn’t take a picture of the wrapping. 😦

For Mom, the four older kids gave her a coupon for 4 meals made by us, which she loved because she doesn’t enjoy cooking all that much. XD Annnd I didn’t get a picture of that either. 😦

For my grandparents, my siblings, my two cousins, and I drew them a calendar. Megan, Jeff, and Logan did that last year and they loved it, so we thought we’d do it again with all their grandchildren. 🙂

dsc_0780-1280x853
Cover by me. 🙂
dsc_0785-1280x853
January by Jeff.
dsc_0786-1280x853
February by Logan.
dsc_0787-1280x853
March by my cousin Leisha.
dsc_0788-1280x853
April by Megan.
dsc_0789-1280x853
May by Carmen. Isn’t it so cute? She’s actually a really good artist for her age.
dsc_0790-1280x853
June by my cousin Jianna. I LOVE THIS ONE!
dsc_0791-1280x853
July by Logan.
dsc_0792-1280x853
August by Yours Truly.
dsc_0793-1280x853
September by Leisha. So pretty!
dsc_0794-1280x853
October by Megan. I really like this one too!
dsc_0795-1280x853
November by me again. This is definitely my favorite of mine.
dsc_0796-1280x853
December by Jianna. Wow. Just wow. Everyone was amazed by this – isn’t it gorgeous?! She’s such an artist!

For my two cousins, I made them each little clinging earrings to look like their cats, Trixie and Roxy respectively. 😀

earrings-1-1280x1280
Sorry about the bad picture. 😦 Anyway, this is Trixie…
earrings-2-1280x853
And these are Roxys. 🙂


~ Receiving ~

Now for the “haul” part! 😀

My parents gave me an amazing Windsor and Newton watercolor set, Pentel waterbrushes, and Arches watercolor paper! I’m sooo excited to use it all! I’ve used the watercolor set and brushes just a tiny bit so far, and I’m really happy with them. 😀 It’s especially nice to have good quality, fine tip brushes.

watercolors-3-1280x853
I really like this picture for some reason. 🙂 This set is really neat because each little cake of paint is in a removable compartment, so if you run out of one color, you can replace just that instead of the whole set! It also comes with a paintbrush and an expandable palette that you cans store in the container.

dsc_0867-1280x960

My aunt and uncle and cousins gave me this pretty washi tape! ♥

dsc_0840-1280x960
I love the lighting for this picture! My aunt figured out how to get my camera off auto-ISO, and now I can truly be on the Maunual setting! Hooray!

My grandparents gave me this handy camera bag. It’s really neat because the compartments are attached with Velcro, so you can readjust them however you like!

dsc_0901-853x1280

dsc_0903-1280x853

They also gave me… The Keeper of the Lost Cities series! YAYAYAYAY! 😀 (Well actually Megan got half and I got half.) I’ve finished the first three so far, and they’re sooo exciting! Thank you, Clara, for introducing them to us. 🙂

dsc_0910-1280x960

dsc_0911-1280x960

kotlc-1280x960

And they gave me this cute little blank journal for Bible journaling. (I wrote the words with my erasable gel pen – more on that later.)

bible-journal-1280x853

My cousins gave me even more lovely watercolor paper! (The Arches pad is from my parents, and the rest are from my cousins.) It’s so nice to have good watercolor paper to work with. *Happy sigh*

dsc_0877-1280x853

These next two things are from my stocking: One is this pair of cozy Cabin socks. My friend also gave me some fuzzy socks, and I am quite pleased. 😀 I LOVE FUZZY THINGS!

dsc_0836-1280x853
Purple + Fuzzy = ♥ Oh, and the cozy pajamas are from my parents too. 😉

The other is a couple of erasable gel pens I showed you in this post. And guess what? They really do work! It’s pretty amazing. See?

dsc_0879-1280x853

dsc_0889-1280x960

dsc_0891-1280x960
It does leave a little bit of a mark behind if you press down hard. But when you just write with it lightly, it erases almost perfectly!

Phew, that was quite a long post, but I hope you enjoyed it! What was your favorite thing you got for Christmas? I hope you all had a wonderful Christmastime enjoying being with your family and opening gifts and thanking God for the greatest gift of all: Jesus. ♥

***Allison***

P. S. Be watching for my end-of-the-year post! I hope to schedule it for 12:00 tomorrow night. 🙂 I can’t believe it’s almost 2017!!

DIY Pallet Christmas Tree

diy (400x800).jpg

The kids made this little tree for our mom’s birthday. It wasn’t that hard (well, we made it ourselves!) and it turned out great! I put together a little tutorial for you guys. 🙂

  1. Pick your pallet. We have a huge pile of pallets behind one of our barns, so we had plenty of options. You don’t want the boards to be too far apart or it looks odd. This is the one we chose: (*Shudder* I know these next few pictures are terrible quality, but I can only say that the lighting in Dad’s shop is also rather terrible. XD ) DSC_0319.JPG
  2. Draw the line. We simply set a board on the pallet at the angle we wanted, and traced a line with a pencil. You might want to use a carpenter’s pencil or Sharpie so you can see the line better. You can measure and all that boring stuff if you want to be more precise, but we just traced. 😉
  3. Cut it out. We – meaning my brothers – used a Sawzall to cut along the lines. This was definitely the trickiest part of the process, and my brother accidentally broke one of the branches when he stepped on it. O.o (We fixed it by first tracing the broken pieces onto an extra pallet board, then cutting it out, and then screwing it back to the tree’s “trunk”.) Make sure to saw the boards at the right angle so you don’t hit the back boards while you’re cutting the top ones.
  4. Trim it up. You’ll have to cut or break off the back boards so they don’t stick out in front. We did this by a combination of cutting them off with a Sawzall and whacking them off with a hammer. (Be as careful as possible, though – don’t want to break any limbs (human or tree)! XD ) Lookin’ good!tree
  5. Sand it smooth. We didn’t actually sand it completely smooth because we wanted it to have a rustic look, but it’s a good idea to at least sand the sawed off edges a bit.
  6. Secure the branches. Some of the pallet boards were a little loose after all that, so we put in a few extra screws to secure them. screwing
  7. Paint it. Yay, now for the fun part! We painted ours all green, but you could also do red and green stripes, or leave stripes of raw pallet wood for a more rustic look.
  8. Bring on the lights. This is optional, but we strung some pretty Christmas lights on it to make it more interesting. We used white, but you could also use colored lights.dsc_0347-1280x853
  9. Display it proudly. Ta-daa! You’re finished! You may want to stop at that, but on the other hand I think it would look neat to make a forest of trees in different sizes and colors. So fun! dsc_0357-1280x853

I hope that wasn’t too confusing. :/ Anyway, do you like how it turned out? I think it’s pretty cute! You can click here to see my sister’s post which has a bunch more pictures of us making the tree. Thank you, brothers, for doing a lot of the hard work for us. 😀 ♥

Merry Almost-Christmas! (HOW CAN IT BE SO CLOSE ALREADY?!)

***Allison***

More Clayations

(See the previous clayation posts here and here.)

I haven’t made a clayation post for a while, have I? We must remedy that, mustn’t we? I should stop asking questions and get to the post, shouldn’t I?

Ahem.

A lot of these things either were or are in my Etsy shop. That sentence sounds kind of awkward but I don’t know what else to say.

snowy-owl-2
I made this little fella as a custom piece. I really love how he turned out!


028-1280x960-2
I was trying to make Toto for Dorothy, a clay doll I made a while ago…
030-1280x960-2
I was really pleased with how this mushroom turned out! I kind of made a bunch. 🙂
037-1280x960
This is my whole collection of succulents – some of which star in my giveaway.
039-1280x960
This was my first attempt at a baby dragon. He’s really-very-super tiny, but he didn’t quite make it to Etsy. I think his brother is a bit better… no offense, little guy!
baby-dragon-3
This is his brother. 🙂 Shhh! Don’t wake the dragon!
042-1280x960
I made this little cutie just tonight. She got a bit dusty though, so I might paint over her and fix her up a bit. 🙂 I think I’ll name her Angel… But then again, maybe not. Do you guys have any name suggestions?
044-1280x960
It’s fun to make realistic, actual size ladybugs! They look pretty real from a distance. 🙂
005
This was a custom order made for Clara (from Clara’s Craft Corner). Maude is so cute – and she looks a lot like our dog, Maggie!
002
This was another custom order by Clara. It was really challenging, but he turned out pretty well.
merlin-the-dragon-1
This is one of my favorite pieces ever, I think. 🙂 He’s for sale in my Etsy shop, but I don’t hardly want to sell him. XD

merlin-the-dragon-5

rose-pendant-1
This little rose pendant is also available on my Etsy shop.
023 (960x720).jpg
And lastly but not leastly we have Miss Snail, a gift for a friend. She’s really shiny from the Triple Thick Gloss Glaze I used.


Whew, that was a lot of clay! 😀 Which was your favorite little creation?

Do you like making polymer clay things? I’d love to see them!

***Allison***

1,000 Followers Giveaway!

I STILL CAN’T BELIEVE IT, GUYSSSS! 1,000 FOLLOWERS! EXCEPT BECAUSE I TOOK SO LONG TO POST THIS, NOW IT’S 1,190 FOLLOWERS!!! OH MY GOODNESSSSSSSS! Just think… before being featured on WordPress Discover, I had 150 followers. That’s really pretty great! And now…. *GASP* It’s simply amazing.

Thank you all soooooo, so much! You guys are one of my top favorite parts of blogging. ♥ I’ve met Clara, Grace, Hayley, K. A., Misty, Rebekah, Josie and so many more lovely girls through blogging. I love you! ♥

In celebration of this momentous moment in my blog’s life, I’m hosting a giveaway (in case you haven’t noticed). 😀

» The Prize «

 The prize will include two things:
  1. A miniature garden kit to make a garden similar to this one. This includes the following:

File Oct 14, 8 32 11 PM.jpeg002003004005

  • 1 glass terrarium globe
  • A mini-bag of soft, green, dried moss
  • A mini-bag of blue glass pebbles
  • 3 clay succulents (made by me)
  • 1 clay mushroom (made by me)
  • 1 shiny, marbled clay stone (made by me)
  • Plus a few other tidbits I might throw in 😉

2. Your choice of one of the following coupons for my Etsy shop:

  • 30% off any item
  • Free shipping on any item

» How to Enter «

  • If you are under 18, please get a parent’s permission before entering this giveaway.
  • I will need your email address and/or your address so I can notify you and give you the prizes. But of course I will NOT share either of those – they’re safe with me. 😉
  • To enter, comment saying you would like to enter (well duh), and include a bible verse, quote, or riddle (or all of the above) that you like.
  • NOTE: This giveaway is only open to my readers living in the United States. I’m so sorry about that, but shipping gets complicated (not to mention expensive) otherwise. 😥

» To Collect Extra Entries… «

  • Take my survey to collect one extra entry – but please take it only if you actually read my blog or it won’t help me much. 😉 (By the way, this is a new survey, so none of you have taken it yet as far as I know.)
  • Share this post on Pinterest or social media to collect one extra entry. (NOTE: You may share this post as many times as you like, but you still will only get one extra entry.)
  • Share any other post from my blog on Pinterest or social media to get one extra entry. Please pick a post you actually like instead of randomly sharing any post. (Again, only the first share will give you an extra entry, but I’m ecstatic if you want to share more! 😀 )

»When Will This Giveaway Close?«

  • This giveaway will close October 28th at 12:00 am, ET. You have only two weeks!
  • On October the 29th I will announce the winner. I’ll also add the bible verse, quote, or riddle they included with their entry, as well as my favorites from the rest of the participants – just to add a little extra fun. 🙂

AAAAHHH THIS IS SO EXCITING! Thank you guys once again for reading my blog. ♥

***Allison***

Mini Succulent Garden DIY

I love miniature gardens and polymer clay – this little project has them both! One thing that makes this garden extra special is the container. When I saw this old metal ladle at a sort of yardsale my grandma was having, I thought, “This would be perfect for a fairy garden!”

And it was.

succulent garden.PNG

Isn’t it so cute? 🙂 I filled the ladle with dirt, added some moss, and stuck in the mushrooms and succulents I made from polymer clay.

I took some pictures while I was making the succulents so I could show you guys how to do it yourself. Let’s start with a really easy succulent.

Step 1: Roll lots of little balls from green polymer clay. (More than it shows here.)

allisonclay_succulents_mums_078

Step 2: Shape the balls into teardrops.

Step 3: Arrange the teardrops as the leaves of the succulent.

allisonclay_succulents_mums_079

Step 4: Smush together layers of teardrop leaves. Start with small teardrops, then surround them with slightly large teardrops and so on and so forth until the desired shape is formed. Attach the teardrops together pointed side down.

Step 5: If you wish, paint a little red-brown artist’s pastel onto the ends of the leaves.

allisonclay_succulents_mums_080

Now let’s try a harder succulent: (But this is definitely one of my favorites.)

Step 1: Roll a medium sized log of green polymer clay.

allisonclay_succulents_mums_034

Step 2: Cut the log into many small chunks with a knife of some kind (if you don’t have an exacto knife, a kitchen paring knife will work too.)

allisonclay_succulents_mums_035

Step 3: Roll one end of each piece to a point so you have a forest of little clay trees.

allisonclay_succulents_mums_031

Step 4: Pinch one of your trees between your thumb and forefinger, like so:Steallisonclay_succulents_mums_038

allisonclay_succulents_mums_039

Step 5: Squish five of these deformed tree shapes into a star, like this: Add a tiny cone in the center.

allisonclay_succulents_mums_040

Step 6: Keep adding layers of five around and around until you reach the desired shape. You can also dent the leaves with the end of a paintbrush or a toothpick.

allisonclay_succulents_mums_067

Step 7: Paint the tip of each leaf with red-brown artist’s pastel powder. (Rub some of the chalk onto paper, then brush it on with a small paintbrush.) This makes your succulent a lot more realistic.

allisonclay_succulents_mums_035allisonclay_succulents_mums_031allisonclay_succulents_mums_038allisonclay_succulents_mums_039allisonclay_succulents_mums_040allisonclay_succulents_mums_068allisonclay_succulents_mums_069allisonclay_succulents_mums_070

There we go! Know you know how to make two kinds of succulents. Play around with different shaped leaves to make different kinds of succulents.

Do you like making miniature gardens? If so keep watching for another post about them soon!

Thanks for reading, guys! 🙂

***Allison***