
I am so excited to show you guys this episode of Art Lab! As you may know, I absolutely love drawing and photographing eyes, so I thought this would be a fun post to do. 🙂
Art Inspiration:
The inspiration for today is this amazing tutorial (also shown below). The end result seriously looks like a photo, doesn’t it?

AHHHH, I love it! Mine looks more like a drawing and less like a photo, but I’m still quite pleased with how it turned out. 😀

It was sooo much fun to draw! Today I’m going to show you a few tips and tricks I’ve learned from this and other tutorials and help you avoid some common mistakes. Now I am NOT saying I don’t make mistakes, because I do, and plenty of ’em! When you make a mistake you can’t fix, sometimes you just have to figure out what went wrong and start over. I know you’ve heard this about 2 billion times in your life, but seriously: if you want to get good at something, art included, just keep practicing! Sometimes you have to fail once or several times before you succeed.
Mistake #1: Eyelashes
Eyelashes can be incredibly hard to draw, am I right? They give me a lot of trouble sometimes. But here are some things to keep in mind that might help.
- Most people’s eyelashes are not perfectly straight and thick like American Girl Doll eyelashes. It’s a sad fact of life, my friends. (Actually, maybe not so sad – that would be kind of creepy. XD ) Look in the mirror: eyelashes cross over each other and are often bunched together in little clusters.

- Lashes aren’t as thick and dark at the top as at the bottom. Press your pencil down hard when you start at the base of the eyelash and not as much as you curve the line upwards.
- Peoples’ bottom set of eyelashes can actually be pretty long (or not, depending on the person). Draw them lighter and more sparsely than the top set. And again, they aren’t perfectly straight and thick. I think eyelashes in the bottom set cross over each other especially much. (Look at the “Art Inspiration” at the beginning of this post for an example.)
Mistake #2: The White of the Eye
Often people leave the white of the eye just that – blank white. But the truth is, your eyelid and eyelashes cast shadows on it, so it’s not perfectly white. Shade and smudge around the inner edges of your eye to make it really pop.

Now that you know what to avoid, I wanted to do a little tutorial for you guys. I already showed you the super amazing, super realistic tutorial for the art inspiration, but it was a bit hard to follow, wasn’t it? This tutorial should be easier to follow, even if it’s not as amazing. 😉
Step 1: Draw the shape of the eye. It’s a rounded almond shape, wider or thinner depending on the person. Don’t forget to add a rounded triangle thingy for the tear duct.
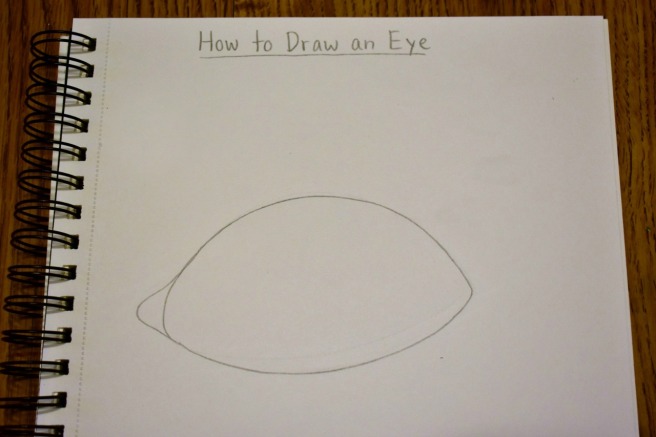
Step 2: Draw the iris, pupil, and highlight. (I just did a simple circle highlight for this tutorial.) Don’t draw the iris as a complete circle because you can’t see the whole iris in real life unless you’re opening your eye really wide. Sketch out the pupil until you find a satisfactory size – a too-small pupil can end up looking kind of weird.
Now add a curved line for the eyelid on top and another curved line at the bottom.

Step 3: Every person’s iris is different, but for this tutorial I went with sort of a starburst pattern. It’s okay if it isn’t perfect because it’s not always perfect in real life! Add a bunch of irregular dark lines coming out from the pupil.

Step 4: Color in the pupil the darkest you can and try to pull out the dark pigment into those lines surrounding it.

Step 5: Ooh, this is an exciting step! Finish the iris by adding more dark, inward pointing lines around the outside of the iris. Shade the top of the iris darker – remember those shadows! I smudged the pencil a bit in the middle of the iris where the starburst was to blend everything together.

Step 6: Woohoo, looking good! See what a difference those shadows make? Shade the top of the eye, the corners of the eye, and the tear duct. Smudge the pencil with your fingers to smooth out the shading.

Step 7: Add the eyelashes, and ta-daa! For extra credit and realism, you can shade the skin around the eye too, which I didn’t show here. (Note: Oops, the eyelashes didn’t turn out as well as I had hoped. I think I should have made them darker, longer, but not as close together. Remember what I was saying about making mistakes? Heh heh. XD Oh well, better luck next time!)

And there you have it! I hope this post was helpful to all you wonderful artists out there. 🙂 Do you have any tips for drawing eyes to share with me and the other readers?
Happy drawing! 😀
***Allison***
P. S. If you want to see another fun tutorial for drawing eyes, be sure to check out Anika’s post here! Her tutorial is super easy to follow (unlike mine maybe, heh heh) and shows you how to draw pretty, colorful eyes with pen and watercolors. I especially love all the expressions she did with the eyes at the end. XD 😀


Oh. My. Gosh. THIS IS BEAUTIFUL AND PERFECT AND HOW DO YOU DO THIS??? ❤ this post, Allison! Super excited to try it out! 😀
LikeLiked by 1 person
Whoa, thank you SOOOO MUCH, May! That’s so sweet of you! ♥
YAY! I hope it turns out great!
LikeLiked by 1 person
Haha, you’re welcome! And I’ll try my best. 😛
LikeLike
Hee hee, you do that. 😉
LikeLiked by 1 person
Allison, thanks so much for this tutorial! I can’t wait to try it! Drawing eyes is something I love, for some reason, but this looks really cool! You’re such a great artist!
LikeLiked by 2 people
Hooray, I am so tickled to hear that, Rutvi! 😀 😀 😀 I hope your drawing goes well! Aww, thank you! ♥
LikeLike
Ooh, yes, I saw this on your Instagram! 😀 Your eye drawing is AMAZING. I could never do that. XD
-Clara ❤
LikeLiked by 1 person
Aww, thank you SOOO much, Clara! I’m so happy you like it!
I think you’re super good at drawing too! It’s hard for me to get such clean, perfect lines like you do. ♥
LikeLiked by 1 person
You’re welcome! 🙂
Aww, thank you! ❤
LikeLiked by 1 person
I love this! I’m terrible at drawing, so this should help me learn to draw people.
LikeLiked by 1 person
Thanks, Ete! I’m so glad you do! Aww, good! (Not that you said you’re terrible at drawing, but that you said this should help. XD XD XD ) I hope so!
LikeLiked by 1 person
You are a great artist! Eyes can be so fun to draw!
~Gracie
LikeLiked by 1 person
Aww, thanks, Gracie! I know, right?!
LikeLike
WOW THAT IS AMAZING! *gasp* You make my eyes look bad, LOL! ;P But you are really good! Eyes are so fun to draw!
LikeLiked by 1 person
Ha ha, wow, thank you so much! ♥ Oh yes, they most certainly ARE fun, aren’t they?!
LikeLiked by 1 person
I’ve been looking for a way to draw an eye easily like this for a loooong time – this was SUPER helpful! Also, your drawing is amazing! 😀
LikeLiked by 1 person
Wow, YAY! I’m so glad, Jordan! And thanks so much! 😀
LikeLike
You’re welcome!
LikeLike
*brain explodes* HOW??? That is absolutely GORGEOUS. Beautiful job, Allison! 😀
LikeLike
Wow, thank you SOOOO MUCH! 😀 : D: D That really made me smile. 🙂 I’m so glad you liked it, my friend!
LikeLiked by 1 person
You’re very welcome, dear! 😀
LikeLiked by 1 person
P. S. I’m just about to send you the pictures…
LikeLiked by 1 person
Yay! Thank you SO much!
LikeLike
You’re quite welcome, my friend. ♥
LikeLiked by 1 person
You do such an amazing job!
LikeLike
Thank you so much!
LikeLike
This is amazing! I didn’t know that that is even possible to draw! You’re drawings are great, Allison!
– Megan Joy
LikeLike
Aww, thank you SO much, Megan!
LikeLike
Wow, this is really good! 🙂 I’m good at drawing eyes, just not the face XD Maybe you could do a tutorial on drawing a face? That would be very helpful 😀
LikeLike
Thanks so much! Well, ha ha, so am I. XD But thanks so much for the suggestion! If I can learn to draw a good face I will try to post a tutorial. 😉
LikeLiked by 1 person
How Beautiful! I could never do that, LOL! You did a great job, when I saw the cover photo I was like, “It’s like a picture, how could that be a drawing?”. I’m not much of an drawing artist, although I am a painter and love to paper craft! I am a card and such artist! I have a craft business, I sell bookmarks and magnets so far, but I want to add greeting cards. Everything is handmade by me. Does that sound cool to you? 😉
LikeLike
Aww, thank you so much! That made me so happy to hear! 😀 😀 😀
Ooh yeah, that DOES sound neat! Good for you, Livy!
LikeLike
Your eyes look amazing!
LikeLike
Thanks so much, Kaitlyn! 😀
LikeLiked by 1 person
This is amazing! You’re such a great artist! I, however, am not, but maybe I’ll try this sometime!
~Samantha
LikeLike
Aww, thank you so much! Oh yes, I hope you can!
LikeLiked by 1 person
This is so amazing! The only eyes I can draw are the basic dot and circle… maybe some color once in a while… It’s so pitiful.. xD
LikeLike
Ha ha, thank you! Well maybe it’s time for some practice, huh? XD 😀
LikeLiked by 1 person
Probably.. 😀
LikeLike
XD
LikeLike
Absolutely fabulous
LikeLike
Why thank you! ♥
LikeLiked by 1 person
Out of curiosity…how do you follow Aria’s blog (Purrfectly Inspired)? I know that she had Bloglovin’, but that never worked out for me and I ended up quitting it. Now, I don’t see any way to follow her at all, and if I enter her into my WP Reader it says emails can’t be sent.
Thanks! 😀
LikeLike
Good question! You can actually sign up to be on her email list, so she emails weekly life and blog updates to you, but otherwise I just get her updates in WP reader… I don’t get the emails. Yeah, otherwise, I’m not sure! Maybe she would know?
LikeLiked by 1 person
Thanks! I signed up for the email list, but she doesn’t send them very regularly. Does she send them regularly for you?
LikeLike
Yeah, she used to send them pretty much every week, but she hasn’t sent any for quite a while recently…
LikeLiked by 1 person
Fabulous! I love the tutorial! I tend to draw more cartoon characters, but this would be good for a portrait of someone. Thanks for sharing!
~ Rainbow Girl ❤
https://borntoinspireblog.wordpress.com
LikeLike
Thank you so much! I’m glad you did! 😀
LikeLiked by 1 person
That picture is AMAZING! I seriously can’t believe that that isn’t a photo! I like drawing eyes, and my mom says that I’m good at it, but I’m not NEARLY as good as that!
LikeLike
Aww, thank you SOO much! Well I can tell you that I was worse before I got better, so keep right on practicing and I’m sure you’ll be a pro! 🙂
LikeLiked by 1 person
Thanks! By the way, how long have you had your blog? It seems like you’ve had it for a while. 🙂
LikeLike
Good question! I’ve had it since May 2014. 🙂
LikeLiked by 1 person
WOW! ALMOST 4 YEARS? I’ve only had it since about middle November, early December 2017!!
LikeLike
Yep! Oh really? I didn’t realize that! Well keep it up, dear. ♥ 🙂
LikeLiked by 1 person
Okay!
LikeLiked by 1 person
😀
LikeLike
😀
LikeLike
If you want to check out my newest post (how to draw a peacock with oil pastels), here’s the link:
https://artsandhobbies989489280.wordpress.com/2018/02/12/how-to-draw-a-peacock-oil-pastels/
LikeLike
Ooh, sure!
LikeLiked by 1 person
Thank you! Also, do you have any ideas about what to post?
LikeLike
You’re welcome! Hmm… other than more of your art, I can’t think of anything right off… Sometimes it helps to figure out what posts are your favorite to read, and then see if you can make some of those!
LikeLiked by 1 person
Okay! Thank you!
LikeLiked by 1 person