30-Second Sketch: A Game

30-sec

The other day I made up a game called 30-Second Sketch and I thought I’d share it with you.  Here are the rules:

**************************************

For 3 or more players.

1. A player chooses a word to draw. (Example: ice cream)

2. Set a timer for 30 seconds.

3.  On “Go!”, someone starts the timer, and all the players must draw a picture of the chosen word in 30 seconds.  Everyone has to keep drawing until the 30 seconds is up, and stop drawing when the 30 seconds is up.

4.  When the time’s up, everyone compares drawings and votes on which drawing is the best. (It doesn’t have to be the most realistic, it can be the cutest, funniest, or whatever the players like.)  Whoever wins gets one point.  If there is a tie, each winner gets a point.

5. One round is finished.  The player to the left of the player who chose the first word gets to choose a word next.

6.  The first player to get a certain number of points first, wins!

*************************************************

My brothers and sisters and I had lots of fun playing this way, but here are some variations to try:

***********************************************

1. Make this into a board game by writing the words to draw on cards, and making a gameboard.  When someone gets a point, they move one space on the gameboard.

2.  Instead of each player voting on the best picture, everyone takes turns being the judge for one round, like in Apples to Apples or Picwits.

3.  You can take turns choosing words to draw or you can write several words on slips of paper and take turns choosing one each round.

4.  You can play with two people if the players make a decision together on the best picture.

5. You can play 20-Second-Sketch for a more challenging version, or 40-Second Sketch for an easier version.

***********************************

Happy drawing!

***Allison***


Hidden Pictures Post #2

How was your Christmas? Mine was great!  I’m back with a new post after taking a break for Christmas.

You can see my first hidden pictures post here.  Now for #2! I will give you some pictures, and you can try to find the hidden pictures within the pictures.  If you get stumped, there are answers at the bottom of the post.  Have fun!

-Allison (Nov. snow, hidden pictures) 002

#1. Can you find a stocking, the letter “b”,  a spiky butterfly, and an evergreen tree? (Hey! That even rhymes!)

-Allison (Nov. snow, hidden pictures) 001

#2. Can you find Little Red Riding Hood?

-Allison (Nov. snow, hidden pictures) 003

#3. This one isn’t exactly hidden, but can you see how this could be a face?

Answers: (Sorry for the sloppy writing – writing freehand on pictures on the computer is hard!)

#1.

-Allison (Nov. snow, hidden pictures) 002 - Copy

#2.

-Allison (Nov. snow, hidden pictures) 001 - Copy

#3.

-Allison (Nov. snow, hidden pictures) 003 - Copy

Did you find all the hidden pictures?  Did you find any that I didn’t?

***Allison***


Make Your Own “Tumble” Game

There is this game called “Tumble” or “Kerplunk”, and one day I decided to make my own version, with a few tweaks to the original game.  It’s fairly easy to make and it’s very customizable.  This game could also make a cute gift for a child of any age.

To start with you will need the following:-Allison(tumble game) 001 •••••••••••••••••••••••••••••••••••••••••••••••••••••••••••••••••••••••••••••••••••••••••••••••••••••••••••••••••••••••••••••••••••••••••••••••••••••••••••••••••

♥ Some sort of cardboard roll (I used the roll from a roll of curling ribbon this time, but I’ve also used a toilet paper roll)

♥ Some sort of wooden stick that is longer than your cardboard roll (such as bamboo skewers or toothpicks)

♥ A hole-punch (a small punch works best)

♥ Marbles (or any small, round ball)

♥ Something to decorate your tube with (I used pretty tape)

♥ Markers (you can also use paint)

♥ Scissors (no parentheses needed, except I just used them…)

•••••••••••••••••••••••••••••••••••••••••••••••••••••••••••••••••••••••••••••••••••••••••••••••••••••••••••••••••••••••••••••••••••••••••••••••••••••••••••••••••

1. Make sure both ends of the cardboard tube are open.

2. Decorate it however your heart desires!  -Allison(tumble game) 0023. This is the hardest part.  Punch holes in the top of the tube, making sure to stagger their placement. (See the picture below.)  If you make all the holes the same distance away from the top of the tube, the sticks will bump into each other and will block each other from fitting into the holes.  Also make sure there are enough holes for the sticks.
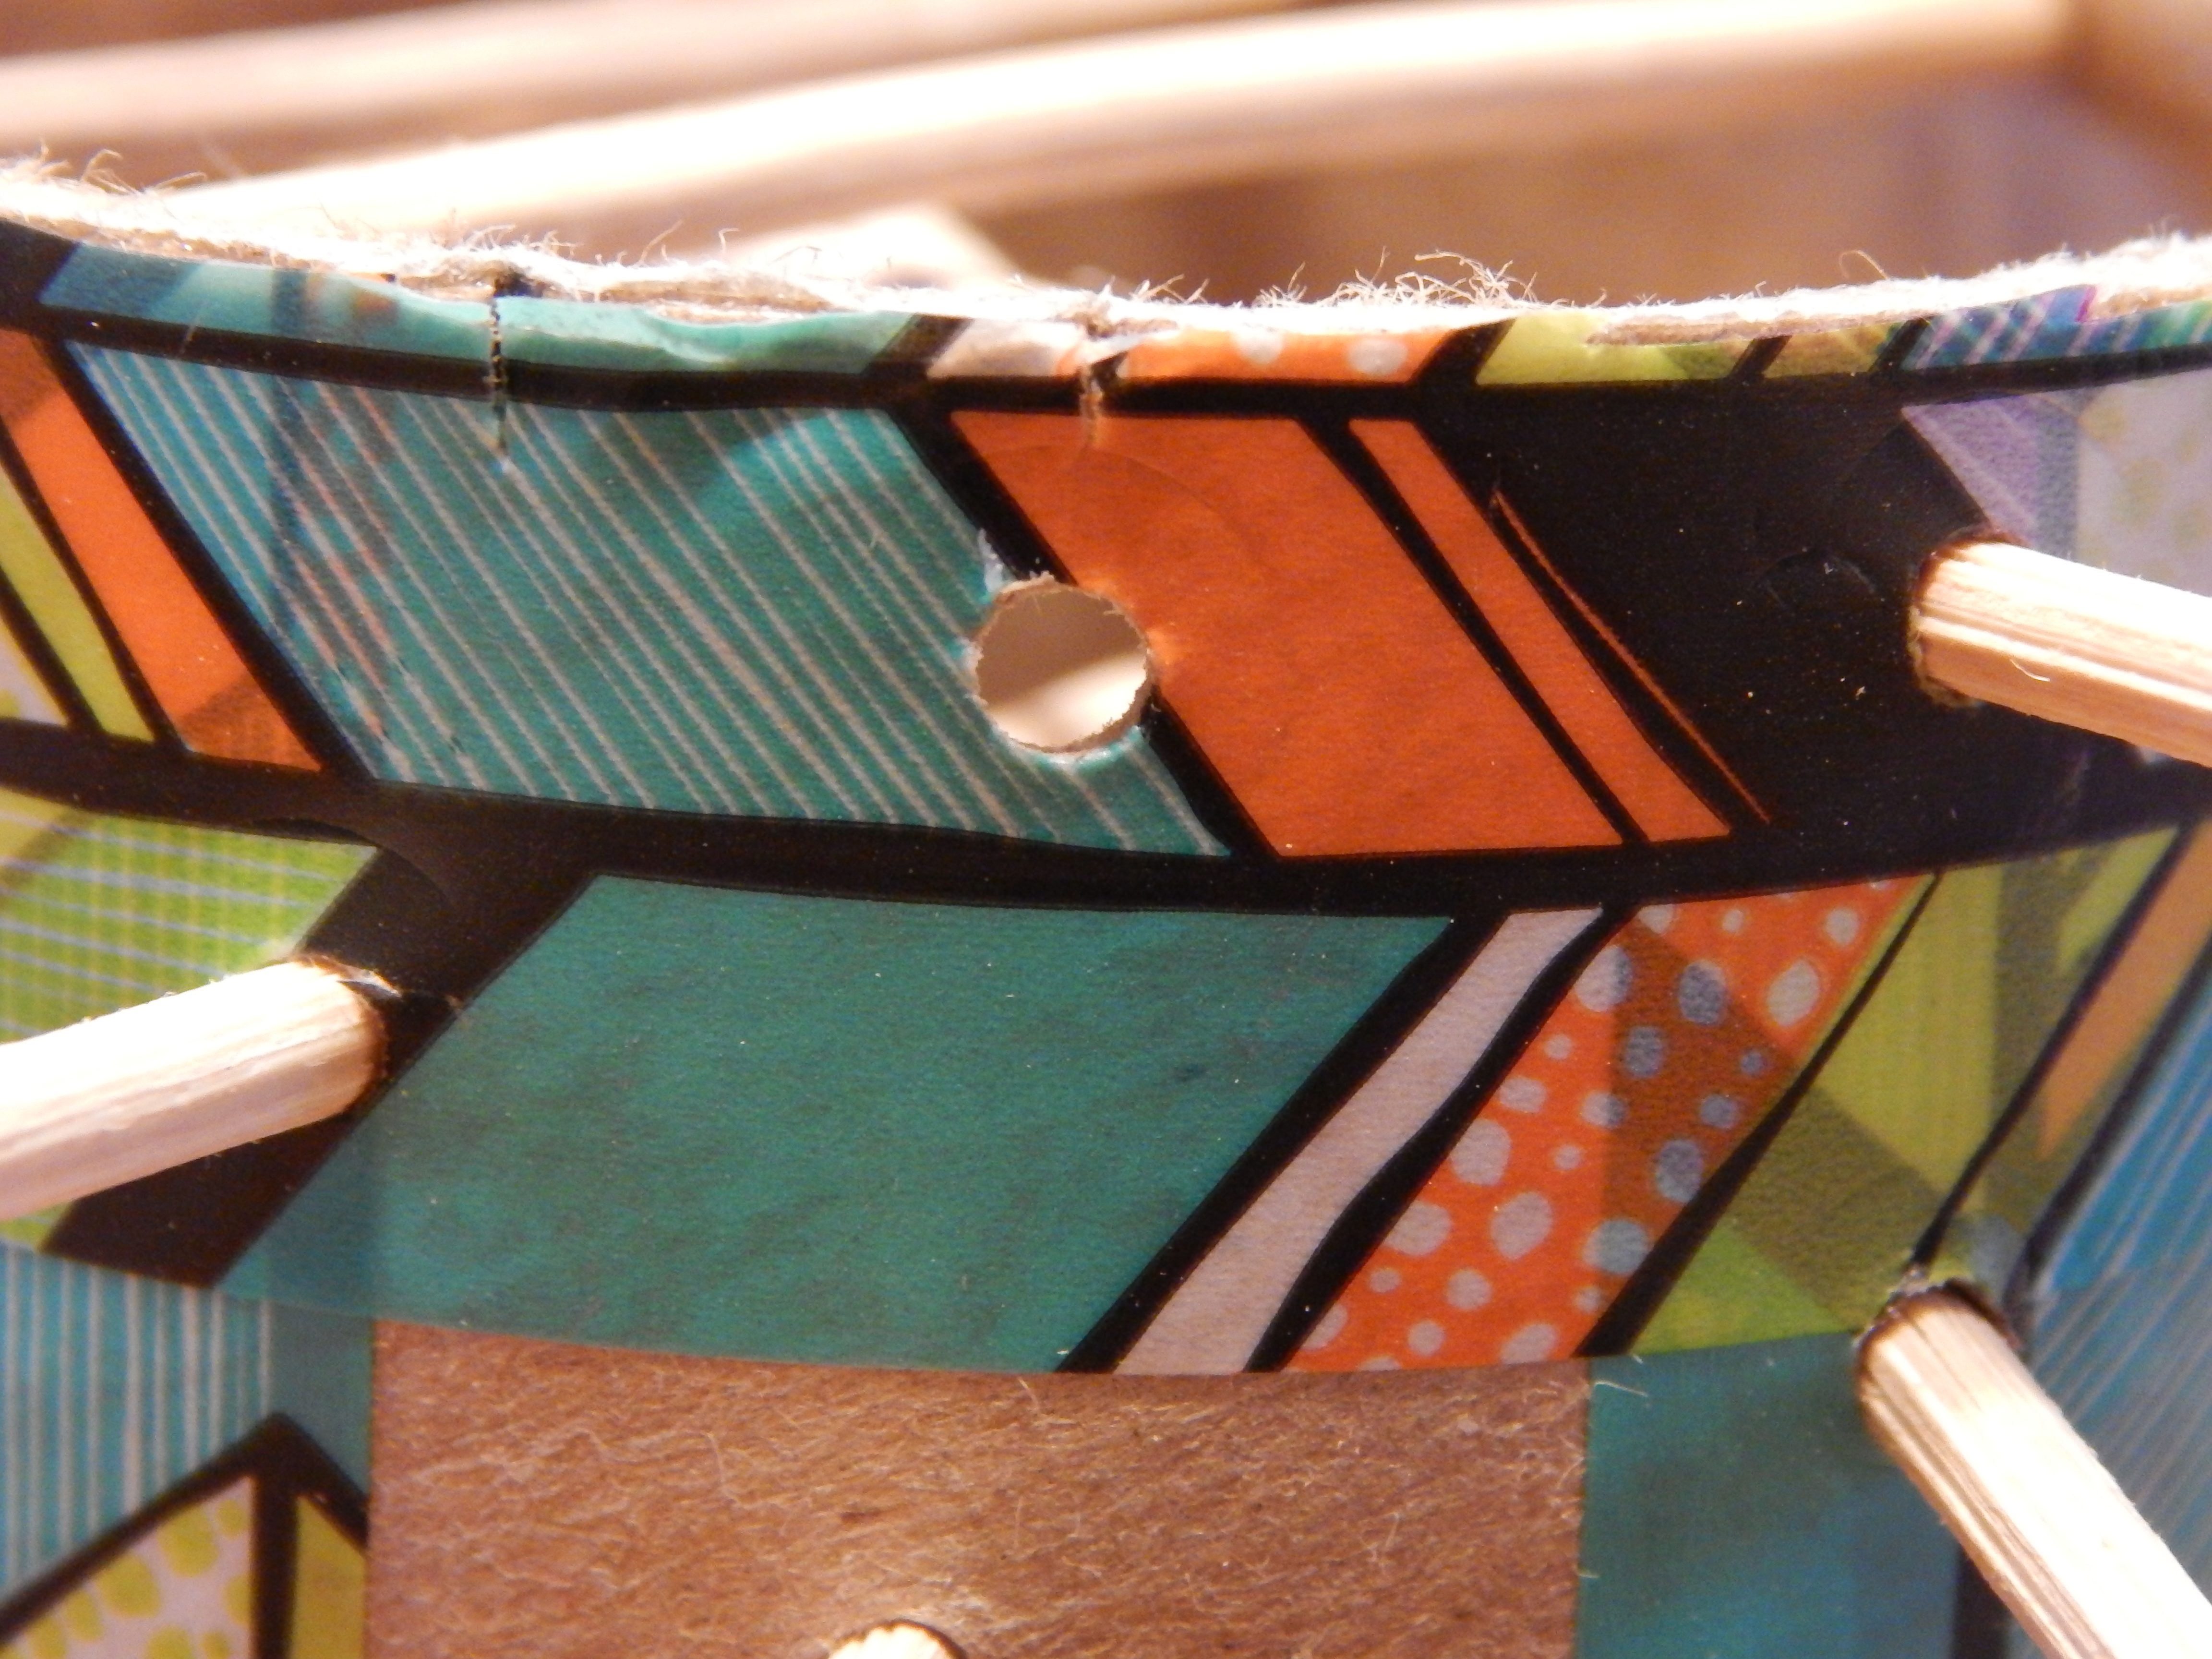
-Allison(tumble game) 0034. To make the sticks, color or paint the ends of all but one of them.  It works best to have a lot of sticks divided into three or four colors.  Make one stick stand out by coloring it all one color, making it a different color, whatever you like.-Allison(tumble game) 0065. Optional step: Cut semi-circles from the bottom of the tube to use as doors for the marbles.

6. Another optional step: You can make balls out of polymer clay to use instead of marbles if you like.

6. Play the game!

To set up, put all the sticks randomly into the holes, then sprinkle the marbles on top.  If the marbles fall through, it means you need to add more sticks to fill up the gaps where the marbles fell.  Punch some more holes for the sticks if necessary.

Here are the rules: Each color of stick is worth a different amount of points.  The one that is different from all the rest can be the special stick.  Make it give you, say, 10 points plus another turn, or something like that.  Here’s a scoring chart that you can change to fit your game:

************************************

Green-tip: 40 points

Blue tip: 30 points

Pink-tip: 20 points

Blue stick: 15 points + another turn

**************************************************

Each player takes turns pulling out a stick, one at a time (unless it’s the stick that gives you another turn).  If, while pulling out a stick, you make a marble fall, you lose 20 points, and you don’t get the points from the stick you just pulled out.  Whoever has the most points after all the sticks are pulled out, wins the game!

Have fun!

***Allison***


6 Ways to Make Work More Fun

Everything is more fun when its… fun!  Here are some ideas that help make work more fun, whether it’s washing dishes or shelling beans.  I hope it helps!

1. Listen to an audio-book – If you like curling up with a book, but your hands are occupied, try audio-books.  We have several at our library, and some of our favorites are Freddy the Pig, and Hank the Cowdog. (These are also available in book form.)

2. Play a game – Just because your hands are busy doesn’t mean you can’t use your brain!  Try these classics:

20 Questions  – Choose one player to think of something in one of the following categories: Animal, Plant, Mineral, and Other.  The other players take turns asking questions to try and figure out what the “it” person is thinking of.  If it is guessed within 20 questions, whoever guessed it gets to be “it.”  If they don’t get it within 20 questions, the person who stumped them gets to be “it” again.

I Packed My Grandfather’s Suitcase – Choose one player to start.  He says “I packed my grandfather’s suitcase, and in it there was ___.”  He fills in the blank with something that starts with the letter “a.” Go around in a circle, each person starting with “I packed my grandfather’s suitcase.” When it’s the second player’s turn, he repeats what the first player says, making sure to include whatever the first player chose for “a,” and he also adds something starting with “b”.  Keep going like this until you either reach the end of the alphabet, or everyone is out but one person.  Someone can get out by saying the wrong thing, forgetting what he was supposed to say, or skipping a letter.  One variation to this game is to have a certain category that the items have to be in, such as “food.”

3. Listen to music. – This one is simple, but it does make things more fun when you’re humming along to your favorite tunes.

If you looking for ways to make the work go faster, while still having fun, try some of these:

4.  Have a race.  Who can finish shelling their bowl of beans first?

5. Beat your record.  Keep track of the time you spent each time you did a certain job.  Try to beat your record, but be careful that no dishes are broken in the process!

6. Set up a timed reward system. – If they get done with their jobs in a certain amount of time, they get computer time, etc.  Make the time limit challenging, but not impossible.

So that’s it! Hopefully these will make chore-time a little bit more fun.  I’ll go now, so you can get to work!

***Allison***

Fun with Dry-Erase Markers

There are lots of fun things to do with dry-erase markers besides draw on a whiteboard.  These things make good boredom-busters, and are good things to do on a rainy day.  Some of these things are good for parties too.

The first two things are “painting” your nails, and drawing your own temporary tattoos.

2014-8-23-Allison (moth) 008 2014-8-23-Allison (moth) 010

Drawing on your fingernails with dry-erase markers is fun for those who love to paint their nails, or those who aren’t ready for “the real thing” yet.  When your ready to “paint” a new design, just wipe off the marker with your finger or the whiteboard eraser.

2014-8-23-Allison (moth) 013

To completely clean off your nails, wash them with soap and water, and, if you need to, a damp washcloth.

********************************************************************

Now for the temporary tattoos: Just draw anything you like onto your skin.  (My nails are “painted” with dry erase marker in this picture, and I have a dry-erase marker “tattoo”)

2014-2 001

Just wash skin like you did for your nails, and voila! a clean slate.

2014-2 002


2014-8-23-Allison (moth) 0172014-8-23-Allison (moth) 018

This can be used as a party or group game.  Draw or print out several sets of doodles beforehand.  Give each player a paper with the same doodle on it.  Each player makes it into a drawing, then compares it to the other players’ drawings.  Every drawing will turn out differently.

***************************************************

The last thing to do with dry-erase markers is fun and simple: just draw with the markers on a mirror or window.  It wipes off easily with a damp paper towel.

**************************************************

Note: Test out your markers in a small spot before you try any of these activities, in case the markers don’t erase for some reason.

I hope you try some of these ideas out, and have fun!

***Allison***

The Amazing Mobius Strip

Over the summer, I’m doing math at Khan Academy, which is sort of an online school.  I like to look at the recreational math section too.  The “Doodling in Math and More” section is very interesting.  Today I watched some videos about Mobius strips.  They are basically one-sided twisted loops of paper that can do amazing things.  They are very simple to make, and fun to play with.  I encourage you to check out the videos here.  There are two videos, and one is a very cute story with a Mobius strip.

Have fun!

***Allison***

Hidden Pictures

We have a lot of unpainted wood in our house, and sometimes the grain of the wood makes a pattern or a picture.  I took photos of some of the best “hidden pictures” for you to see.  The first one is one we’ve known about for a while.

Can you find a happy piggy in this wood?2014-6-24-Allison 008

The next one can look like two things: an owl, or a cross-eyed pelican.  See if you can find both.

2014-6-24-Allison 010

I saved the best for last.  This one has lots of detail.  Can you find a bird that looks kind of like a female peacock in this picture?  Once you see it, it’s hard to look the picture and not see it.

2014-6-24-Allison 014

Did you find them all?  If you haven’t there are answers below.

******************************************************************************************************************************************

The happy pig:

2014-6-24-Allison 009

The owl:2014-6-24-Allison 013

The cross-eyed pelican:2014-6-24-Allison 012

And last but not least, the peacock: (The head’s at the top)

2014-6-24-Allison 015

See if you can find hidden pictures in your house.

***Allison***

Fun with Ivory Soap

It’s amazing what you can do with an ordinary bar of Ivory soap.  You can explode it, smash it, make it into dough, or even make — who would guess?– more soap?

The idea of exploding Ivory soap was from Pinterest, but I made up some more fun stuff to do with the puffed up soap.

The fun begins with exploding the soap. (Sorry, I don’t know why I didn’t take pictures of this, but if you search for it on Pinterest or the web, you can find lots of pictures.)  Put a bar of Ivory soap on a plate covered with a paper towel.  Stick it in the microwave for a couple of minutes.  There’s not a certain time limit, just take it out when it stops growing.

Watch the soap through the microwave window.  It is AMAZING!  The soap starts exploding and pieces of puffed soap stick out of the original bar.  (Argh! I really wish I got a picture of this!) Anyway, when the soap stops growing, take it out of the microwave.  Be careful! It can get pretty hot.  Admire it for a while it cools down.  When it’s cool, go ahead and touch it.  The soap looks puffy, but it’s actually pretty firm.  After you’ve exploded the soap, you can stop right there and use it as you would a regular bar of soap, or you can keep going for more fun.

The next thing to do is to pound it into pieces.  Spread out some sort of floor cover,(tablecloth, newspaper, etc.) take a small hammer, and pound it to smithereens!

When it is pretty much powder, you can make soap dough.  To make white soap dough, add a small amount of shaving cream to the soap powder.

2014-6-13 001

Mix it up with your hands.  Experiment with adding more or less shaving cream.  The dough is about right when you can squeeze once and it holds its shape, but crumbles when you squeeze it again.

2014-6-13 005

2014-6-13 006

You can make towers, balls, handprints, maybe even a sandcastle with this stuff.

2014-6-13 004

If you would like to make your dough colored, add a few drops of food coloring to the shaving cream before mixing.

2014-6-13 007

After you’re done playing with soap dough, you can mold the dough into pretty soaps.

2014-6-13 009

You will probably need to add more shaving cream to your dough so it holds itself together better.

If anyone is messy from all this fun, no problem.  Just take your newly made soap and wash up!

****************************Notes*********************************

I think Ivory soap explodes best if it is freshly bought from the store.

This is a great activity to do with kids, but it can get a little messy.  Make sure to adequately cover your play space, and you should be fine.  Have a blast!

***Allison***